Monday, 23 October 2023
Markdown (and Mermaid) on Blogger in 2023
Sunday, 16 April 2023
Micro-Optimisation #393: More Log Macros!
I've posted some of my VSCode Log Macros previously, but wherever there is repetitive typing, there are further efficiencies to be gleaned!
Log, Label and Prettify a variable - [ Ctrl + Option + Command + J ]
You know what's better than having the contents of your console.log() autogenerated?
Having the whole thing inserted for you!

How do I add this?
On the Mac you can use ⌘-K-S to see the pretty shortcut list, then hit the "Open Keyboard Shortcuts (JSON)" icon in the top-right to get the text editor to show the contents of keybindings.json. And by the way, execute the command Developer: Toggle Keyboard Shortcuts Troubleshooting to get diagnostic output on what various special keystrokes map to in VSCode-speak (e.g. on a Mac, what Ctrl, Option and Command actually do)
keybindings.json
// Place your key bindings in this file to override the defaults
[
{
    "key": "ctrl+meta+alt+j",
    "when": "editorTextFocus",
    "command": "runCommands",
    "args": {
      "commands": [
        {
          "command": "editor.action.copyLinesDownAction"
        },
        {
          "command": "editor.action.insertSnippet",
          "args": {
            "snippet": "\nconsole.log(`${TM_SELECTED_TEXT}: ${JSON.stringify(${TM_SELECTED_TEXT}$1, null, 2)}`);\n"
          }
        },
        {
          "command": "cursorUp"
        },
        {
          "command": "editor.action.deleteLines"
        },
        {
          "command": "cursorDown"
        },
        {
          "command": "editor.action.deleteLines"
        },
      ],
    }
  }
]
This one uses the new (for April 2023, VSCode v1.77.3) runCommands command, which, as you might infer, allows commands to be chained together in a keybinding. A really nice property of this is that you can Command-Z your way back out of the individual commands; very helpful for debugging the keybinding, but also potentially just nice-to-have.
The trick here is to retain the text selection so that ${TM_SELECTED_TEXT} can continue to contain the right thing, without clobbering whatever might be in the editor clipboard at this moment. We do this by copying the line down. This helpfully keeps the selection right on the variable where we want it. We then blast over the top of the selection with the logging line, but by sneakily inserting \n symbols at each end, we break up the old line into 3 lines, where the middle one is the only one we want to keep. So we delete the above and below.
Sunday, 29 January 2023
Sneaking through the Analog Hole


Tuesday, 5 July 2022
The bizarre world of cheap iPhone accessories
Recently I purchased a couple of extremely-cheap Lightning-to-3.5mm headphone socket adaptors on eBay, primarily so I can use a pair of quality over-ear headphones rather than the in-ear Apple buds which I find uncomfortable.

These adaptors come in at under AUD$5 including shipping, putting them at one-third the cost of the genuine Apple accessory. They arrived within 2 days and I was all set to put them to work and feel superior at my money-saving (smug-and-play?), except ... they didn't work.
The adaptor would chirpily announce "Power on!" in my headphones, but then there was no further indication that the iPhone had "seen" them at all. And this was the case for both adaptors I'd purchased.
I was all set to fire off an angry complaint to the eBay seller and get a refund, when I noticed something ... odd ... on the listing:

Why would these Lightning accessories "include Bluetooth support"? Just for fun, I turned on my iPhone's Bluetooth (which I usually leave turned off for battery-saving and anti-h@X0r reasons)...
"Connected!" says the chirpy voice.
OH
MY
GOD
So it turns out that these cheap cables are cheap because they don't bother getting certified as "Made for iPhone" by Apple. A "compliant" Lightning device must have some kind of ID in its handshake with the phone, which the phone checks for legitimacy.
So instead, the very clever, very sneaky makers of these cables just use the DC power provided on Lightning pins 1 and 5 to drive a Bluetooth audio interface chip, which doesn't have the same "Made for iPhone" hurdles. The phone doesn't even realise there's a device hanging off there, so there's no way it can check if it's compliant!
Full marks for ingenuity, but I think I'm going to go to an Apple Store and get the real deal. Audio over Bluetooth is quality-compromised, plus this solution uses much more power and I prefer to leave my Bluetooth OFF for the aforementioned reasons. Still - I won't need to return them to the eBay seller - they *do* work and I'll keep them around for backup purposes.
Saturday, 30 April 2022
Automating heating vents with openHAB, esp8266 and LEGO - Part 2.5; Hardware rework
Working with hardware is fun; working with LEGO hardware is awesome. So before proceeding with the next part of my heating vent automation series, I took the opportunity to refine my vent manipulator, with the following aims:
- Quieter operation; v1 sounded like a coffee-grinder
- Faster movement; to sound like a quieter coffee-grinder for less time
- Lower stack height above floor level; to avoid impeding the sofa-bed mechanism directly overhead
V1 Hardware
As a reminder, here's the first hardware revision featuring a LEGO Technic XL motor and an extremely over-engineered - and tall - chassis.

V2 Hardware
Here's the respun version, which works as well as, if not better than, the original.

The changes:
- The chassis is half as high above the vent surface
- The rack-and-pinion mechanism is centered in the chassis to reduce torque
- The rack is situated lower to reduce flex
- The motor is reduced in size to a LEGO Technic "M" motor (quieter and faster)
- The manipulator clamps to the vent with a Technic pulley wheel instead of a brick, further reducing height-above-floor
Now we're in a really good position to get down-and-dirty with some firmware...
Sunday, 28 November 2021
Importing/capturing digital video (DV) for FREE on a Mac in 2021
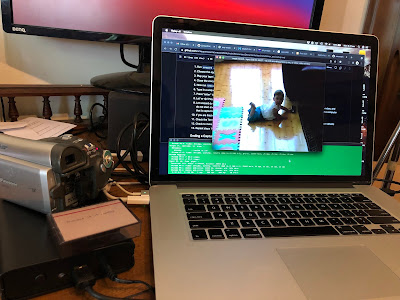
Like many others, I have a giant box of Mini DV video cassettes from 10+ years ago that I fairly-urgently need to get onto a more long-term-safe medium. As it's a pretty tedious job I have tended to do this in batches, when I can be bothered getting all the necessary bits together. Fortunately my trusty 2012 MacBook Pro has Thunderbolt ports that with just a couple of cheap adapters, can connect to the 4-pin Firewire port of my still-functional Panasonic NV-GS27 camcorder and do the job.
But while the hardware is willing, sometimes the software is not. It's all too easy to get on the upgrade treadmill and forget about applications you only use once every couple of years. In the past I used Vidi, which was minimal but $0, and thus excellent. But it won't work on 64-bit MacOS and appears unmaintained so I needed something new.
All I needed was something that could capture the raw data from each cassette and dump it into a .dv file that I can stash away on a hard drive.After a very dismaying tour through Google and YouTube made me think I'd either need to pay for a software package, or kludge something together using libdc1394 (which would be massive overkill) I finally found what I needed by searching Github directly: vrecord by AMIA Open Source.

vrecord works beautifully on my Catalina (OSX 10.15) MacBook Pro - follow the Basic Usage guide and you'll be capturing those precious memories in no time.
Saturday, 25 September 2021
Automating heating vents with openHAB, esp8266 and LEGO - Part 2; Hardware implementation
In the first part of this series I outlined what I'm trying to build - a smart vent on the cheap - so now it's time to build it! Here's what I'm working with - these are "period-style heating registers" as available from my local warehouse-style hardware store. A decorative "vintage" metal plate (scratched to hell) holds a rectangular plastic frame with two pivoting slats sitting in the airflow. A simple plastic slider protrudes through a slot in the metal plate for user control of slat angle.

In the grand tradition of absolutely-ridiculous first hardware versions (check out Mouse v1.0!), I've built this proof-of-concept out of LEGO Technic. In an excellent coincidence, the width of the vent is a perfect fit for the crab-claw-like clamping mechanism I've created, which is fortunate because it requires quite a decent bit of force to move the slider. This gizmo is heavily overbuilt using my best "LEGO Masters" techniques and doesn't flex, warp or bend one bit once it's in position. I'm using an "XL" LEGO Power Functions motor with a worm drive PLUS some extra gear reduction to make sure that:
- I have the torque to move the slider
- The slats won't move unless I want them to (one of the best features of worm-drives); and
- The transition from shut-to-open (or vice versa) takes a while

Here it is all mounted up. It sits up about 5cm above the normal vent height, which is obviously less than ideal, but should be fine as the whole assembly sits under a sofa-bed which has copious amounts of space underneath it. The dual pinions (to spread the torque and keep everything level) drive the rack left or right, and the slider is "captured" between the red elements and opens or shuts the slats.

The remainder of the hardware is pretty simple - a butchered LEGO Power Functions cable connects the motor to a standard L293D H-bridge, and thence to the "embedded computer" part of the solution, which I'll talk about next...
Sunday, 25 July 2021
Automating heating vents with openHAB, esp8266 and LEGO - Part 1; rationale
It's winter here in Melbourne, and it's a cold one. Combined with the fact that everyone is spending a lot more time at home than before, it's time to start optimising for comfort and efficiency...
I've shared my house's floorplan before on this blog, but this time here it is overlaid with the "schema" of the gas central-heating system, which sends hot air through underfloor ducts into the house through eight vents (or "registers" if you prefer) - shown as red squares:
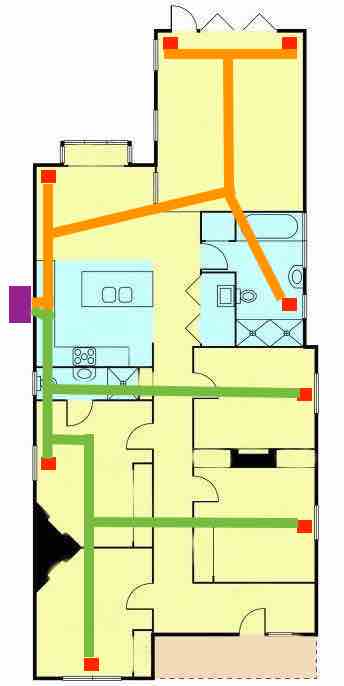
Now some houses *might* have "zones" implemented, where certain areas of the house are on a physically separated section of ducting and can be addressed and controlled individually. This house is not one of those. I've shown the two *notional* zones we'd probably *like* to have in orange (living spaces) and green (sleeping areas). If you're wondering, we've been advised that for technical reasons related to our heating unit (aka furnace) and available space under the house, a zoned system is not practicable. In any case, it would probably be a bit coarse-grained anyway, as these days I'm working pretty-much 5-days-a-week at home, from the study - the room at the bottom-left of the floorplan.
As such, I would like to be able to control the specific vent in my study, opening and closing it as needed so that it's warm to work in, particularly in the mornings, but also not wasting warm air that is better off being routed to elsewhere in the house in the evenings and on weekends. Also, if the temperature in the study is warm enough, I'd like the vent to shut itself off. It sounds like the height of laziness, but it happens that this vent is located underneath a large couch, so it's actually a major pain to adjust it by hand.
Off-the-shelf "smart vent" solutions have been available for a number of years, from Flair and Keen but they are Not Cheap, don't have any openHAB binding support, don't have stock available and/or don't ship to me in Australia. So it's a roll-your-own situation...
Thursday, 24 June 2021
How do I find all the HTML elements that aren't getting my preferred font?
A quickie script that saved a lot of manually combing through the DOM
Someone noticed that certain elements in our React app were not getting the desired font-face, instead getting plain-old Arial. I wanted to be able to programmatically sniff them out in the browser, so here's what I came up with, mainly thanks to an answer on Stack Overflow for finding all elements on a page, and the MDN documentation for the getComputedStyle function which browsers helpfully expose.
Whack this in your browser's Javascript console and you should be able to hover on any element that is listed to see it on the page:
  // Start where React attaches to the DOM
  const reactRoot = document.getElementById("root");

  // Get all elements below that
  const kids = reactRoot.getElementsByTagName("*");

  for (var e of kids) {
    if (window.getComputedStyle(e)["font-family"] === "Arial") {
      console.log(e); // Allows it to be hovered in console
    }
  }
In case you were wondering, the culprit here was a button that didn't have its font-family set - and Chrome (perhaps others) will use its default (user-agent stylesheet) font style for that in preference to what you have set on the body, which you might be forgiven for assuming gets cascaded down.
Saturday, 31 October 2020
Micro-optimisation #392: Log-macros!
Something I find myself doing a lot in the Javascript/Node/TypeScript world is logging out an object to the console. But of course if you're not careful you end up logging the oh-so-useful [Object object], so you need to wrap your thing in JSON.stringify() to get something readable.
I got heartily sick of doing this so created a couple of custom keybindings for VS Code to automate things.
Wrap in JSON.stringify - [ Cmd + Shift + J ]
Takes the selected text and wraps it in a call to JSON.stringify() with null, 2 as the second and third args to make it nicely indented (because why not given it's a macro?); e.g.:
console.log(`Received backEndResponse`)becomes:
console.log(`Received ${JSON.stringify(backEndResponse, null, 2)}`)

Label and Wrap in JSON.stringify - [ Cmd + Shift + Alt + J ]
As the previous macro, but repeats the name of the variable with a colon followed by the JSON, for clarity as to what's being logged; e.g.:
console.log(`New localState`)becomes:
console.log(`New localState: ${JSON.stringify(localState, null, 2)}`)

How do I set these?
On the Mac you can use ⌘-K-S to see the pretty shortcut list, then hit the "Open Keyboard Shortcuts (JSON)" icon in the top-right to get the text editor to show the contents of keybindings.json. Then paste away!
// Place your key bindings in this file to override the defaults
[
  {
    "key": "cmd+shift+j",
    "command": "editor.action.insertSnippet",
    "when": "editorTextFocus",
    "args": {
      "snippet": "JSON.stringify(${TM_SELECTED_TEXT}$1, null, 2)"
    }
  },
  {
    "key": "cmd+shift+alt+j",
    "command": "editor.action.insertSnippet",
    "when": "editorTextFocus",
    "args": {
      "snippet": "${TM_SELECTED_TEXT}: ${JSON.stringify(${TM_SELECTED_TEXT}$1, null, 2)}"
    }
  }
]
Sunday, 17 May 2020
Home Automation In The Small; Part 2
Continuing on the theme of home automation in the small, here's another tiny but pleasing hack that leverages the Chromecast and Yamaha receiver bindings in OpenHAB.
To conclude a happy Spotify listening session, we like to tell the Google Home to "stop the music and turn off the Living Room TV" - "Living Room TV" being the name of the Chromecast attached to HDMI2 of the Yamaha receiver.
While this does stop the music and turn off the television, the amplifier remains powered up. Probably another weird HDMI control thing. It's just a small detail, but power wastage annoys me, so here's the fix.
The trick with this one is ensuring we catch the correct state transition; namely, that the Chromecast's running "app" is the Backdrop and the state is "idling". If those conditions are true, but the amp is still listening to HDMI2, there's obviously nothing else interesting being routed through the amp so it's safe to shut it down. Note that the type of LivingRoomTV_Idling.state is an OnOffType so we don't compare to "ON", it has to be ON (i.e. it's an enumerated value) - some fun Java legacy there ...
rules/chromecast-powerdown.rules
rule "Ensure Yamaha amp turns off when Chromecast does"
when
  Item LivingRoomTV_App changed
then
  logInfo("RULE.CCP", "Chromecast app: " + LivingRoomTV_App.state)
  logInfo("RULE.CCP", "Chromecast idle: " + LivingRoomTV_Idling.state)
  logInfo("RULE.CCP", "Yamaha input: " + Yamaha_Input.state )

  if (LivingRoomTV_App.state == "Backdrop") {
    if (LivingRoomTV_Idling.state == ON) {
       if (Yamaha_Input.state == "HDMI2") {
         logInfo("RULE.CCP", "Forcing Yamaha to power off")
         Yamaha_Power.sendCommand("OFF")
       }
     }
  }
end
Sunday, 26 April 2020
Home Automation In The Small
When you say "Home Automation" to many people they picture some kind of futuristic Iron-Man-esque fully-automatic robot home, but often, the best things are really very small. Tiny optimisations that make things just a little bit nicer - like my "Family Helper" that remembers things for us. It's not for everyone, and it's not going to change the world, but it's been good for us.
In that vein, here's another little optimisation that streamlines out a little annoyance we've had since getting a Google Chromecast Ultra. We love being able to ask the Google Home to play something on Spotify, and with the Chromecast plugged directly into the back of my Yamaha AV receiver via HDMI, it sounds fantastic too. There's just one snag, and fixing it means walking over to the AV receiver and changing the input to HDMI2 ("Chromecast") manually, which (#firstworldproblems) kinda undoes the pleasure of being able to use voice commands.
It comes down to the HDMI CEC protocol, which is how the AV receiver is able to turn on the TV, and how the Chromecast turns on the AV receiver. It's cool, handy, and most of the time it works well. However, when all the involved devices are in standby/idle mode, and a voice command to play music on Spotify is issued, here's what seems to be happening:
| Time | Chromecast | AV receiver | Television |
|---|---|---|---|
| 0 | OFF | OFF | OFF |
| 1 | Woken via network | ||
| 2 | Sends CEC "ON" to AVR | ||
| 3 | Wakes | ||
| 4 | Switches to HDMI2 | ||
| 5 | AV stream starts | ||
| 6 | Detects video | ||
| 7 | Sends CEC "ON" to TV | ||
| 8 | Wakes | ||
| 9 | Routes video to TV | ||
| 10 | "Burps" via analog audio out | ||
| 11 | Hears the burp on AV4 | ||
| 12 | Switches to AV4 |
Yes, my TV (a Sony Bravia from 2009) does NOT have HDMI ARC (Audio Return Channel) which may or may not address this. However, I'm totally happy with this TV (not-"smart" TVs actually seem superior to so-called "smart" TVs in many ways).
The net effect is you get a few seconds of music from the Chromecast, before the accompanying video (i.e. the album art image that the Chromecast Spotify app displays) causes the TV to wake up, which makes the amp change to it, which then silences the music. It's extremely annoying, especially when a small child has requested a song, and they have to semi-randomly twiddle the amp's INPUT knob until they get back to the Chromecast input.
But, using the power of the Chromecast and Yamaha Receiver OpenHAB bindings, and OpenHAB's scripting and transformation abilities, I've been able to "fix" this little issue, such that there is less than a second of interrupted sound in the above scenario.
The approach
The basic approach to solve this issue is:
- When the Chromecast switches to the Spotify app
- Start polling (every second) the Yamaha amp
- If the amp input changes from HDMI2, force it back
- Once 30s has elapsed or the input has been forced back, stop polling
Easy right? Of course, there are some smaller issues along the way that need to be solved, namely:
- The Yamaha amp already has a polling frequency (10 minutes) which should be restored
- There's no way to (easily) change the polling frequency
The solution
Transformation
First of all, we need to write a JavaScript transform function, because in order to change the Yamaha polling frequency, we'll need to download the Item's configuration as JSON, alter it, then upload it back into the Item:
transform/replaceRefreshInterval.js
(function(newRefreshValuePipeJsonString) {
  var logger = Java.type("org.slf4j.LoggerFactory").getLogger("rri");
  logger.warn("JS got " + newRefreshValuePipeJsonString);
  var parts = newRefreshValuePipeJsonString.split('|');
  logger.warn("JS parts: " + parts.length);
  var newRefreshInterval = parts[0];
  logger.warn("JS new refresh interval: " + newRefreshInterval);
  var entireJsonString = parts[1];
  logger.warn("JS JSON: " + entireJsonString);
  var entireThing = JSON.parse(entireJsonString);
  var config = entireThing.configuration;
  logger.warn("JS config:" + JSON.stringify(config, null, 2));

  // Remove the huge and noisy album art thing:
  config.albumUrl = "";
  config.refreshInterval = newRefreshInterval;

  logger.warn("JS modded config:" + JSON.stringify(config, null, 2));

  return JSON.stringify(config);
})(input)
Apologies for the verbose logging, but this is a tricky thing to debug. The signature of an OpenHAB JS transform is effectively (string) => string so if you need to get multiple arguments in there, you've got to come up with a string encoding scheme - I've gone with pipe-separation, and more than half of the function is thus spent extracting the args back out again!
Basically this function takes in [new refresh interval in seconds]|[existing Yamaha item config JSON], does the replacement of the necessary field, and returns the new config JSON, ready to be uploaded back to OpenHAB.
Logic
Some preconditions:
- A Chromecast Thing is set up in OpenHAB
- With #appName channel configured as item LivingRoomTV_App
- A Yamaha AVReceiver Thing is set up in OpenHAB
- With (main zone) #power channel configured as item Yamaha_Power and
- (Main zone) #input channel configured as item Yamaha_Input
rules/chromecast.rules
val AMP_THING_TYPE="yamahareceiver:yamahaAV"
val AMP_ID="5f9ec1b3_ed59_1900_4530_00a0dea54f93"
val AMP_THING_ID= AMP_THING_TYPE + ":" + AMP_ID
val AMP_URL = "http://localhost:8080/rest/things/" + AMP_THING_ID

var Timer yamahaWatchTimer = null
rule "Ensure AVR is on HDMI2 when Chromecast starts playing music"
when
  Item LivingRoomTV_App changed
then
  logInfo("RULE.CCAST", "Chromecast app is: " + LivingRoomTV_App.state)

  if(yamahaWatchTimer !== null) {
    logInfo("RULE.CCAST", "Yamaha is already being watched - ignoring")
    return;
  }

  if (LivingRoomTV_App.state == "Spotify") {
    logInfo("RULE.CCAST", "Forcing Yamaha to power on")
    Yamaha_Power.sendCommand("ON")

    // Fetch the Yamaha thing's configuration:
    var yamahaThingJson = sendHttpGetRequest(AMP_URL)
    logInfo("RULE.CCAST", "Existing config is: " + yamahaThingJson)

    // Replace the refresh interval field with 1 second:
    var newYamahaConfig = transform(
      "JS",
      "replaceRefreshInterval.js",
      "1|" + yamahaThingJson
    )

    logInfo("RULE.CCAST", "New config is: " + newYamahaConfig)

    // PUT it back using things/config:
    sendHttpPutRequest(
      AMP_URL + "/config",
      "application/json",
      newYamahaConfig.toString())

    logInfo("RULE.CCAST", "Forcing Yamaha to HDMI2")
    Yamaha_Input.sendCommand("HDMI2")
    logInfo("RULE.CCAST", "Forced Yamaha to HDMI2")

    logInfo("RULE.CCAST", "Will now watch the Yamaha for the next 30")
    logInfo("RULE.CCAST", "sec & force it back to HDMI2 if it wavers")
    val DateTimeType ceasePollingTime = now.plusMillis(30000)

    yamahaWatchTimer = createTimer(now, [ |
      if(now < ceasePollingTime){
        Yamaha_Input.sendCommand("REFRESH")
        logInfo("RULE.CCAST", "Yamaha input: " + Yamaha_Input.state)
        if (Yamaha_Input.state.toString() != "HDMI2") {
          logInfo("RULE.CCAST", "Force PUSH")
          Yamaha_Input.sendCommand("HDMI2")
        }
        yamahaWatchTimer.reschedule(now.plusMillis(1000))
      }
      else {
        logInfo("RULE.CCAST", "Polling time has expired.")
        logInfo("RULE.CCAST", "Will not self-schedule again.")
        var revertedYamahaConfig = transform(
          "JS", "replaceRefreshInterval.js",
          "600|" + yamahaThingJson
        )
        sendHttpPutRequest(
          AMP_URL + "/config",
          "application/json",
          revertedYamahaConfig.toString()
        )
        logInfo("RULE.CCAST", "Yamaha polling reverted to 10 minutes.")
        yamahaWatchTimer = null
      }
    ])
  }
end
Some things to note. This uses the "self-triggering-timer" pattern outlined in the OpenHAB community forums, reads the configuration of a Thing using the REST interface as described here, and is written in the XTend dialect which is documented here.
Monday, 30 March 2020
Home-grown mesh networking
Here's what you need to do (presented in the order that should cause minimal disruption to your home network):
Establish which router you want to be the "master"
This may be the only router currently running, the best-positioned Wifi-wise, the one with the WAN connection, all of the aforementioned, or something else.Configure the master AP
- We'll reflect this router's status with its static IP address; ending in .1
- If you rely on a router to provide DHCP, make it this one
- Set your Wifi channel to 1,2 or 3 (for non-US locations) and do not allow it to "hop" automatically
- I'll refer to this channel as CM
- If possible, set the Wifi transmit power to LOW
Configure your (first) slave AP
- Give it a static IP address ending in .2 (or .n for the nth device)
- Disable DHCP
- Set your Wifi channel to CM +5 (for non-US locations) (e.g. 6 if CM is 1) and do not allow it to "hop" automatically
- The logic behind this is to avoid overlapping frequencies
- Let's call this channel CS
- If possible, set the Wifi transmit power to LOW
- Set your SSID, WPA scheme and password exactly as per the master
Connect master and slave via wired Ethernet
Oh and if neither of those devices is your WAN connection device, then that needs to be wired to this "backbone" too. This is super-important for good performance. If an AP can only get to the internet via Wifi, it'll be battling its own clients for every internet conversation. The Googleable name for this is "wired backhaul" or "Ethernet backhaul" and it's well worth drilling some holes and fishing some cable to get it. Don't skimp on this cable either - go for Cat6, even if your devices only (currently) go to 100Mbps.Tune it
Grab a Wifi analyser app for your phone - IP Tools and Farproc's Wifi Analyser work well on Android. Your best option on iOS is called Speed Test - Wifi Signal Strength by Xiaoyan Huang.Using the signal strength view, start walking from your master device towards your first slave. You should see the signal strength on channel CM start dropping and the strength of CS increase. Now if you've got some control over Wifi transmit strength, this is where you can "tune" the point at which your portable Wifi devices will start looking around for a "better option" - typically at around -70 to -75dBm. Remember, you actually want them to start getting "uncomfortable" quite quickly, so that they begin scanning earlier, and find the better option before you even notice any glitch. That's why we dropped our signal strength when we set the APs up - we don't want them to be too "sticky" to any given AP.
A real-life example
Prior warning - I'm a geek, so my network configuration might be a little more involved than yours, but the basics remain the same.I have 4 devices of interest:
- WAN Modem - a TP-Link Archer v1600v that has a broken* Wifi implementation, so is just being used as a WAN Modem
- DHCP Server - a Raspberry Pi running dnsmasq - a bit more flexible than what's in most domestic routers
- Living area AP - a Linksys X6200 router/AP
- Home office AP - a D-link DIR-655 router/AP
Here's how they are physically laid out:

Pink lines are Gigabit Ethernet running on Cat6 cables. The red arrow is the WAN connection, which arrives at the front of the house and is terminated in the home office. That long curved pink line is the "backhaul" - it leaves the home office through a neat RJ45 panel in the skirting board, runs under the house, and surfaces through another RJ45 panel in the back of a closet in the bathroom - a little unusual, but there is power available and it is excellently positioned to cover the living area of the house as you can probably see.
Here's the configuration:
- WAN Modem - Static IP 10.240.0.1
- DHCP Server - Static IP 10.240.0.200, hands out addresses with network gateway set to 10.240.0.1
- Living area AP - Static IP 10.240.0.2, Wifi channel 3, transmit power LOW
- Home office AP - Static IP 10.240.0.3, Wifi channel 9, transmit power LOW
I've done a little visualisation of the signal strength using my pet project react-chromakeyed-image (more on that in another post):

You can see that the whole house is now bathed in a good strong signal, from either the living area (red) AP or the home office (green) and the only questionable area is on one side of that other front room (bottom of image), which is a playroom and doesn't need strong Wifi anyway.
(*) It actually seems to be that IPv6 advertisements can't be turned off and it advertises the "wrong" DNS addresses.
Friday, 31 January 2020
OpenHAB Broadlink Binding situation report
After #dadlife, #newjob and #otherstuff got in the way for a while last year, I got back into my role as maintainer of the OpenHAB Broadlink device binding. My first priority was to create a binding JAR that would actually work with the newly-published OpenHAB version 2.5. As the Broadlink binding is still not part of the official OpenHAB binding repository, it doesn't "automagically" get the necessary changes applied when the upstream APIs change. Luckily, it wasn't too much work.
My priorities for 2020 for this binding remain unchanged; get it to a high-quality state, make it pass the (extremely strict) linter guidelines for OpenHAB code, and get it merged into the official codebase. For me to consider it high-quality, there are still the following tasks to do:
- Get a solid chunk of it covered by unit tests to prevent regressions; and
- Redesign the device-discovery and identification areas of the code, to make adding new devices easier
Unit Tests
Prior to OpenHAB 2.5, bindings/addons that wished to define tests had to create an entire second project that shadowed the production code and could only be run via a strange incantation to Maven which did horrible OSGi things to run integration-style tests. Essentially, OpenHAB addons were not unit-testable by conventional means. Which given most addons are developed by unpaid volunteers, naturally meant that hardly any addons had tests.
Fortunately, one of the major changes in the 2.5 architecture has been a move towards more Java-idiomatic unit testing. Finally, classic JUnit-style unit testing with Mockito mocking will be available for fast, reliable testing within the binding. I'll be shooting for at least 60% test coverage before I'll consider submitting a PR to OpenHAB.
Discovery redesign
I've been told that new versions of some popular Broadlink devices will be arriving in 2020. In anticipation of that, I want to make it much easier to add a new device. At the moment it requires defining a new subclass of BroadlinkBaseThingHandler (which is par-for-the-course for OpenHAB, being a pretty standard Java app), but also adding "magic numbers" in a number of places to assist in looking-up and identifying devices during "discovery" and also when they boot up. I want to consolidate this such that everything needed to support a device is located within one .java file - i.e. adding support for a new device will require exactly two changes in Git:
- The new .java file containing all the required information to support the new device; and
- Adding a reference to this class somewhere to "pick it up".
Thanks for all the kind words from users/testers of this binding - it's very rewarding to hear people using it with great success!
Sunday, 8 September 2019
I like to watch
Remember how computers were supposed to do the work, so people had time to think?
Do you ever catch yourself operating in a tight loop, something like:
  10 Edit file
  20 Invoke [some process] on file
  30 Read output of [some process]
  40 GOTO 10
Feels a bit mechanical, no? Annoying having to switch from the text editor to your terminal window, yes?
Let's break down what's actually happening in your meatspace loop*:
  10 Edit file in text editor
  15 Save file (e.g. Ctrl-S)
  17 Change active window to Terminal (e.g. Cmd/Alt+Tab)
  20 Press [up-arrow] once to recall the last command
  22 Visually confirm it's the expected command
  25 Hit [Enter] to execute the command
  30 Wait for the command to complete
  35 Interpret the output of the command
  40 Cmd/Alt+Tab back to the editor
  45 GOTO 10
That's even more blatant! Most of the work is telling the computer what to do next, even though it's exactly the same as the last iteration.
(*) Props to anyone recognising the BASIC line-numbering reference 😂
Wouldn't something like this be better?
  10 Edit file in text editor
  15 Save file (e.g. Ctrl-S)
  20 Swivel eyeballs to terminal window
  30 Wait for the command to complete
  35 Interpret the output of the command
  40 Swivel eyeballs back to editor
  45 GOTO 10
It can be better
If you've got npm on your system somewhere it's as simple as:
$ npm install -g watchand arranging your UI windows suitably. Having multiple monitors is awesome for this. Now by invoking:
$ watch '[processing command with arguments]' dir1 dir2 ... dirNyou have the machine on your side. As soon as you save any file in dir1, dir2 etc, the command will be run for you. Here are some examples:
Validate a CircleCI build configuration
You're editing the circleci/config.yml of a CircleCI continuously-integrated project. These YAML files are notoriously tricky to get right (whitespace matters...🙄) - so you can get the circleci command-line tool to check your work each time you save the file:$ brew install circleci $ watch 'circleci config validate' .circleci
Validate a Terraform configuration
You're working on a Terraform infrastructure-as-code configuration. These .TF files can have complex interrelationships - so you can get the terraform command-line tool to check your work each time you save the file:$ brew install terraform $ watch 'terraform validate' .
Auto-word-count an entire directory of files
You're working on a collection of files that will eventually be collated together into a single document. There's a word-limit applicable to this end result. How about running wc to give you a word-count whenever you save any file in the working directory?:$ watch 'wc -w *.txt' .
Power tip
Sometimes, the command in your watch expression is so quick (and/or its output so terse), you can't tell whether you're seeing the most-recent output. One way of solving this is to prefix the time-of-day to the output - a quick swivel of the eyeballs to the system clock will confirm which execution you're looking at:
  $ watch 'echo `date '+%X'` `terraform validate`' .
  > Watching .
  13:31:59 Success! The configuration is valid.
  13:32:23 Success! The configuration is valid.
  13:34:41 Success! The configuration is valid.
Tuesday, 28 May 2019
Whose Turn Is it? An OpenHAB / Google Home / now.sh Hack (part 4 - The Rethink)
The "whose turn is it?" system was working great, and the kids loved it, but the SAF (Spousal Acceptance Factor) was lower than optimal, because she didn't trust that it was being kept up-to-date. We had a number of "unusual" weekends where we didn't have a Movie Night, and she was concerned that the "roll back" (which of course, has to be manually performed) was not being done. The net result of which being, a human still had to cast their mind back to when the last movie night was, whose turn it was, and what they chose! FAIL.
Version 2 of this system takes these human factors into account, and leverages the truly "conversational" aspect of using DialogFlow, to actually extract NOUNS from a conversation and store them in OpenHAB. Instead of an automated weekly rotation scheme which you ASK for information, the system has morphed to a TELL interaction. When it IS a Movie Night, a human TELLS the Google Home Mini somewhat like this:
Hey Google, for Movie Night tonight we watched Movie Name. It was Person's choice.
or;Hey Google, last Friday it was Person's turn for Movie Night. we watched Movie Name.
To do this, we use the "parameters" feature of DialogFlow to punch the nouns out of a templated phrase. It's not quite as rigid as it sounds due to the machine-learning magic that Google runs on your phrases when you save them in DialogFlow. Here's how it's set up; with the training phrases:

Kudos to Google for the UI and UX of this tricky stuff - it's extremely intuitive to set up, and easy to spot errors thanks to the use of coloured regions. Here's where the parameters get massaged into a suitable state for my webhook Lambda. Note the conversion into a single pipe-separated variable (requestBody) which is then PUT into the OpenHAB state for the item that has the same name as this Intent, e.g. LastMovieNight.

Within OpenHAB, almost all of the complexity in working out "who has the next turn" is now gone. There's just a tiny rule that, when the item called LastMovieNight is updated (i.e. by the REST interface), appends it to a "log" file for persistence purposes:
rule "Append Last Movie Night"
when
    Item LastMovieNight received update
then
    executeCommandLine(
      "/home/pi/writelog.sh /var/lib/openhab2/movienight-logs.txt " +
      LastMovieNight.state,
      5000)
end
(writelog.sh is just a script that effectively just does echo ${2} >> $1 - it seems like OpenHAB's executeCommandLine really should be called executeScript because you can't do anything directly).
The flip side is being able to query the last entry. In this case the querying side is very straightforward, but the trick is splitting out the |-separated data into something that the Google Home can speak intelligibly. I've seen this called "having a good VUI" (Voice User Interface) so let's call it that.
Given that the result of querying the MyOpenHAB's interface for /rest/items/LastMovieNight/state will return:
Sophie|2019-05-26T19:00:00+10:00|Toy Story 2
I needed to be able to "slice" up the pipe-separated string into parts, in order to form a nice sentence. Here's what I came up with in the webhook lambda:
...
const { restItem, responseForm, responseSlices } =
  webhookBody.queryResult.parameters;
...
// omitted - make the REST call to /rest/items/${restItem}/state,
// and put the resulting string into "body"
...
if (responseSlices) {
   const expectedSlices = responseSlices.split('|');
   const bodySlices = body.split('|');
   if (expectedSlices.length !== bodySlices.length) {
     fulfillmentText = `Didn't get ${expectedSlices.length} slices`;
   } else {
     const responseMap = expectedSlices.map((es, i) => {
       return { name: es, value: bodySlices[i] }
     });

     fulfillmentText = responseMap.reduce((accum, pair) => {
       const regex = new RegExp(`\\\$${pair.name}`);
       let replacementValue = pair.value;
       if (pair.name === 'RELATIVE_DATE') {
         replacementValue = moment(pair.value).fromNow();
       }
       return accum.replace(regex, replacementValue);
     }, responseForm);
   }
}
Before I try and explain that, take a look at how it's used:

The whole thing hinges on the pipe-separators. By supplying a responseSlices string, the caller sets up a mapping of variable names to array slices, the corresponding values of which are then substituted into the responseForm. It's completely neutral about what the variable names are, with the one exception: if it finds a variable named RELATIVE_DATE it will treat the corresponding value as a date, and apply the fromNow() function from moment.js to give a nicely VUI-able string like "3 days ago". The result of applying these transformations to the above pipe-separated string is thus:
"The last movie night was 3 days ago, when Sophie chose Toy Story 2"
Job done!
Sunday, 28 April 2019
Whose Turn Is it? An OpenHAB / Google Home / now.sh Hack (part 3)
In this third part of my mini-series on life-automation via hacking home-automation, I want to show how I was able to ask our Google Home whose turn it was for movie night, and have "her" respond with an English sentence.
First a quick refresher on what we have so far. In part 1, I set up an incredibly-basic text-file-munging "persistence" system for recording the current person in a rota via OpenHAB. We can query and rotate (both backwards and forwards) the current person, and there's also a cron-like task that rotates the person automatically once a week. The basic pattern can be (and has been!) repeated for multiple weekly events.
In part 2, I exposed the state of the MovieNight item to the "outside world" via the MyOpenHAB RESTful endpoint, and then wrote a lambda function that translates a Google Dialogflow webhook POST into a MyOpenHAB GET for any given "intent"; resulting in the following architecture:

Here are the pertinent screens in Dialogflow where things are set up.
First, the "training phrases" which guide Google's machine-learning into picking the correct Intent:

On the Fulfillment tab is where I specify the URL of the now.sh webhook handler and feed in the necessary auth credentials (which it proxies through to OpenHAB):

From Integrations -> Google Assistant -> Integration Settings is where I "export" the Intents I want to be usable from the Google Home:

The final piece of the puzzle is invoking this abomination via a voice command. Within the Dialogflow console it is very straightforward to test your 'fulfillment' (i.e. your webhook functionality) via typing into the test panel on the side, but actually "going live" so you can talk with real hardware requires digging in a little deeper. There's a slightly-odd relationship between the Google Actions console (which is primarily concerned with getting an Action into the Actions Directory) and the Dialogflow console (which is all about having conversations with "agents"). They are aware of each other to a pretty-good extent (as you'd hope for two sibling Google products) but they are also a little confusing to get straight in your head and/or working together.
You need to head over to the Actions Console to actually "release" your helper so that a real-life device can use it. An "Alpha" release makes sure random people on the internet can't start using your private life automation software!

I really wanted to be able to ask the Google Assistant in a conversational style; "Hey Google, whose turn is it for Movie Night this week?" - in the same way one can request a Spotify playlist. But it turns out to be effectively-impossible to have a non-publicly-released "app" work in this way.
Instead the human needs to explicitly request to talk to your app. So I renamed my app "The Marshall Family Helper" to make it as natural-sounding as it can be. A typical conversation will now look like this:
Human: "Hey Google, talk to The Marshall Family Helper"
Google: "Okay, loading the test version of The Marshall Family Helper"
(Short pause)
{beep} "You can ask about Movie Night or Take-Away"
"Whose turn is it for movie night?"
(Long pause)
"It's Charlotte's turn"
{beep}
Some things to note. The sentence after the first {beep} is what I've called my "Table of Contents" intent - it is automatically invoked when the Marshall Family Helper is loaded - as discovery is otherwise a little difficult. The "short pause" is usually less than a second, and the "long pause" around 3-4 seconds - this is a function of the various latencies as you can see in the system diagram above - it's something I'm going to work on tuning. At the moment now.sh automatically selects the Sydney point-of-presence as the host for my webhook lambda, which would normally be excellent, but as it's being called from Google and making a call to MyOpenHAB, I might spend some time finding out where geographically those endpoints are and locating the lambda more appropriately.
But, it works!
Saturday, 30 March 2019
Whose Turn Is it? An OpenHAB / Google Home / now.sh Hack (part 2)
So in the first part of this "life-automation" mini-series, we set up some OpenHAB items that kept track of whose turn it was to do a chore or make a decision. That's fine, but not super-accessible for the whole family, which is where our Google Home Mini comes in.
First, (assuming you've already configured and enabled the OpenHAB Cloud service to expose your OpenHAB installation at myopenhab.org) we add our MovieNight to our exposed items going out to the MyOpenHAB site. To do this, use the PaperUI to go to Services -> MyOpenHAB and add MovieNight to the list. Note that it won't actually appear at myopenhab.org until the state changes ...
Next, using an HTTP client such as Postman, we hit https://myopenhab.org/rest/items/MovieNight/state (sending our email address and password in a Basic Auth header) and sure enough, we get back Charlotte.
Unfortunately, as awesome as it would be, the Google Home Assistant can't "natively" call a RESTful API like the one at MyOpenHAB, but it *can* if we set up a custom Action to do it, via a system called Dialogflow. This can get very involved as it is capable of amazing levels of "conversation" but here's how I solved this for my simple interaction needs:
So over in the Dialogflow console, we set up a new project, which will use a webhook for "fulfillment", so that saying "OK Google, whose turn is it for movie night?"* will result in the MovieNight "Intent" firing, making a webhook call over to a now.sh lambda, which in turn makes the RESTful request to the MyOpenHAB API. Phew!
I've mentioned now.sh before as the next-generation Heroku - and until now have just used it as a React App serving mechanism - but it also has sleek backend deployment automation (that's like Serverless minus the tricksy configuration file) that was just begging to be used for a job like this.
The execution environment inside a now.sh lambda is super-simple. Define a function that takes a Node request and response, and do with them what you will. While I really like lambdas, I think they are best used in the most straightforward way possible - no decision-making, no state - a pure function of its inputs that can be reasoned about for all values over all time at once (a really nice way of thinking about the modern "declarative" approach to writing software that I've stolen from the amazing Dan Abramov).
This particular one is a little gem - basically proxying the POSTed webhook call from Google, to a GET of the OpenHAB API. Almost everything this lambda needs is given to it - the Basic authentication header from Google is passed straight through to the OpenHAB REST call, the URL is directly constructed from the name of the intent in the webhook request, and the response from OpenHAB gets plopped into an English sentence for the Google Assistant to say. The only real snag is that the body of the POST request is not made directly available to us, so I had to add a little helper to provide that:
'use strict';

const bent = require('bent');

// Helper function to get the body from a POST
function processPost(request, response, callback) {
  var queryData = "";
  if (typeof callback !== 'function') return null;

  if (request.method == 'POST') {
    request.on('data', function (data) {
      queryData += data;
      if (queryData.length > 1e6) {
        queryData = "";
        response.writeHead(413, { 'Content-Type': 'text/plain' }).end();
        request.connection.destroy();
      }
    });

    request.on('end', function () {
      callback(queryData);
    });

  } else {
    response.writeHead(405, { 'Content-Type': 'text/plain' });
    response.end();
  }
}

// Proxy a Dialogflow webhook request to an OpenHAB REST call
module.exports = async (request, response) => {
  processPost(request, response, async (bodyString) => {
    const requestBody = JSON.parse(bodyString);
    const intent = requestBody.queryResult.intent.displayName;
    const uri = `https://myopenhab.org/rest/items/${intent}/state`;
    const auth = request.headers['authorization'];

    console.log(`About to hit OpenHAB endpoint: ${uri}`);

    const getString = bent('string', { 'Authorization': auth });
    const body = await getString(uri);

    console.log(`OpenHAB response: ${body}`);

    const json = {
      fulfillmentText: `It's ${body}'s turn.`,
    };
    const jsonString = JSON.stringify(json, null, 2);
    response.setHeader('Content-Type', 'application/json');
    response.setHeader('Content-Length', jsonString.length);
    response.end(jsonString);
  });
};
It returns the smallest valid JSON response to a Dialogflow webhook request - I did spend some time with the various client libraries available to do this, but they seemed like overkill when all that is needed is grabbing one field from the request and sending back one line of JSON!
We're almost there! Now to wire up this thing so we can voice-command it ...
(*) That's the theory at least - see Part 3 for the reality ...
Thursday, 28 February 2019
Whose Turn Is it? An OpenHAB Hack (part 1)
As my young family grows up, we have our little routines - one of which is the weekly Movie Night. On a rotating basis, each family-member gets to choose the movie that we'll watch, as a family, on a Saturday night. Looking at other screens is not allowed during this time - it's a Compulsory Family Fun Night if you like. The thing is, maybe I'm getting too old, but it frequently seems very difficult to remember whose turn it is. Maybe we skipped a week due to some other activity, or nobody can remember exactly because it was a group decision. Anyway, something that computers are especially good at is remembering things, so I decided to extend my existing OpenHAB home (device) automation to include home process automation too!
Unlike the similarly-named Amazon Alexa "skill" which appears to a) be totally random and b) not actually work very well, I wanted something that would intelligently rotate the "turn" on a given schedule (weekly being my primary requirement). I also wanted to keep the essentials running locally, on the Raspberry Pi that runs my OpenHAB setup. I'm sure you could move this entirely into the cloud should you wish, but doing it this way has allowed me to start with the basics and scale up.
First step; create a simple text file with one participant name per line: ${OPENHAB_USERDATA}/movienight.txt (i.e. /var/lib/openhab2/movienight.txt on my system):
Charlotte
Mummy
Daddy
Sophie
Make sure that the openhab user can read and write it.
Now we use the exec binding to create a Thing that reads the first line of this file via the head command-line tool, once every 6 hours (21600 seconds). Unfortunately as you'll see in all the snippets below, there seems to be no way to access environment variables when defining these file locations; so while I'd love to write ${OPENHAB_USERDATA}/movienight.txt, I have to use the hard-coded path: /var/lib/openhab2/movienight.txt.
$OPENHAB_CONF/things/householdrota.things:
Thing exec:command:movienight "Movie Night" @ "Living Room"
  [command="head -1 /var/lib/openhab2/movienight.txt",
   interval=21600,
   timeout=5,
   autorun=true
]
Here are the items that fetch, display and adjust the current movie night, respectively. It's useful to be able to adjust the rotation, for example if we skipped a week, so need to back out the automatically-changed value.
$OPENHAB_CONF/items/householdrota.items:
Switch FetchMovieNight {channel="exec:command:movienight:run"}

String MovieNight "Whose turn is it?"
  {channel="exec:command:movienight:output"}

Switch AdjustMovieNight
We expose the items in the sitemap:
$OPENHAB_CONF/sitemaps/default.sitemap:
  ...
  Frame label="Household rotas" {
    Text item=MovieNight label="Whose Movie Night is it?"
    Switch item=AdjustMovieNight
           label="Adjust Movie Night"
           mappings=[ON="Rotate", OFF="Unrotate"]
  }
  ...
Which results in the following in Basic UI:
Now for the weekly-rotation part. First, a simple Bash script to rotate the lines of a text file such as the one above. That is, after running ./rotate.sh movienight.txt, the topmost line becomes the bottom-most:
Mummy Daddy Sophie Charlotte/home/pi/rotate.sh:
#!/bin/bash

TMPFILE=$(mktemp)
if [[ $# -eq 2 ]]
then
        # Assume a -r flag provided: Reverse mode
        TAIL=`tail -n 1 $2`
        echo ${TAIL} > $TMPFILE
        head -n -1 $2 >> $TMPFILE
        mv $TMPFILE $2
else
        HEAD=`head -1 $1`
        tail -n +2 $1 > $TMPFILE
        echo ${HEAD} >> $TMPFILE
        mv $TMPFILE $1
fi
And now we can automate it using a time-based rule in OpenHAB - each Saturday night at 9pm, as well as supporting rotation "by hand":
$OPENHAB_CONF/rules/householdrota.rules:
rule "Rotate Movie Night - weekly"
when
  Time cron "0 0 21 ? * SAT *"
then
  logInfo("cron", "Rotating movie night...")
  executeCommandLine(
    "/home/pi/rotate.sh /var/lib/openhab2/movienight.txt"
  )
  FetchMovieNight.sendCommand(ON);
end


rule "Adjust Movie Night"
when
  Item AdjustMovieNight received command
then

  val reverseFlag = if (receivedCommand == ON) "" else "-r"

  val results = executeCommandLine(
    "/home/pi/rotate.sh " +
    reverseFlag +
    " /var/lib/openhab2/movienight.txt", 5000)

  # If anything went wrong it will be displayed in the log:
  logInfo("AdjustMovieNight", "Results: " + results)
  FetchMovieNight.sendCommand(ON);
end
Now this is fine, but believe me when I tell you that having a text field available in a web page somewhere is simply not enough to achieve a winning SAF (Spousal Acceptance Factor). So onwards we must plunge into being able to ask the Google Home whose turn it is ...
Thursday, 6 December 2018
Green Millhouse: OK Google, turn on the living room air conditioner
The RM3 sits in a little niche that has line-of-sight to both these devices (a Daikin in the living room, and a Panasonic in the dining area). Using the RM-Bridge Android app, the fun2code website and the method I've documented over on the OpenHAB forums), I've learnt the ON and OFF codes for each device, and put them into transforms/broadlink.map:
PANASONIC_AIRCON_ON=D3ADB33F...

PANASONIC_AIRCON_OFF=13371337...

DAIKIN_AIRCON_ON=F00F00FAAFAA...

DAIKIN_AIRCON_OFF=F00D00FAAFAA...
The "basic" way of invoking the commands is by using a String Item for your IR-blaster device, and a Switch in your sitemap, like this:
items/remotecontrollable.items:
String RM3_MINI {channel="broadlink:rm3:34-ea-34-58-9d-5b:command"}
sitemaps/default.sitemap:
sitemap default label="My house" {
  Frame label="Aircon" {
    Switch
      item=RM3_MINI
      label="Dining Area"
      mappings=[PANASONIC_AIRCON_ON="On", PANASONIC_AIRCON_OFF="Off"]
  }
  ...
}
Which gives you this:

... which is completely fine for basic UI control. But if you want the Google Home Assistant (aka "OK Google") to be able to operate it, it won't work. The reason for this is that the Switchable trait that you have to give the item can only take the simple values ON and OFF, not a string like PANASONIC_AIRCON_ON. So while it *might* work if you named your remote control commands ON and OFF, you're hosed if you want to add a second switchable device.
The best solution I could find was to set up a second Item, which is literally the most basic Switch you can have. You can also give it a label that makes it easier to remember and say when commanding your Google Home device. You then use a rule to issue the "command" to match the desired item's state. I'll demonstrate the difference by configuring the Living Room aircon in this Google-friendly way:
items/remotecontrollable.items:
String RM3_MINI {channel="broadlink:rm3:34-ea-34-58-9d-5b:command"}
Switch AC_LIVING_ONOFF "Living Room Air Conditioner" [ "Switchable" ]
Notice the "label" in the Switch is the one that will be used for Google voice commands.
rules/remotecontrollable.rules:
rule "Translate Living Room ON/OFF to aircon state"
when
  Item AC_LIVING_ONOFF changed
then
  val isOn = (AC_LIVING_ONOFF.state.toString() == "ON")
  val daikinState = if(isOn) "DAIKIN_AIRCON_ON" else "DAIKIN_AIRCON_OFF"
  RM3_MINI.sendCommand(daikinState)
end
This rule keeps the controlling channel (RM3_MINI) in line with the human-input channel (the OpenHAB UI or the Google Home Assistant input). Finally the sitemap:
sitemaps/default.sitemap:
sitemap default label="My house" {
  Frame label="Aircon" {
    Switch item=AC_LIVING_ONOFF label="Living Room On/Off"
  }
  ...
}
I quite like the fact that the gory detail of which command to send (the DAIKIN_AIRCON_ON stuff) is not exposed in the sitemap by doing it this way. You also get a nicer toggle switch as a result:

The final step is to ensure the AC_LIVING_ONOFF item is being exposed via the MyOpenHAB connector service, which in turn links to the Google Assistant integration. And now I can say "Hey Google, turn on the living room air conditioner" and within 5 seconds it's spinning up.