Tuesday, 1 July 2025
Mikrotik - automation
Tuesday, 22 April 2025
Upgrading to the Mikrotik RouterBoard RB2011, Part 3 - DNS

Sunday, 30 March 2025
Upgrading to the Mikrotik RouterBoard RB2011, Part 2 - DHCP

Wednesday, 22 January 2025
Upgrading to the Mikrotik RouterBoard RB2011, Part 1

Sunday, 20 October 2024
Google Home Minis (1st Gen) bricked

Sunday, 30 October 2022
Dispatchables Part 3; Make It So
In the previous part of this series about implementing a "dispatchable" for solar-efficient charging of (AA and AAA) batteries, I'd worked out that with a combination of the Google Assistant's Energy Storage trait (made visible through the openHAB Google Assistant Charger integration) and a small amount of local state, it looked like in theory, I could achieve my aim of a voice-commanded (and -queryable) system that would allow efficient charging for a precise amount of time. Let's now see if we can turn theory into practice.
First step is to copy all the configuration from the openHAB Charger device type into an items file:
$OPENHAB_CONF/items/dispatchable.items
Group  chargerGroup
{ ga="Charger" [ isRechargeable=true, unit="SECONDS" ] }

Switch chargingItem         (chargerGroup)
{ ga="chargerCharging" }

Switch pluggedInItem        (chargerGroup)
{ ga="chargerPluggedIn" }

Number capacityRemainItem   (chargerGroup)
{ ga="chargerCapacityRemaining" }

Number capacityFullItem     (chargerGroup)
{ ga="chargerCapacityUntilFull" }
You'll note the only alterations I made was to change the unit to SECONDS as that's the best fit for our timing system, and a couple of renames for clarity. Here's what they're all representing:
- chargingItem: are the batteries being charged at this instant?
- pluggedInItem: has a human requested that batteries be charged?
- capacityRemainSecondsItem: how many seconds the batteries have been charging for
- capacityFullSecondsItem: how many seconds of charging remain
If we look at the openHAB UI at this point we'll just have a pile of NULL values for all these items:

Rule 1: Only charge if it's wanted, AND if we have power to spare
$OPENHAB_CONF/rules/dispatchable.rules
rule "Make charging flag true if wanted and in power surplus"
when
  Item currentPowerUsage changed
then
  if (pluggedInItem.state == ON) {
    if (currentPowerUsage.state > 0|W) {
      logInfo("dispatchable", "[CPU] Non-zero power usage");
      chargingItem.postUpdate(OFF);
    } else {
      logInfo("dispatchable", "[CPU] Zero power usage");
      chargingItem.postUpdate(ON);
    }
  }
end
This one looks pretty similar to the old naïve rule we had way back in version 1.0.0, and it pretty-much is. We've just wrapped it with the "intent" check (pluggedInItem) to make sure we actually need to do something, and offloaded the hardware control elsewhere. Which brings us to...
Rule 2: Make the hardware track the state of chargingItem
$OPENHAB_CONF/rules/dispatchable.rules
rule "Charge control toggled - drive hardware"
when
  Item chargingItem changed to ON or
  Item chargingItem changed to OFF
then
  logInfo("dispatchable", "[HW] Charger: " + chargingItem.state);
  SP2_Power.sendCommand(chargingItem.state.toString());
end
The simplest rule of all, it's a little redundant but it does prevent hardware control "commands" getting mixed up with software state "updates".
Rule 3: Allow charging to be requested and cancelled
$OPENHAB_CONF/rules/dispatchable.rules
rule "Charge intent toggled (pluggedIn)"
when
  Item pluggedInItem changed
then
  if (pluggedInItem.state == ON) {
    // Human has requested charging
    logInfo("dispatchable", "[PIN] charge desired for: ");
    logInfo("dispatchable", capacityFullSecondsItem.state + "s");
    capacityRemainSecondsItem.postUpdate(0);
    // If possible, begin charging immediately:
    if (currentPowerUsage.state > 0|W) {
      logInfo("dispatchable", "[PIN] Awaiting power-neutrality");
    } else {
      logInfo("dispatchable", "[PIN] Beginning charging NOW");
      chargingItem.postUpdate(ON);
    }
  } else {
    logInfo("dispatchable", "[PIN] Cancelling charging");
    // Clear out all state
    capacityFullSecondsItem.postUpdate(0);
    capacityRemainSecondsItem.postUpdate(0);
    chargingItem.postUpdate(OFF);
  }
end
This rule is where things start to get a little trickier, but it's pretty straightforward. The key thing is setting or resetting the three other variables to reflect the user's intent. If charging is desired we assume that the "how long for" variable has already been set correctly and zero the "how long have you been charging for" counter. Then, if the house is already power-neutral, we start. Otherwise we wait for conditions to be right (Rule 1).
If charging has been cancelled we can just clear out all our state. The hardware will turn off almost-immediately because of Rule 2.
Rule 4: Keep timers up-to-date
$OPENHAB_CONF/rules/dispatchable.rules
rule "Update charging timers"
when
  Time cron "0 0/1 * * * ?"
then
  if (pluggedInItem.state == ON) {
    // Charging has been requested
    if (chargingItem.state == ON) {
      // We're currently charging
      var secLeft = capacityFullSecondsItem.state as Number - 60;
      capacityFullSecondsItem.postUpdate(secLeft);
      logInfo("dispatchable", "[CRON] " + secLeft + "s left");

      var inc = capacityRemainSecondsItem.state as Number + 60;
      capacityRemainSecondsItem.postUpdate(inc);

      // Check for end-charging condition:
      if (secLeft <= 0) {
        // Same as if user hit cancel:
        logInfo("dispatchable", "[CRON] Reached target.");
        pluggedInItem.postUpdate(OFF);
      }
    }
  }
end
This last rule runs once a minute, but only does anything if the user asked for charging AND we're doing so. If that's the case, we decrement the time left" by 60 seconds, and conversely increase the "how long have they been charging for" by 60 seconds. Yes, I know this might not be strictly accurate but it's good enough for my needs.The innermost if statement checks for the happy-path termination condition - we've hit zero time left! - and toggles the flag which will once-again lower the intent flag, thus causing Rule 3 to fire, which in turn will cause Rule 2 to fire, and turn off the hardware.
UI Setup
This has ended up being quite the journey, and we haven't even got the Google integration going yet! The last thing for this installment is to knock up a quick control/status UI so that we can see that it actually works correctly. Here's what I've got in my openHAB "Overview" page:

[PIN] charge desired for: 420 seconds
[PIN] Beginning charging immediately
[HW] Charger: ON
[CRON] 360s left
...
[CRON] 120s left
[CRON] 60s left
[CRON] 0s left
[CRON] Reached desired charge. Stopping
[PIN] Cancelling charging
[HW] Charger: OFF
Sunday, 29 May 2022
Automating heating vents with openHAB, esp8266 and LEGO - Part 3; Firmware intro
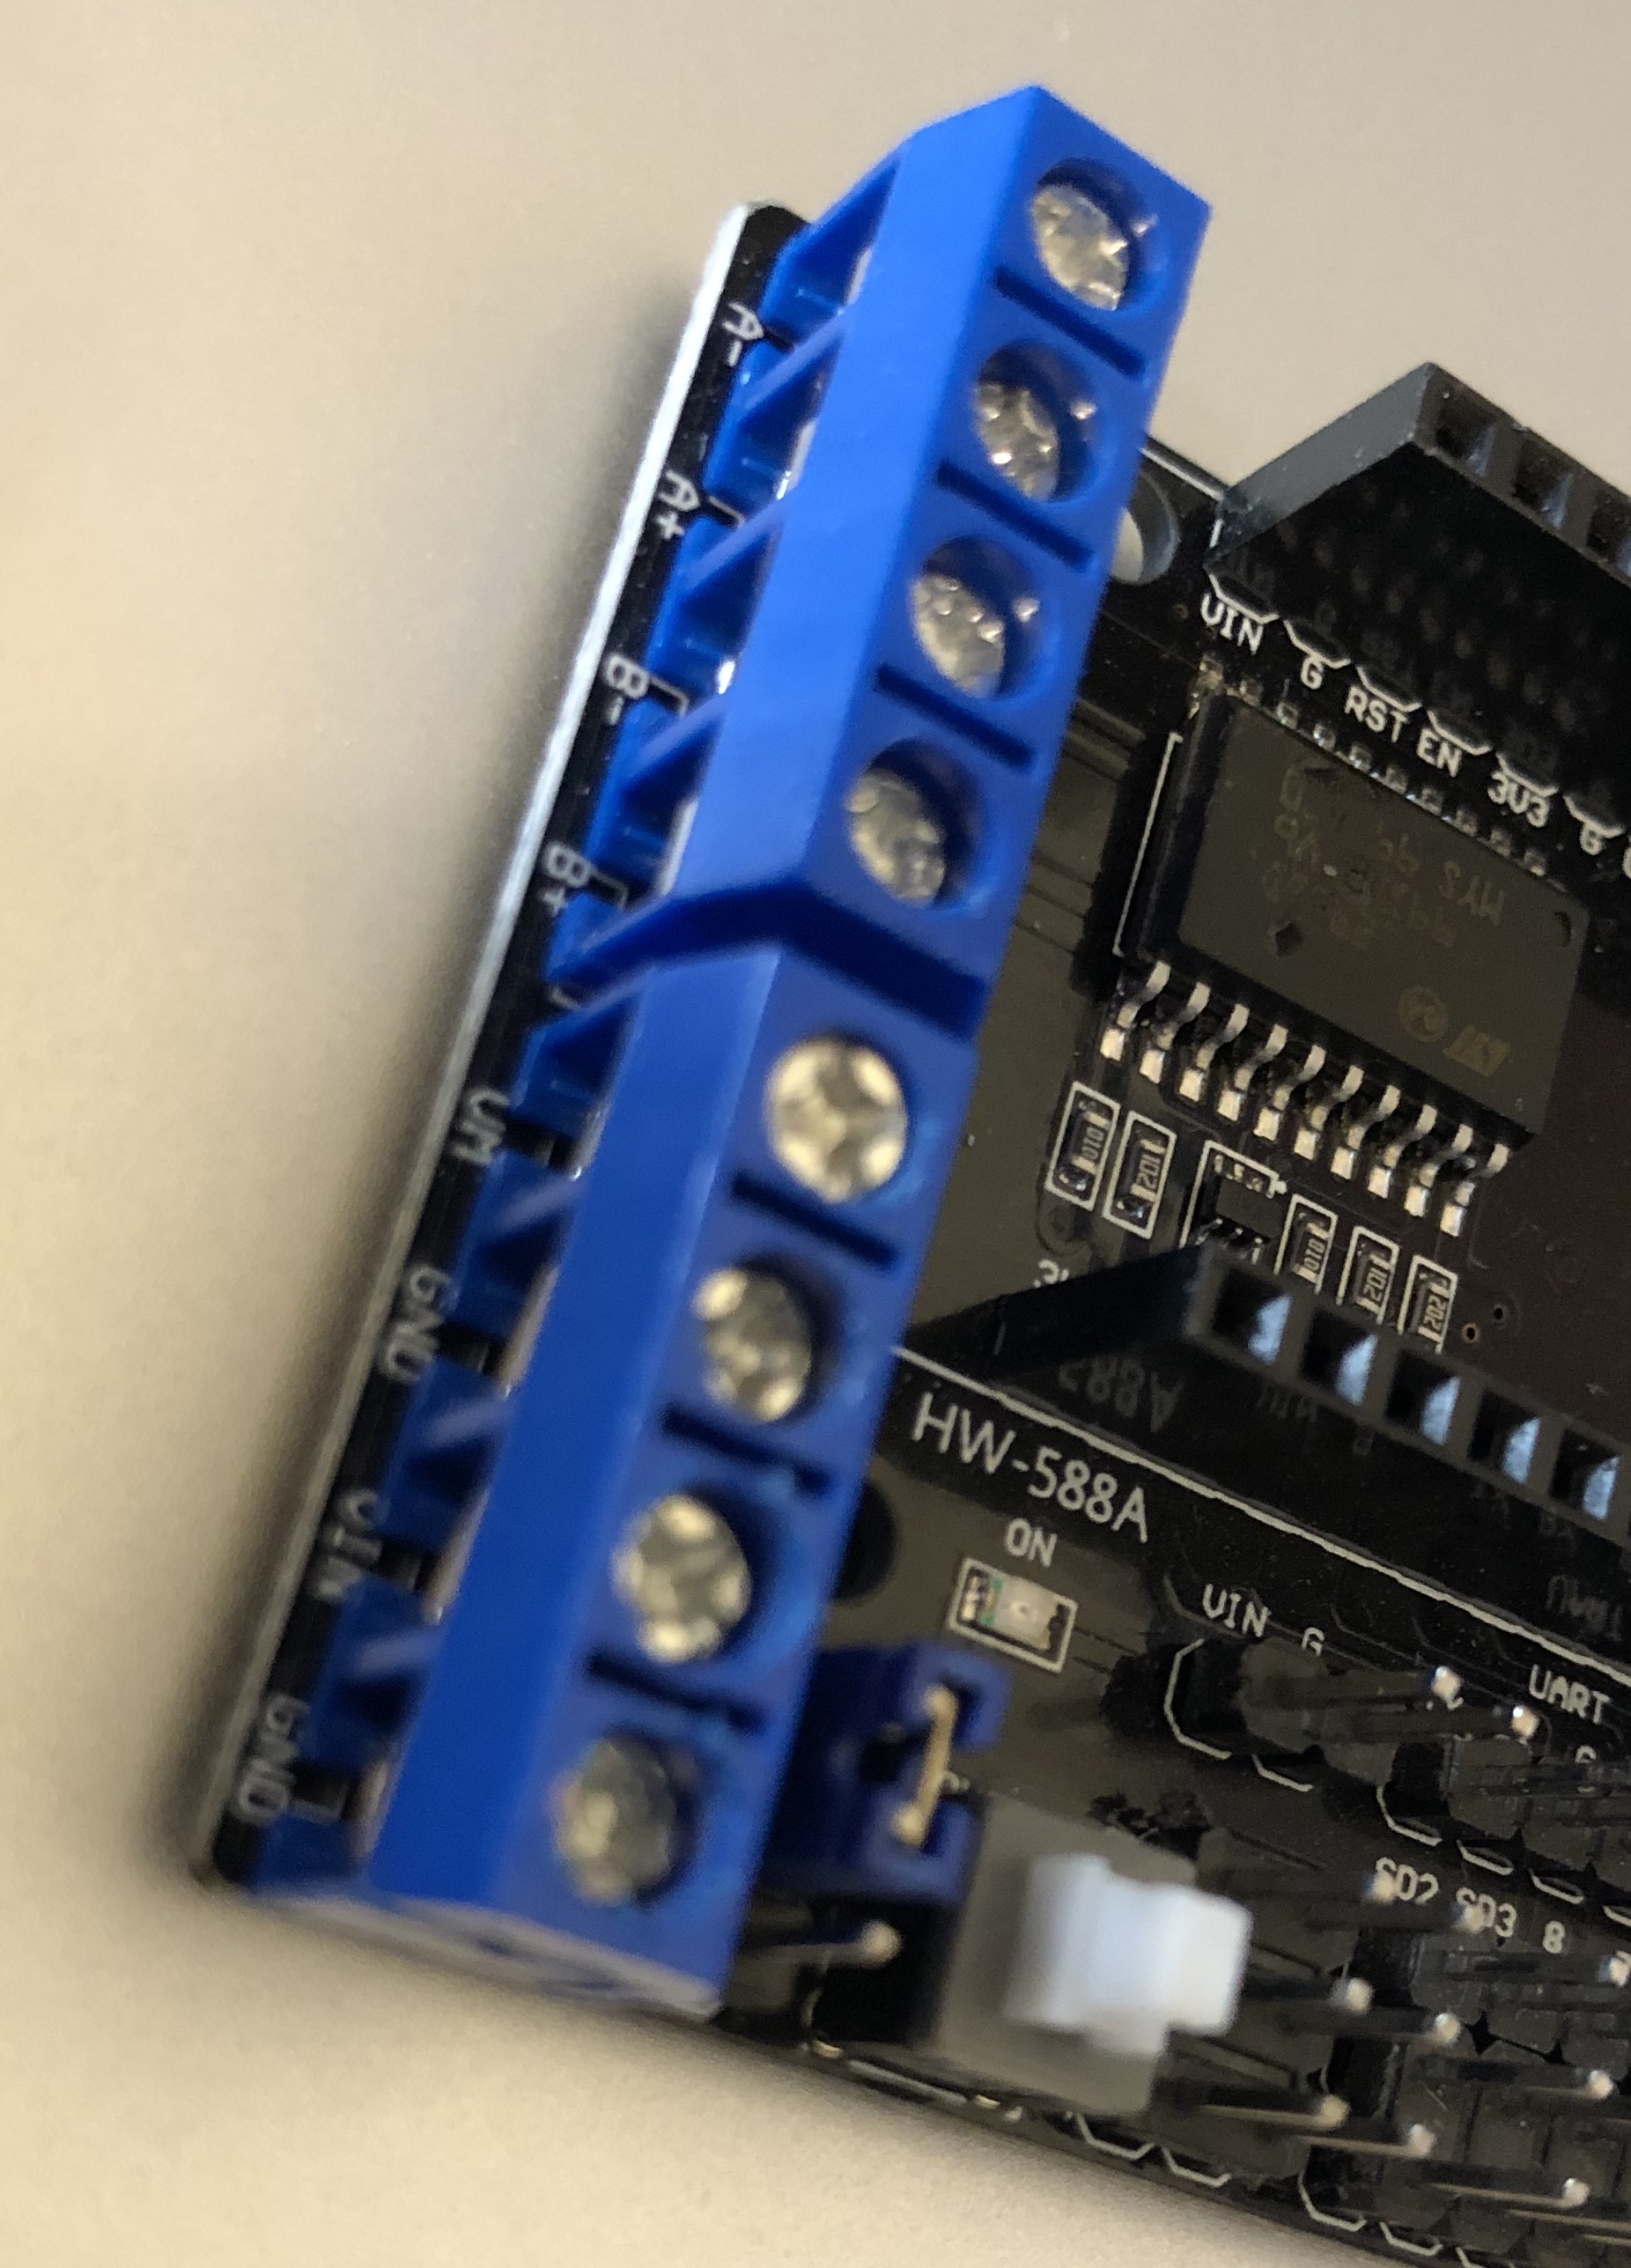
Continuing to work up the stack from my LEGO physical vent manipulator(V1), (V2), I decided to do something new for the embedded control software part of this solution and employ an Expressif ESP8266-based chipset and an accompanying L293D H-bridge daughterboard, primarily because they are just ridiculously cheap.
It took a little bit of finessing to find out exactly what to search eBay for (try ESP-12E + L293D) but listings like this, for AUD$12.55 including postage are simply incredible value. That's an 80MHz processor, motor driver board, USB cable and motor cable, all for less than I probably paid for the serial cable I would have used for my primitive robotics exercises back in university. Absolutely extraordinary.
As this setup uses the "NodeMCU" framework, it can be developed in the Arduino Studio IDE that I've used previously for Arduino experiments, in Arduino's C++-esque language that is simultaneously familiar, but also not ...

But I digress. The real trick with this board package is deducing from the non-existent documentation, exactly what you have and how it's meant to be used. For this particular combination, it's a "Node MCU 1.0 (ESP-12E Module)" that is accessed by using the CP210x "USB to UART" port driver available here. Once you've got the board installed, you can browse example code that should work perfectly for your hardware under File -> Examples -> Examples for NodeMCU 1.0. There's a generous selection here, all the way from "Blink" (which, as the "Hello World" of hardware, should always be the first sketch your hardware runs) all the way to "ESP8266WebServer" - which unsurprisingly ended up being the perfect jumping-off point for my own firmware.
After a frustrating and time-consuming detour getting the device to join my WiFi network (it transpires that the "Scan" sketch can find the SSIDs of 802.11b/g/n networks, but to actually connect, it's far better to be on 802.11n-only) it was time to drive some output, which meant more Googling to determine exactly how the L293D "Motor Driver Expansion Board" actually connects to the ESP's GPIO, and what that means in terms of software configuration.
Eventually I cobbled together the necessary knowledge from this board datasheet which talks about D1-D4, and the Arduino documentation for NodeMCU which indicates that these symbols should be magically available in my code. Then I took a tour through the ESP8266WebServer example code to find out what handler methods I had available. At last, I was ready to put it all together - as you'll see in the next blog post.
But before then, a cautionary tale - I fried both the motor shield board and an ESP board while developing this, and I suspect it was due to not being able to resist the temptation to run the whole thing off a single power supply. You can do this by moving this jumper to bridge the VIN (for the chip) pin to the VM (for the motor) pin. But I suspect the resulting exposure to back-EMF and all that grubby analogue stuff is not good for either the ESP chip nor the L293D motor driver on the shield board. You've been warned.


Saturday, 30 April 2022
Automating heating vents with openHAB, esp8266 and LEGO - Part 2.5; Hardware rework
Working with hardware is fun; working with LEGO hardware is awesome. So before proceeding with the next part of my heating vent automation series, I took the opportunity to refine my vent manipulator, with the following aims:
- Quieter operation; v1 sounded like a coffee-grinder
- Faster movement; to sound like a quieter coffee-grinder for less time
- Lower stack height above floor level; to avoid impeding the sofa-bed mechanism directly overhead
V1 Hardware
As a reminder, here's the first hardware revision featuring a LEGO Technic XL motor and an extremely over-engineered - and tall - chassis.

V2 Hardware
Here's the respun version, which works as well as, if not better than, the original.

The changes:
- The chassis is half as high above the vent surface
- The rack-and-pinion mechanism is centered in the chassis to reduce torque
- The rack is situated lower to reduce flex
- The motor is reduced in size to a LEGO Technic "M" motor (quieter and faster)
- The manipulator clamps to the vent with a Technic pulley wheel instead of a brick, further reducing height-above-floor
Now we're in a really good position to get down-and-dirty with some firmware...
Saturday, 25 September 2021
Automating heating vents with openHAB, esp8266 and LEGO - Part 2; Hardware implementation
In the first part of this series I outlined what I'm trying to build - a smart vent on the cheap - so now it's time to build it! Here's what I'm working with - these are "period-style heating registers" as available from my local warehouse-style hardware store. A decorative "vintage" metal plate (scratched to hell) holds a rectangular plastic frame with two pivoting slats sitting in the airflow. A simple plastic slider protrudes through a slot in the metal plate for user control of slat angle.

In the grand tradition of absolutely-ridiculous first hardware versions (check out Mouse v1.0!), I've built this proof-of-concept out of LEGO Technic. In an excellent coincidence, the width of the vent is a perfect fit for the crab-claw-like clamping mechanism I've created, which is fortunate because it requires quite a decent bit of force to move the slider. This gizmo is heavily overbuilt using my best "LEGO Masters" techniques and doesn't flex, warp or bend one bit once it's in position. I'm using an "XL" LEGO Power Functions motor with a worm drive PLUS some extra gear reduction to make sure that:
- I have the torque to move the slider
- The slats won't move unless I want them to (one of the best features of worm-drives); and
- The transition from shut-to-open (or vice versa) takes a while

Here it is all mounted up. It sits up about 5cm above the normal vent height, which is obviously less than ideal, but should be fine as the whole assembly sits under a sofa-bed which has copious amounts of space underneath it. The dual pinions (to spread the torque and keep everything level) drive the rack left or right, and the slider is "captured" between the red elements and opens or shuts the slats.

The remainder of the hardware is pretty simple - a butchered LEGO Power Functions cable connects the motor to a standard L293D H-bridge, and thence to the "embedded computer" part of the solution, which I'll talk about next...
Sunday, 25 July 2021
Automating heating vents with openHAB, esp8266 and LEGO - Part 1; rationale
It's winter here in Melbourne, and it's a cold one. Combined with the fact that everyone is spending a lot more time at home than before, it's time to start optimising for comfort and efficiency...
I've shared my house's floorplan before on this blog, but this time here it is overlaid with the "schema" of the gas central-heating system, which sends hot air through underfloor ducts into the house through eight vents (or "registers" if you prefer) - shown as red squares:
Now some houses *might* have "zones" implemented, where certain areas of the house are on a physically separated section of ducting and can be addressed and controlled individually. This house is not one of those. I've shown the two *notional* zones we'd probably *like* to have in orange (living spaces) and green (sleeping areas). If you're wondering, we've been advised that for technical reasons related to our heating unit (aka furnace) and available space under the house, a zoned system is not practicable. In any case, it would probably be a bit coarse-grained anyway, as these days I'm working pretty-much 5-days-a-week at home, from the study - the room at the bottom-left of the floorplan.
As such, I would like to be able to control the specific vent in my study, opening and closing it as needed so that it's warm to work in, particularly in the mornings, but also not wasting warm air that is better off being routed to elsewhere in the house in the evenings and on weekends. Also, if the temperature in the study is warm enough, I'd like the vent to shut itself off. It sounds like the height of laziness, but it happens that this vent is located underneath a large couch, so it's actually a major pain to adjust it by hand.
Off-the-shelf "smart vent" solutions have been available for a number of years, from Flair and Keen but they are Not Cheap, don't have any openHAB binding support, don't have stock available and/or don't ship to me in Australia. So it's a roll-your-own situation...
Thursday, 31 December 2020
Quick 2020 A-Z Wrapup
So 2020 was a thing, huh?
In between all the incredibly bad stuff, there were a few cool techy things worth remembering:
- Apple released their M1 Silicon which is ushering in a new level of performance and power-efficiency
- OpenHAB Version 3.0 has rolled out and fixed a lot of quirks and clunky behaviours, improving the WAF of this automation platform still further
- Tesla shipped its millionth electric car and became the world's most valuable carmaker
- Zeit rebranded as Vercel and continued to build Next.js as the best framework for React apps
Stay safe!
Sunday, 17 May 2020
Home Automation In The Small; Part 2
Continuing on the theme of home automation in the small, here's another tiny but pleasing hack that leverages the Chromecast and Yamaha receiver bindings in OpenHAB.
To conclude a happy Spotify listening session, we like to tell the Google Home to "stop the music and turn off the Living Room TV" - "Living Room TV" being the name of the Chromecast attached to HDMI2 of the Yamaha receiver.
While this does stop the music and turn off the television, the amplifier remains powered up. Probably another weird HDMI control thing. It's just a small detail, but power wastage annoys me, so here's the fix.
The trick with this one is ensuring we catch the correct state transition; namely, that the Chromecast's running "app" is the Backdrop and the state is "idling". If those conditions are true, but the amp is still listening to HDMI2, there's obviously nothing else interesting being routed through the amp so it's safe to shut it down. Note that the type of LivingRoomTV_Idling.state is an OnOffType so we don't compare to "ON", it has to be ON (i.e. it's an enumerated value) - some fun Java legacy there ...
rules/chromecast-powerdown.rules
rule "Ensure Yamaha amp turns off when Chromecast does"
when
  Item LivingRoomTV_App changed
then
  logInfo("RULE.CCP", "Chromecast app: " + LivingRoomTV_App.state)
  logInfo("RULE.CCP", "Chromecast idle: " + LivingRoomTV_Idling.state)
  logInfo("RULE.CCP", "Yamaha input: " + Yamaha_Input.state )

  if (LivingRoomTV_App.state == "Backdrop") {
    if (LivingRoomTV_Idling.state == ON) {
       if (Yamaha_Input.state == "HDMI2") {
         logInfo("RULE.CCP", "Forcing Yamaha to power off")
         Yamaha_Power.sendCommand("OFF")
       }
     }
  }
end
Sunday, 26 April 2020
Home Automation In The Small
When you say "Home Automation" to many people they picture some kind of futuristic Iron-Man-esque fully-automatic robot home, but often, the best things are really very small. Tiny optimisations that make things just a little bit nicer - like my "Family Helper" that remembers things for us. It's not for everyone, and it's not going to change the world, but it's been good for us.
In that vein, here's another little optimisation that streamlines out a little annoyance we've had since getting a Google Chromecast Ultra. We love being able to ask the Google Home to play something on Spotify, and with the Chromecast plugged directly into the back of my Yamaha AV receiver via HDMI, it sounds fantastic too. There's just one snag, and fixing it means walking over to the AV receiver and changing the input to HDMI2 ("Chromecast") manually, which (#firstworldproblems) kinda undoes the pleasure of being able to use voice commands.
It comes down to the HDMI CEC protocol, which is how the AV receiver is able to turn on the TV, and how the Chromecast turns on the AV receiver. It's cool, handy, and most of the time it works well. However, when all the involved devices are in standby/idle mode, and a voice command to play music on Spotify is issued, here's what seems to be happening:
| Time | Chromecast | AV receiver | Television |
|---|---|---|---|
| 0 | OFF | OFF | OFF |
| 1 | Woken via network | ||
| 2 | Sends CEC "ON" to AVR | ||
| 3 | Wakes | ||
| 4 | Switches to HDMI2 | ||
| 5 | AV stream starts | ||
| 6 | Detects video | ||
| 7 | Sends CEC "ON" to TV | ||
| 8 | Wakes | ||
| 9 | Routes video to TV | ||
| 10 | "Burps" via analog audio out | ||
| 11 | Hears the burp on AV4 | ||
| 12 | Switches to AV4 |
Yes, my TV (a Sony Bravia from 2009) does NOT have HDMI ARC (Audio Return Channel) which may or may not address this. However, I'm totally happy with this TV (not-"smart" TVs actually seem superior to so-called "smart" TVs in many ways).
The net effect is you get a few seconds of music from the Chromecast, before the accompanying video (i.e. the album art image that the Chromecast Spotify app displays) causes the TV to wake up, which makes the amp change to it, which then silences the music. It's extremely annoying, especially when a small child has requested a song, and they have to semi-randomly twiddle the amp's INPUT knob until they get back to the Chromecast input.
But, using the power of the Chromecast and Yamaha Receiver OpenHAB bindings, and OpenHAB's scripting and transformation abilities, I've been able to "fix" this little issue, such that there is less than a second of interrupted sound in the above scenario.
The approach
The basic approach to solve this issue is:
- When the Chromecast switches to the Spotify app
- Start polling (every second) the Yamaha amp
- If the amp input changes from HDMI2, force it back
- Once 30s has elapsed or the input has been forced back, stop polling
Easy right? Of course, there are some smaller issues along the way that need to be solved, namely:
- The Yamaha amp already has a polling frequency (10 minutes) which should be restored
- There's no way to (easily) change the polling frequency
The solution
Transformation
First of all, we need to write a JavaScript transform function, because in order to change the Yamaha polling frequency, we'll need to download the Item's configuration as JSON, alter it, then upload it back into the Item:
transform/replaceRefreshInterval.js
(function(newRefreshValuePipeJsonString) {
  var logger = Java.type("org.slf4j.LoggerFactory").getLogger("rri");
  logger.warn("JS got " + newRefreshValuePipeJsonString);
  var parts = newRefreshValuePipeJsonString.split('|');
  logger.warn("JS parts: " + parts.length);
  var newRefreshInterval = parts[0];
  logger.warn("JS new refresh interval: " + newRefreshInterval);
  var entireJsonString = parts[1];
  logger.warn("JS JSON: " + entireJsonString);
  var entireThing = JSON.parse(entireJsonString);
  var config = entireThing.configuration;
  logger.warn("JS config:" + JSON.stringify(config, null, 2));

  // Remove the huge and noisy album art thing:
  config.albumUrl = "";
  config.refreshInterval = newRefreshInterval;

  logger.warn("JS modded config:" + JSON.stringify(config, null, 2));

  return JSON.stringify(config);
})(input)
Apologies for the verbose logging, but this is a tricky thing to debug. The signature of an OpenHAB JS transform is effectively (string) => string so if you need to get multiple arguments in there, you've got to come up with a string encoding scheme - I've gone with pipe-separation, and more than half of the function is thus spent extracting the args back out again!
Basically this function takes in [new refresh interval in seconds]|[existing Yamaha item config JSON], does the replacement of the necessary field, and returns the new config JSON, ready to be uploaded back to OpenHAB.
Logic
Some preconditions:
- A Chromecast Thing is set up in OpenHAB
- With #appName channel configured as item LivingRoomTV_App
- A Yamaha AVReceiver Thing is set up in OpenHAB
- With (main zone) #power channel configured as item Yamaha_Power and
- (Main zone) #input channel configured as item Yamaha_Input
rules/chromecast.rules
val AMP_THING_TYPE="yamahareceiver:yamahaAV"
val AMP_ID="5f9ec1b3_ed59_1900_4530_00a0dea54f93"
val AMP_THING_ID= AMP_THING_TYPE + ":" + AMP_ID
val AMP_URL = "http://localhost:8080/rest/things/" + AMP_THING_ID

var Timer yamahaWatchTimer = null
rule "Ensure AVR is on HDMI2 when Chromecast starts playing music"
when
  Item LivingRoomTV_App changed
then
  logInfo("RULE.CCAST", "Chromecast app is: " + LivingRoomTV_App.state)

  if(yamahaWatchTimer !== null) {
    logInfo("RULE.CCAST", "Yamaha is already being watched - ignoring")
    return;
  }

  if (LivingRoomTV_App.state == "Spotify") {
    logInfo("RULE.CCAST", "Forcing Yamaha to power on")
    Yamaha_Power.sendCommand("ON")

    // Fetch the Yamaha thing's configuration:
    var yamahaThingJson = sendHttpGetRequest(AMP_URL)
    logInfo("RULE.CCAST", "Existing config is: " + yamahaThingJson)

    // Replace the refresh interval field with 1 second:
    var newYamahaConfig = transform(
      "JS",
      "replaceRefreshInterval.js",
      "1|" + yamahaThingJson
    )

    logInfo("RULE.CCAST", "New config is: " + newYamahaConfig)

    // PUT it back using things/config:
    sendHttpPutRequest(
      AMP_URL + "/config",
      "application/json",
      newYamahaConfig.toString())

    logInfo("RULE.CCAST", "Forcing Yamaha to HDMI2")
    Yamaha_Input.sendCommand("HDMI2")
    logInfo("RULE.CCAST", "Forced Yamaha to HDMI2")

    logInfo("RULE.CCAST", "Will now watch the Yamaha for the next 30")
    logInfo("RULE.CCAST", "sec & force it back to HDMI2 if it wavers")
    val DateTimeType ceasePollingTime = now.plusMillis(30000)

    yamahaWatchTimer = createTimer(now, [ |
      if(now < ceasePollingTime){
        Yamaha_Input.sendCommand("REFRESH")
        logInfo("RULE.CCAST", "Yamaha input: " + Yamaha_Input.state)
        if (Yamaha_Input.state.toString() != "HDMI2") {
          logInfo("RULE.CCAST", "Force PUSH")
          Yamaha_Input.sendCommand("HDMI2")
        }
        yamahaWatchTimer.reschedule(now.plusMillis(1000))
      }
      else {
        logInfo("RULE.CCAST", "Polling time has expired.")
        logInfo("RULE.CCAST", "Will not self-schedule again.")
        var revertedYamahaConfig = transform(
          "JS", "replaceRefreshInterval.js",
          "600|" + yamahaThingJson
        )
        sendHttpPutRequest(
          AMP_URL + "/config",
          "application/json",
          revertedYamahaConfig.toString()
        )
        logInfo("RULE.CCAST", "Yamaha polling reverted to 10 minutes.")
        yamahaWatchTimer = null
      }
    ])
  }
end
Some things to note. This uses the "self-triggering-timer" pattern outlined in the OpenHAB community forums, reads the configuration of a Thing using the REST interface as described here, and is written in the XTend dialect which is documented here.
Monday, 30 March 2020
Home-grown mesh networking
Here's what you need to do (presented in the order that should cause minimal disruption to your home network):
Establish which router you want to be the "master"
This may be the only router currently running, the best-positioned Wifi-wise, the one with the WAN connection, all of the aforementioned, or something else.Configure the master AP
- We'll reflect this router's status with its static IP address; ending in .1
- If you rely on a router to provide DHCP, make it this one
- Set your Wifi channel to 1,2 or 3 (for non-US locations) and do not allow it to "hop" automatically
- I'll refer to this channel as CM
- If possible, set the Wifi transmit power to LOW
Configure your (first) slave AP
- Give it a static IP address ending in .2 (or .n for the nth device)
- Disable DHCP
- Set your Wifi channel to CM +5 (for non-US locations) (e.g. 6 if CM is 1) and do not allow it to "hop" automatically
- The logic behind this is to avoid overlapping frequencies
- Let's call this channel CS
- If possible, set the Wifi transmit power to LOW
- Set your SSID, WPA scheme and password exactly as per the master
Connect master and slave via wired Ethernet
Oh and if neither of those devices is your WAN connection device, then that needs to be wired to this "backbone" too. This is super-important for good performance. If an AP can only get to the internet via Wifi, it'll be battling its own clients for every internet conversation. The Googleable name for this is "wired backhaul" or "Ethernet backhaul" and it's well worth drilling some holes and fishing some cable to get it. Don't skimp on this cable either - go for Cat6, even if your devices only (currently) go to 100Mbps.Tune it
Grab a Wifi analyser app for your phone - IP Tools and Farproc's Wifi Analyser work well on Android. Your best option on iOS is called Speed Test - Wifi Signal Strength by Xiaoyan Huang.Using the signal strength view, start walking from your master device towards your first slave. You should see the signal strength on channel CM start dropping and the strength of CS increase. Now if you've got some control over Wifi transmit strength, this is where you can "tune" the point at which your portable Wifi devices will start looking around for a "better option" - typically at around -70 to -75dBm. Remember, you actually want them to start getting "uncomfortable" quite quickly, so that they begin scanning earlier, and find the better option before you even notice any glitch. That's why we dropped our signal strength when we set the APs up - we don't want them to be too "sticky" to any given AP.
A real-life example
Prior warning - I'm a geek, so my network configuration might be a little more involved than yours, but the basics remain the same.I have 4 devices of interest:
- WAN Modem - a TP-Link Archer v1600v that has a broken* Wifi implementation, so is just being used as a WAN Modem
- DHCP Server - a Raspberry Pi running dnsmasq - a bit more flexible than what's in most domestic routers
- Living area AP - a Linksys X6200 router/AP
- Home office AP - a D-link DIR-655 router/AP
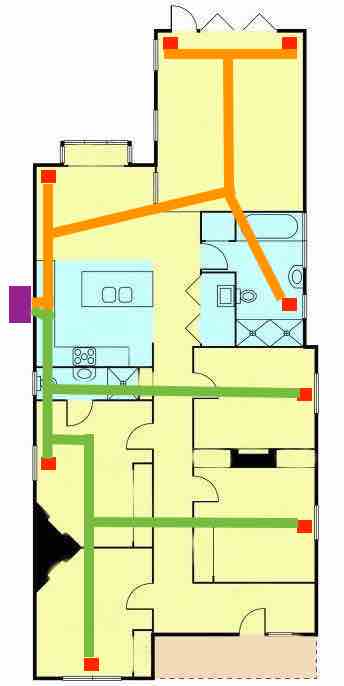
Here's how they are physically laid out:

Pink lines are Gigabit Ethernet running on Cat6 cables. The red arrow is the WAN connection, which arrives at the front of the house and is terminated in the home office. That long curved pink line is the "backhaul" - it leaves the home office through a neat RJ45 panel in the skirting board, runs under the house, and surfaces through another RJ45 panel in the back of a closet in the bathroom - a little unusual, but there is power available and it is excellently positioned to cover the living area of the house as you can probably see.
Here's the configuration:
- WAN Modem - Static IP 10.240.0.1
- DHCP Server - Static IP 10.240.0.200, hands out addresses with network gateway set to 10.240.0.1
- Living area AP - Static IP 10.240.0.2, Wifi channel 3, transmit power LOW
- Home office AP - Static IP 10.240.0.3, Wifi channel 9, transmit power LOW
I've done a little visualisation of the signal strength using my pet project react-chromakeyed-image (more on that in another post):

You can see that the whole house is now bathed in a good strong signal, from either the living area (red) AP or the home office (green) and the only questionable area is on one side of that other front room (bottom of image), which is a playroom and doesn't need strong Wifi anyway.
(*) It actually seems to be that IPv6 advertisements can't be turned off and it advertises the "wrong" DNS addresses.
Friday, 31 January 2020
OpenHAB Broadlink Binding situation report
After #dadlife, #newjob and #otherstuff got in the way for a while last year, I got back into my role as maintainer of the OpenHAB Broadlink device binding. My first priority was to create a binding JAR that would actually work with the newly-published OpenHAB version 2.5. As the Broadlink binding is still not part of the official OpenHAB binding repository, it doesn't "automagically" get the necessary changes applied when the upstream APIs change. Luckily, it wasn't too much work.
My priorities for 2020 for this binding remain unchanged; get it to a high-quality state, make it pass the (extremely strict) linter guidelines for OpenHAB code, and get it merged into the official codebase. For me to consider it high-quality, there are still the following tasks to do:
- Get a solid chunk of it covered by unit tests to prevent regressions; and
- Redesign the device-discovery and identification areas of the code, to make adding new devices easier
Unit Tests
Prior to OpenHAB 2.5, bindings/addons that wished to define tests had to create an entire second project that shadowed the production code and could only be run via a strange incantation to Maven which did horrible OSGi things to run integration-style tests. Essentially, OpenHAB addons were not unit-testable by conventional means. Which given most addons are developed by unpaid volunteers, naturally meant that hardly any addons had tests.
Fortunately, one of the major changes in the 2.5 architecture has been a move towards more Java-idiomatic unit testing. Finally, classic JUnit-style unit testing with Mockito mocking will be available for fast, reliable testing within the binding. I'll be shooting for at least 60% test coverage before I'll consider submitting a PR to OpenHAB.
Discovery redesign
I've been told that new versions of some popular Broadlink devices will be arriving in 2020. In anticipation of that, I want to make it much easier to add a new device. At the moment it requires defining a new subclass of BroadlinkBaseThingHandler (which is par-for-the-course for OpenHAB, being a pretty standard Java app), but also adding "magic numbers" in a number of places to assist in looking-up and identifying devices during "discovery" and also when they boot up. I want to consolidate this such that everything needed to support a device is located within one .java file - i.e. adding support for a new device will require exactly two changes in Git:
- The new .java file containing all the required information to support the new device; and
- Adding a reference to this class somewhere to "pick it up".
Thanks for all the kind words from users/testers of this binding - it's very rewarding to hear people using it with great success!
Tuesday, 28 May 2019
Whose Turn Is it? An OpenHAB / Google Home / now.sh Hack (part 4 - The Rethink)
The "whose turn is it?" system was working great, and the kids loved it, but the SAF (Spousal Acceptance Factor) was lower than optimal, because she didn't trust that it was being kept up-to-date. We had a number of "unusual" weekends where we didn't have a Movie Night, and she was concerned that the "roll back" (which of course, has to be manually performed) was not being done. The net result of which being, a human still had to cast their mind back to when the last movie night was, whose turn it was, and what they chose! FAIL.
Version 2 of this system takes these human factors into account, and leverages the truly "conversational" aspect of using DialogFlow, to actually extract NOUNS from a conversation and store them in OpenHAB. Instead of an automated weekly rotation scheme which you ASK for information, the system has morphed to a TELL interaction. When it IS a Movie Night, a human TELLS the Google Home Mini somewhat like this:
Hey Google, for Movie Night tonight we watched Movie Name. It was Person's choice.
or;Hey Google, last Friday it was Person's turn for Movie Night. we watched Movie Name.
To do this, we use the "parameters" feature of DialogFlow to punch the nouns out of a templated phrase. It's not quite as rigid as it sounds due to the machine-learning magic that Google runs on your phrases when you save them in DialogFlow. Here's how it's set up; with the training phrases:

Kudos to Google for the UI and UX of this tricky stuff - it's extremely intuitive to set up, and easy to spot errors thanks to the use of coloured regions. Here's where the parameters get massaged into a suitable state for my webhook Lambda. Note the conversion into a single pipe-separated variable (requestBody) which is then PUT into the OpenHAB state for the item that has the same name as this Intent, e.g. LastMovieNight.

Within OpenHAB, almost all of the complexity in working out "who has the next turn" is now gone. There's just a tiny rule that, when the item called LastMovieNight is updated (i.e. by the REST interface), appends it to a "log" file for persistence purposes:
rule "Append Last Movie Night"
when
    Item LastMovieNight received update
then
    executeCommandLine(
      "/home/pi/writelog.sh /var/lib/openhab2/movienight-logs.txt " +
      LastMovieNight.state,
      5000)
end
(writelog.sh is just a script that effectively just does echo ${2} >> $1 - it seems like OpenHAB's executeCommandLine really should be called executeScript because you can't do anything directly).
The flip side is being able to query the last entry. In this case the querying side is very straightforward, but the trick is splitting out the |-separated data into something that the Google Home can speak intelligibly. I've seen this called "having a good VUI" (Voice User Interface) so let's call it that.
Given that the result of querying the MyOpenHAB's interface for /rest/items/LastMovieNight/state will return:
Sophie|2019-05-26T19:00:00+10:00|Toy Story 2
I needed to be able to "slice" up the pipe-separated string into parts, in order to form a nice sentence. Here's what I came up with in the webhook lambda:
...
const { restItem, responseForm, responseSlices } =
  webhookBody.queryResult.parameters;
...
// omitted - make the REST call to /rest/items/${restItem}/state,
// and put the resulting string into "body"
...
if (responseSlices) {
   const expectedSlices = responseSlices.split('|');
   const bodySlices = body.split('|');
   if (expectedSlices.length !== bodySlices.length) {
     fulfillmentText = `Didn't get ${expectedSlices.length} slices`;
   } else {
     const responseMap = expectedSlices.map((es, i) => {
       return { name: es, value: bodySlices[i] }
     });

     fulfillmentText = responseMap.reduce((accum, pair) => {
       const regex = new RegExp(`\\\$${pair.name}`);
       let replacementValue = pair.value;
       if (pair.name === 'RELATIVE_DATE') {
         replacementValue = moment(pair.value).fromNow();
       }
       return accum.replace(regex, replacementValue);
     }, responseForm);
   }
}
Before I try and explain that, take a look at how it's used:

The whole thing hinges on the pipe-separators. By supplying a responseSlices string, the caller sets up a mapping of variable names to array slices, the corresponding values of which are then substituted into the responseForm. It's completely neutral about what the variable names are, with the one exception: if it finds a variable named RELATIVE_DATE it will treat the corresponding value as a date, and apply the fromNow() function from moment.js to give a nicely VUI-able string like "3 days ago". The result of applying these transformations to the above pipe-separated string is thus:
"The last movie night was 3 days ago, when Sophie chose Toy Story 2"
Job done!