Showing posts with label devops. Show all posts

Saturday, 28 December 2019

SOTSOG 2019

It's been quite a while since I last did a SOTSOG awards ceremony but there have definitely been some standouts for Standing On The Shoulders Of Giants this year. So without any further ado:

React.js

I wouldn't consider building a front-end with anything else. Hooks have been a game-changer, taking the declarative approach to the next level.

Apollo GraphQL

Version 2.x of the reference GraphQL client library brought vast improvements, and the React Hooks support fits in beautifully. Combine it with top-notch documentation and you've got a stone-cold winner for efficient and elegant data communications.

Next.js and now.sh

The dynamic duo from Zeit have almost-instantly become my go-to for insanely-quick prototyping and deployment. The built-in Lambda deployment system is ridiculously good. Just try it - it's free.

Honourable Mentions

Typescript and ES6

For making JavaScript feel like a grown-up language. Real compile-time type safety and protection from the dreaded undefined is not a function, the functional goodness of map(), reduce() and Promises without pain.

Visual Studio Code

Two Microsoft products getting a nod?!? Amazing to see - a stunning turnaround this decade from Redmond. VSCode has simply exploded onto most developers' launch bars thanks to its speed, flexibility, incredible rate of feature development and enormous plugin community. At this price point, it's very hard to look further for an IDE.

Sunday, 8 September 2019

I like to watch

Remember how computers were supposed to do the work, so people had time to think?

Do you ever catch yourself operating in a tight loop, something like:

  10 Edit file
  20 Invoke [some process] on file
  30 Read output of [some process]
  40 GOTO 10
Feels a bit mechanical, no? Annoying having to switch from the text editor to your terminal window, yes?

Let's break down what's actually happening in your meatspace loop*:

  10 Edit file in text editor
  15 Save file (e.g. Ctrl-S)
  17 Change active window to Terminal (e.g. Cmd/Alt+Tab)
  20 Press [up-arrow] once to recall the last command
  22 Visually confirm it's the expected command
  25 Hit [Enter] to execute the command
  30 Wait for the command to complete
  35 Interpret the output of the command
  40 Cmd/Alt+Tab back to the editor
  45 GOTO 10
That's even more blatant! Most of the work is telling the computer what to do next, even though it's exactly the same as the last iteration.
(*) Props to anyone recognising the BASIC line-numbering reference 😂

Wouldn't something like this be better?

  10 Edit file in text editor
  15 Save file (e.g. Ctrl-S)
  20 Swivel eyeballs to terminal window
  30 Wait for the command to complete
  35 Interpret the output of the command
  40 Swivel eyeballs back to editor
  45 GOTO 10

It can be better

If you've got npm on your system somewhere it's as simple as:

  $ npm install -g watch
and arranging your UI windows suitably. Having multiple monitors is awesome for this. Now by invoking:
  $ watch '[processing command with arguments]' dir1 dir2 ... dirN
you have the machine on your side. As soon as you save any file in dir1, dir2 etc, the command will be run for you. Here are some examples:

Validate a CircleCI build configuration
You're editing the circleci/config.yml of a CircleCI continuously-integrated project. These YAML files are notoriously tricky to get right (whitespace matters...🙄) - so you can get the circleci command-line tool to check your work each time you save the file:
  $ brew install circleci
  $ watch 'circleci config validate' .circleci
Validate a Terraform configuration
You're working on a Terraform infrastructure-as-code configuration. These .TF files can have complex interrelationships - so you can get the terraform command-line tool to check your work each time you save the file:
  $ brew install terraform
  $ watch 'terraform validate' .
Auto-word-count an entire directory of files
You're working on a collection of files that will eventually be collated together into a single document. There's a word-limit applicable to this end result. How about running wc to give you a word-count whenever you save any file in the working directory?:
  $ watch 'wc -w *.txt' .

Power tip

Sometimes, the command in your watch expression is so quick (and/or its output so terse), you can't tell whether you're seeing the most-recent output. One way of solving this is to prefix the time-of-day to the output - a quick swivel of the eyeballs to the system clock will confirm which execution you're looking at:

  $ watch 'echo `date '+%X'` `terraform validate`' .
  > Watching .
  13:31:59 Success! The configuration is valid. 
  13:32:23 Success! The configuration is valid.
  13:34:41 Success! The configuration is valid.
  

Thursday, 25 January 2018

OpenShift - the 'f' is silent

So it's come to this.

After almost-exactly four years of free-tier OpenShift usage for Jenkins purposes, I have finally had to throw up my hands and declare it unworkable.

The first concern was earlier in 2017 when, with minimal notice, they announced the end-of-life of the OpenShift 2.0 platform which was serving me so well. Simultaneously they dropped the number of nodes available to free-tier customers from 3 to 1. A move I would have been fine with if there had been any way for me to pay them down here in Australia - a fact I lamented about almost 2 years ago.

Then, in the big "upgrade" to version 3, OpenShift disposed of what I considered to be their best feature - having the configuration of a node held under version control in Git; push a change, the node restarts with the new config. Awesome. Instead, version 3 handed us a complex new ecosystem of pods, containers, services, images, controllers, registries and applications, administered through a labyrinth of somewhat-complete and occasionally-buggy web pages. Truly a downgrade from my perspective.

The final straw was the extraordinarily fragile and flaky nature of the one-and-only node (or is it "pod"? Or "application"? I can't even tell any more) that I have running as a Jenkins master. Now this is hardly a taxing thing to run - I have a $5-per-month Vultr instance actually being a slave and doing real work - yet it seems to be unable to stay up reliably while doing such simple tasks as changing a job's configuration. It also makes "continuous integration" a bit of a joke if pushing to a repository doesn't actually end up running tests and building a new artefact because the node was unresponsive to the webhook from Github/Bitbucket. Sigh.

You can imagine how great it is to see this page when you've just hit "save" on the meticulously-detailed configuration for a brand new Jenkins job...

So, in what I hope is not a taste of things to come, I'm de-clouding my Jenkins instance and moving it back to the only "on-premises" bit of "server hardware" I still own - my Synology DS209 NAS. Stay tuned.

Saturday, 3 June 2017

A Top-Shelf Web Stack (Scala version) - part 2 - Herokufication

In Part 1 of this 2-part series, we set up a neat little two-pronged web project that combined the power, type-safety and scalability of a Scala/Play Framework backend with the finely-tuned and highly-productive Create-React-App system on the front. This works exceptionally well for very rapid development on a single local workstation with automatic hot-reloading on both sides, but we're going to need to deploy this somewhere if we want anybody else to feel the awesomeness. Enter Heroku, long my PaaS of choice and still IMHO a very viable option over "raw" AWS if you need it live, yesterday.

The essentials of this process are covered well in the Rails-centric article that has been the inspiration for this series, but I'll whip through it here as there are a couple of changes to make it work with Play.

First, we drop a package.json into the project root, that describes the front-end packaging process to Heroku:
{
  "name": "build-client-on-heroku",
  "engines": {
    "node": "6.3.1"
  },
  scripts": {
    "build": "cd client && npm install && npm run build && cd ..",
    "deploy": "cp -a client/build/. public/",
    "postinstall": "npm run build && npm run deploy && echo 'Done!'"
  }
}

Next, we add a Heroku buildpack to the front of our Heroku build chain, to assemble the Node front-end prior to booting Play:
  % heroku buildpacks:add heroku/nodejs --index 1
  % heroku buildpacks 
=== myapp Buildpack URLs
1. heroku/nodejs
2. heroku/scala
And, as documented in the above-linked article, we set an NPM environment variable that will get react-scripts (which is declared as a devDependency by create-react-app) to be installed as needed:
 
  % heroku config:set NPM_CONFIG_PRODUCTION=false

We're almost there. But before you git push heroku master, there's one extra bit of configuration to perform to make Play serve up our React app as expected. You might have noticed the deploy step up there in that package.json where we copy the result of the NPM build into public. If we just leave everything as-is, we'll only be able to access the React front-end by using https://myapp.herokuapp.com/assets/index.html - which is almost certainly not what we want.
A couple of extra lines in conf/routes will fix this right up:

# Our backend routes (e.g. serving up JSON) come FIRST:
GET /dummy-json controllers.DummyController.dummyJson 

# Last of all, fall through to the React app
GET /           controllers.Assets.at(path="/public",file="index.html")
GET /*file      controllers.Assets.at(path="/public",file)
Because of the use of wildcards, order is very important here. Backend endpoints come first, then the / route which captures the age-old "index.html is the default page" web convention, and finally a catch-all that ensures all the other artefacts of the NPM bundling get served up by Play's Assets controller.

And there we have it! A Create-React-App+Play stack. The CRAP stack! Despite the unfortunate name, I hope this has been a useful and inspirational starting point to build something great with these amazing (and free) technologies.

Wednesday, 17 May 2017

A Top Shelf Web Stack - Scala version - Play 2.5 + create-react-app

There are tutorials on the web about using ReactJS with Play on the back end, such as this one by Fabio Tiriticco but they almost always achieve the integration via the WebJars mechanism, which, while kinda neat and clever, can never be "first-class citizens" in the incredibly fast-moving JavaScript world. My day job uses a completely separate front- and back-end architecture which has shown me that letting NPM/Webpack et al manage the front-end is the only practical choice if you want to use the latest-and-greatest libraries and tooling.

A fantastic example is create-react-app, by Dan (Redux) Abramov et al, which makes it ludicrously-simple to get going with a React.JS front-end application that incorporates all of the current best-practices and configuration. I came across a very fine article that discussed hosting a create-react-app front-end on a Ruby-on-Rails server (in turn on Heroku) and figured it would be a good exercise to do a version with the Play Framework 2.5 (Scala) on the back end. This version will have a lot fewer animated GIFs and general hilarity, but hopefully it is still a worthwhile exercise!

I won't go into setting up a simple Play app as complete instructions for both beginners and experts are provided at the Play website, and it can be as simple as typing:
  % sbt new
  % sbt run
Once you've got your Play app all happy, getting the front-end going is as simple as running two commands in your project's root directory:
  % npm install -g create-react-app
  % create-react-app client
to create a React application in the client directory. You can check it works with:
  % cd client
  % npm start
Great. Now's a good time to commit your new client directory to Git, although you'll definitely want to add client/node_modules to your .gitignore file first. Let's modify the backend to have a tiny little JSON endpoint, call it from React when the app mounts, and display the content. First, we just add one line to our package.json so that backend data requests get proxied through the front-end server, making everything just work with no CORS concerns:
  "private": true,
  "proxy": "http://localhost:9000/",
  "dependencies": {
    "react": "^15.5.4",
    "react-dom": "^15.5.4"
  },
Make sure you kill-and-restart your React app after adding that line. Next, let's whip up a Play endpoint that returns some JSON: In conf/routes:
GET          /dummy-json       controllers.DummyController.dummyJson 
In app/controllers/DummyController.scala:
class DummyController extends Controller {

  val logger = Logger("DummyController")

  def dummyJson = Action {
    logger.info("Handling request for dummy JSON")
    Ok(Json.obj(
      "foo" -> "foo",
      "bar" -> "bar",
      "bazzes" -> Seq("baz1", "baz2", "baz3")
      )
    )
  }

Check that's all good by hitting http://localhost:9000/dummy-json directly with your browser. Now we put our front-end hat on and get the React app to fetch the JSON when it mounts:
class App extends Component {

  componentDidMount() {
    console.log('Mounted');
    fetch('/dummy-json',{ accept: 'application/json'})
      .then(response => response.json() )
      .then(json => console.log(json) )
      .catch(error => console.error(error));
  }
 ...
}
Setting the accept header is not strictly necessary but it helps create-react-app to know that this request should be proxied. Plus it's generally good form too. Now when your app hot-reloads, watch your browser's Network tab. You'll see the request go out on port 3000, the server log the request and respond on 9000, and the response arrive back on port 3000. Let's finish off the local-development part of this little demo by wiring that response into our app's state so that we can render appropriately:
class App extends Component {

  constructor() {
    super();
    this.state = {};
  }

  componentDidMount() {
    console.log('Mounted');
    this.fetch('/dummy-json').then( result => {
      this.setState({
        result
      });
    });
  }

  fetch (endpoint) {
    return new Promise((resolve, reject) => {
      window.fetch(endpoint, { accept: 'application/json'})
      .then(response => response.json())
      .then(json => resolve(json))
      .catch(error => reject(error))
    })
  }

  render() {
    let { result } = this.state;
    return (
      <div className="App">
        <div className="App-header">
          <img src={logo} className="App-logo" alt="logo" />
          {result ? (
            <h3>{result.foo}</h3>
          ) : (
            <h3>Loading...</h3>
          )
        }
        </div>
        <p className="App-intro">
          To get started, edit src/App.js and save to reload.
        </p>
      </div>
    );
  }
}
So easy! In the next installment, we'll consider deployment to Heroku.

Saturday, 30 July 2016

Vultr Jenkins Slave GO!

I was alerted to the existence of VULTR on Twitter - high-performance compute nodes at reasonable prices sounded like a winner for Jenkins build boxes. After the incredible flaming-hoop-jumping required to get OpenShift Jenkins slaves running (and able to complete builds without dying) it was a real pleasure to have the simplicity of root-access to a Debian (8.x/Jessie) box and far-higher limits on RAM.

I selected a "20Gb SSD / 1024Mb" instance located in "Silicon Valley" for my slave. Being on the opposite side of the US to my OpenShift boxes feels like a small, but important factor in preventing total catastrophe in the event of a datacenter outage.

Setup Steps

(All these steps should be performed as root):

User and access

Create a jenkins user:
addgroup jenkins
adduser jenkins --ingroup jenkins

Now grab the id_rsa.pub from your Jenkins master's .ssh directory and put it into /home/jenkins/.ssh/authorized_keys. In the Jenkins UI, set up a new set of credentials corresponding to this, using "use a file from the Jenkins master .ssh". (which by the way, on OpenShift will be located at /var/lib/openshift/{userid}/app-root/data/.ssh/jenkins_id_rsa).
I like to keep things organised, so I made a vultr.com "domain" container and then created the credentials inside.

Install Java

echo "deb http://ppa.launchpad.net/webupd8team/java/ubuntu xenial main" | tee /etc/apt/sources.list.d/webupd8team-java.list
echo "deb-src http://ppa.launchpad.net/webupd8team/java/ubuntu xenial main" | tee -a /etc/apt/sources.list.d/webupd8team-java.list
apt-key adv --keyserver hkp://keyserver.ubuntu.com:80 --recv-keys EEA14886
apt-get update
apt-get install oracle-java8-installer

Install SBT

apt-get install apt-transport-https
echo "deb https://dl.bintray.com/sbt/debian /" | tee -a /etc/apt/sources.list.d/sbt.list
apt-key adv --keyserver hkp://keyserver.ubuntu.com:80 --recv 642AC823
apt-get update
apt-get install sbt

More useful bits

Git
apt-get install git
NodeJS
curl -sL https://deb.nodesource.com/setup_4.x | bash -
apt-get install nodejs

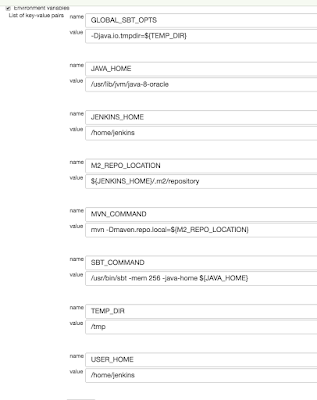
This machine is quite dramatically faster and has twice the RAM of my usual OpenShift nodes, making it extra-important to have those differences defined per-node instead of hard-coded into a job. One thing I was surprised to have to define was a memory limit for the JVM (via SBT's -mem argument) as I was getting "There is insufficient memory for the Java Runtime Environment to continue" errors when letting it choose its own upper limit. For posterity, here are the environment variables I have configured for my Vultr slave:

Thursday, 12 May 2016

Cloudy Continuous Integration Part 2 - Trigger-Happy

In Part 1 of this highly-sporadic series, I specified No Polling as a must-have for your build box. I have seen countless examples where otherwise-great toolchains are let down by dumb polling on behalf of the build server. Even worse is when a heap of jobs all go polling at the same time (e.g. a */5 * * * * cron expression or similar), resulting in terrible load spiking, and unfair (and possibly even wrong) build order.

Why do otherwise-excellent and smart engineers end up doing the kind of dumb polling in Jenkins that would keep them up at night if it was their code? Mainly because historically, it's been substantially harder to get properly-triggered job execution going in Jenkins. But things are getting better. The Jenkins GitHub Plugin does a terrific job of simplifying triggering, thanks to its convention-over-configuration approach - once you've nominated where your GitHub repo is, getting triggering is as simple as checking a box. Lovely.


Now, finally, it seems BitBucket have almost caught up in this regard. Naturally, as they offer (free) private repositories, there is a little bit more configuration required on the SCM side, but I can confirm that in May 2016, it works. There seem to have been a lot of changes going on under the hood at BitBucket, and the reliability of their triggering has suffered from week-to-week at times, but hopefully things will be solid now.

The 2016 Way to trigger Jenkins from BitBucket
  1. Firstly, there is now no need to configure a special user for triggering purposes
  2. Install the Jenkins BitBucket plugin. For your reference, I have 1.1.5
  3. In jobs that you want to be triggered, note there is a new "BitBucket" option under Build Triggers. You want this. If it was checked, uncheck the "polling" option and feel clean
  4. That's the Jenkins side done. Now flip to your BitBucket repo, and head to the Settings
  5. Under Integrations -> Webhooks add a new one, and fill it out something like this:
    Where jjj.rhcloud.com is your (in this case imaginary-OpenShift) Jenkins URL.
  6. Make sure you've included that trailing slash, and then you're done! Push some code to test
One of the nicest features of this Webhook-powered way of triggering is that you can actually view the details of each request and the response that came back from your Jenkins. This was completely opaque when using the Services integration that was until-recently the best option.
Hat-Tips to the following (but sadly outdated) bloggers

Friday, 4 March 2016

Unbreaking the Heroku Jenkins Plugin

TL;DR: If you need a Heroku Jenkins Plugin that doesn't barf when you Set Properties, here you go.

CI Indistinguishable From Magic

I'm extremely happy with my OpenShift-based Jenkins CI setup that deploys to Heroku. It really does do the business, and the price simply cannot be beaten.

Know Thy Release

Too many times, at too many workplaces, I have faced the problem of trying to determine Is this the latest code? from "the front end". Determined not to have this problem in my own apps, I've been employing a couple of tricks for a few years now that give excellent traceability.

Firstly, I use the nifty sbt-buildinfo plugin that allows build-time values to be injected into source code. A perfect match for Jenkins builds, it creates a Scala object that can then be accessed as if it contained hard-coded values. Here's what I put in my build.sbt:

buildInfoSettings

sourceGenerators in Compile <+= buildInfo

buildInfoKeys := Seq[BuildInfoKey](name, version, scalaVersion, sbtVersion)

// Injected via Jenkins - these props are set at build time: 
buildInfoKeys ++= Seq[BuildInfoKey](
  "extraInfo" -> scala.util.Properties.envOrElse("EXTRA_INFO", "N/A"),
  "builtBy"   -> scala.util.Properties.envOrElse("NODE_NAME", "N/A"),
  "builtAt"   -> new java.util.Date().toString)

buildInfoPackage := "com.themillhousegroup.myproject.utils"
The Jenkins Wiki has a really useful list of available properties which you can plunder to your heart's content. It's definitely well worth creating a health or build-info page that exposes these.

Adding Value with the Heroku Jenkins Plugin

Although Heroku works spectacularly well with a simple git push, the Heroku Jenkins Plugin adds a couple of extra tricks that are very worthwhile, such as being able to place your app into/out-of "maintenance mode" - but the most pertinent here is the Heroku: Set Configuration build step. Adding this step to your build allows you to set any number of environment variables in the Heroku App that you are about to push to. You can imagine how useful this is when combined with the sbt-buildinfo plugin described above!

Here's what it looks like for one of my projects, where the built Play project is pushed to a test environment on Heroku:

Notice how I set HEROKU_ENV, which I then use in my app to determine whether key features (for example, Google Analytics) are enabled or not.

Here are a couple of helper classes that I've used repeatedly (ooh! time for a new library!) in my Heroku projects for this purpose:

import scala.util.Properties

object EnvNames {
  val DEV   = "dev"
  val TEST  = "test"
  val PROD  = "prod"
  val STAGE = "stage"
}

object HerokuApp {
  lazy val herokuEnv = Properties.envOrElse("HEROKU_ENV", EnvNames.DEV)
  lazy val isProd = (EnvNames.PROD == herokuEnv)
  lazy val isStage = (EnvNames.STAGE == herokuEnv)
  lazy val isDev = (EnvNames.DEV == herokuEnv)
 
  def ifProd[T](prod:T):Option[T] = if (isProd) Some(prod) else None

  def ifProdElse[T](prod:T, nonProd:T):T = {
    if (isProd) prod else nonProd
  }
}

... And then it all went pear-shaped

I had quite a number of Play 2.x apps using this Jenkins+Heroku+BuildInfo arrangement to great success. But then at some point (around September 2015 as far as I can tell) the Heroku Jenkins Plugin started throwing an exception while trying to Set Configuration. For the benefit of any desperate Google-trawlers, it looks like this:

  at com.heroku.api.parser.Json.parse(Json.java:73)
  at com.heroku.api.request.releases.ListReleases.getResponse(ListReleases.java:63)
  at com.heroku.api.request.releases.ListReleases.getResponse(ListReleases.java:22)
  at com.heroku.api.connection.JerseyClientAsyncConnection$1.handleResponse(JerseyClientAsyncConnection.java:79)
  at com.heroku.api.connection.JerseyClientAsyncConnection$1.get(JerseyClientAsyncConnection.java:71)
  at com.heroku.api.connection.JerseyClientAsyncConnection.execute(JerseyClientAsyncConnection.java:87)
  at com.heroku.api.HerokuAPI.listReleases(HerokuAPI.java:296)
  at com.heroku.ConfigAdd.perform(ConfigAdd.java:55)
  at com.heroku.AbstractHerokuBuildStep.perform(AbstractHerokuBuildStep.java:114)
  at com.heroku.ConfigAdd.perform(ConfigAdd.java:22)
  at hudson.tasks.BuildStepMonitor$1.perform(BuildStepMonitor.java:20)
  at hudson.model.AbstractBuild$AbstractBuildExecution.perform(AbstractBuild.java:761)
  at hudson.model.Build$BuildExecution.build(Build.java:203)
  at hudson.model.Build$BuildExecution.doRun(Build.java:160)
  at hudson.model.AbstractBuild$AbstractBuildExecution.run(AbstractBuild.java:536)
  at hudson.model.Run.execute(Run.java:1741)
  at hudson.model.FreeStyleBuild.run(FreeStyleBuild.java:43)
  at hudson.model.ResourceController.execute(ResourceController.java:98)
  at hudson.model.Executor.run(Executor.java:374)
Caused by: com.heroku.api.exception.ParseException: Unable to parse data.
  at com.heroku.api.parser.JerseyClientJsonParser.parse(JerseyClientJsonParser.java:24)
  at com.heroku.api.parser.Json.parse(Json.java:70)
  ... 18 more 
Caused by: org.codehaus.jackson.map.JsonMappingException: Can not deserialize instance of java.lang.String out of START_OBJECT token
 at [Source: [B@176e40b; line: 1, column: 473] (through reference chain: com.heroku.api.Release["pstable"])
  at org.codehaus.jackson.map.JsonMappingException.from(JsonMappingException.java:160)
  at org.codehaus.jackson.map.deser.StdDeserializationContext.mappingException(StdDeserializationContext.java:198)
  at org.codehaus.jackson.map.deser.StdDeserializer$StringDeserializer.deserialize(StdDeserializer.java:656)
  at org.codehaus.jackson.map.deser.StdDeserializer$StringDeserializer.deserialize(StdDeserializer.java:625)
  at org.codehaus.jackson.map.deser.MapDeserializer._readAndBind(MapDeserializer.java:235)
  at org.codehaus.jackson.map.deser.MapDeserializer.deserialize(MapDeserializer.java:165)
  at org.codehaus.jackson.map.deser.MapDeserializer.deserialize(MapDeserializer.java:25)
  at org.codehaus.jackson.map.deser.SettableBeanProperty.deserialize(SettableBeanProperty.java:230)
  at org.codehaus.jackson.map.deser.SettableBeanProperty$MethodProperty.deserializeAndSet(SettableBeanProperty.java:334)
  at org.codehaus.jackson.map.deser.BeanDeserializer.deserializeFromObject(BeanDeserializer.java:495)
  at org.codehaus.jackson.map.deser.BeanDeserializer.deserialize(BeanDeserializer.java:351)
  at org.codehaus.jackson.map.deser.CollectionDeserializer.deserialize(CollectionDeserializer.java:116)
  at org.codehaus.jackson.map.deser.CollectionDeserializer.deserialize(CollectionDeserializer.java:93)
  at org.codehaus.jackson.map.deser.CollectionDeserializer.deserialize(CollectionDeserializer.java:25)
  at org.codehaus.jackson.map.ObjectMapper._readMapAndClose(ObjectMapper.java:2131)
  at org.codehaus.jackson.map.ObjectMapper.readValue(ObjectMapper.java:1481)
  at com.heroku.api.parser.JerseyClientJsonParser.parse(JerseyClientJsonParser.java:22)
  ... 19 more 
Build step 'Heroku: Set Configuration' marked build as failure
Effectively, it looks like Heroku has changed the structure of their pstable object, and that the baked-into-a-JAR definition of it (Map<String, String> in Java) will no longer work.

Open-Source to the rescue

Although the Java APIs for Heroku have been untouched since 2012, and indeed the Jenkins Plugin itself was announced deprecated (without a suggested replacement) only a week ago, fortunately the whole shebang is open-source on Github so I took it upon myself to download the code and fix this thing. A lot of swearing, further downloading of increasingly-obscure Heroku libraries and general hacking later, and not only is the bug fixed:
- Map<String, String> pstable;
+ Map<String, Object> pstable;
But there are new tests to prove it, and a new Heroku Jenkins Plugin available here now. Grab this binary, and go to Manage Jenkins -> Manage Plugins -> Advanced -> Upload Plugin and drop it in. Reboot Jenkins, and you're all set.

Friday, 16 October 2015

Cloudy Continuous Integration: BitBucket-to-Jenkins-to-Heroku[-to-Heroku] - Part 1

I can't quite believe it but it's actually almost a year since I moved away from an entirely-Cloudbees-based build-and-deploy chain to a far more higgledy-piggledy, yet much more satisfactory, best-of-breed chain.

In that time this setup has built a helluva lot of software, both open-source libraries and closed-source moonlighting apps, and I've learnt a helluva lot too. Time to share.

John's Continuous Integration Rules

No Polling

The pipeline/flow should kick off the instant something is pushed to master. Waiting 59 seconds because we just missed the poll is wasteful. If we're using a modern source-control system, there is absolutely no reason to be periodically polling it for changes. It's the 21st century, last century's batch processing techniques aren't useful here.

Clean, Tagged Builds

The build must begin with a clean to ensure repeatability. Each and every successful build should be appropriately tagged so that the correlation between git commit ID and Jenkins build number is evident.

Versioning Includes Build Configuration

Things go wrong. Jenkins configurations get accidentally broken. It should be just as easy to roll back a misconfigured job as it is to roll back a bad code change.

If It Passes The Tests, It's In test

Yes the test environment will be volatile, but as long as the tests are good, it should be good-volatile; aka latest-and-greatest. This puts the onus on developers to write comprehensive, meaningful tests. The test environment should be a glittering showcase of all the awesome that is about to hit prod.

Fully-automated push-button test/staging-to-prod

No manual funny-business allowed. Repeatable, reliable, and (ideally) rollback-able from the Jenkins UI.

Desired Setup

The simplest thing that will deliver to the target environments, and abides by the above rules:

            [User] 
              |
      commits to master 
              |
              v
         [BitBucket]
              |
            pokes
              |
              v
  [Secured Jenkins Instance] 
              |
          commits to 
              |
              v
       [Heroku TEST/STAGING Env]
  
        (manual trigger)
              |
              v
       [Heroku PROD Env]       

How To Make It Happen

Sound good? Stand by for Part 2 where all is revealed...

Thursday, 27 August 2015

SSH Tunnels: The corporate developer's WD40 + Gaffer Tape


So at my current site the dreaded Authenticating Proxy policy has been instigated - one of those classic corporate network-management patterns that may make sense for the 90% of users with their locked-down Windows/Active Directory/whatever setups, but makes life a miserable hell for those of us playing outside on our Ubuntu boxes.

In a nice display of classic software-developer passive-aggression we've been keeping track of the hours lost due to this change - we're up to 10 person-days since the policy came in 2 months ago. Ouch.

Mainly the problems are due to bits of open-source software that simply haven't had to deal with such proxies - these generally cause things like Jenkins build boxes and other "headless" (or at least "human-less") devices to have horrendous problems.

I got super-tied-up today trying to get one of these build boxes to install something via good-old apt-get in Ubuntu. In the end I used one of my old favourite tricks, the SSH Tunnel backchannel to use the proxy that my dev box has authenticated with, to get the job done.

Here's how it goes:
Preconditions:
  • dev-box is my machine, which is happily using the authenticated proxy via some other mechanism (e.g. kinit)
  • build-box is a build slave that is unable to use apt-get due to proxy issues (e.g. 407 Proxy Authentication Required)
  • proxy-box is the authenticating proxy, listening on port 8080


 proxy-box            dev-box            build-box
    ---                 ---                ---
    | |                 | |                | |
    | |                _____               | |
    | 8080    < < <    _____    < < <   7777 |
    | |                 | |                | |
    | |                 | |                | |
    ---                 ---                ---


From dev-box
ssh build-box -R7777:proxy-box:8080

Welcome to build-box
> sudo vim /etc/apt/apt.conf
.. and create/modify apt.conf as follows:
Acquire::http::proxy "http://localhost:7777/";
At which point, apt-get should start working, via your own machine (and your proxy credentials). Once you're done, you may want to revert your change to apt.conf, or you could leave it there, with an explanatory comment of how and why it has been set up like this (or just link to this post!)

Saturday, 1 November 2014

Walking away from Run@Cloud Part 3: Pause and Reflect

As a happy free-tier CloudBees user, my "build ecosystem" looked like this:


As CloudBees seem to have gone "Enterprise" in the worst possible way (from my perspective) and don't have any free offerings any more, I was now looking for:
  • Git repository hosting (for private repos - my open-source stuff is on GitHub)
  • A private Nexus instance to hold closed-source library artifacts
  • A public Nexus instance to hold open-source artifacts for public consumption
  • A "cloud" Jenkins instance to build both public- and private-repo-code when it changes;
    • pushing private webapps to Heroku
    • publishing private libs to the private Nexus
    • pushing open-source libs to the public Nexus
... and all for as close to $0 as possible. Whew!

I did a load of Googling, and the result of this is an ecosystem that is far more "diverse" (a charitable way to say "dog's breakfast") but still satisfies all of the above criteria, and it's all free. More detail in blog posts to come, but here's what I've come up with:

Wednesday, 8 October 2014

Walking away from Run@Cloud. Part 1: Finding A Worthy Successor

In very disappointing news, last month CloudBees announced that they would be discontinuing their Run@Cloud service, a facility I have been happily using for a number of years.

I was using a number of CloudBees services, namely:
  • Dev@Cloud Repos - Git repositories
  • Dev@Cloud Builds - Jenkins in the cloud
  • Run@Cloud Apps - PaaS for hosted Java/Scala apps
  • Run@Cloud Database Service - for some MySQL instances
  • MongoHQ/Compose.io ecosystem service - MongoDB in the cloud

In short, a fair bit of stuff:
... the best bit being of course, that it was all free. So now I'm hunting for a new place for most, if not all, of this stuff to live, and run, for $0.00 or as close to it as conceivably possible. And before you mention it, I've done the build-it-yourself, host-it-yourself thing enough times to know that I do not ever want to do it again. It's most definitely not free for a start.

After a rather disappointing and fruitless tour around the block, it seemed there was only one solution that encompassed what I consider to be a true "run in the cloud" offering, for JVM-based apps, at zero cost. Heroku.