


It may surprise you to know that yes, I am back working on Frenzy.js after a multi-year hiatus. It's a bit surreal working on an "old-skool" (pre-hooks) React app but the end is actually in sight. As of September 2023 I have (by my reckoning) about 80% of the game done;
The big-ticket items I still need to complete are:
To remind you (if you were an 80s Acorn kid) or (far more likely) educate you on what I mean by "flood-fill", here's Frenzy doing its thing in an emulator; I've just completed drawing the long vertical line, and now the game is flood-filling the smaller area:
I wanted to replicate this distinctive style of flood-fill exactly in my browser-based version, and it's been quite the labour of love. My first attempt (that actually worked there were many iterations that did not) was so comically slow that I almost gave up on the whole idea. Then I took a concrete pill and decided that if I couldn't get a multiple-GHz multi-cored MONSTER of a machine to replicate a single-cored 2MHz (optimistically) 8-bit grot-box from the early 1980s, I may as well just give up...
The basic concept for this is:
Given a polygonal area A that needs to be flood-filled;

Determine bottom-rightmost inner point P within A.
The "frontier pixels" is now the array [P]
On each game update "tick":
  Expand each of the "frontier pixels" to the N,S,E and W; but
    Discard an expansion if it hits a boundary of A
    Also discard it if the pixel has already been filled
  The new "frontier pixels" is all the undiscarded pixels
Stop when the "frontier pixels" array is empty
I got this to be pretty efficient using a bit-field "sparse array" to quickly check for already-filled pixels. In the browser, I could perform the per-tick operations in less than 0.1 milliseconds for any size of A. Not too surprising given the entire game area is only 240x180 pixels, and the maximum possible polygonal area could only ever be half that big: 21,600 pixels.
The problem now became efficiently shifting the big pile'o'filled-pixels from the algorithm onto the HTML5 canvas that is the main gameplay area. I'm using the excellent React Konva library as a nice abstraction over the canvas, but the principal problem is that a canvas doesn't expose per-pixel operations in its API, and nor does Konva. The Konva team has done an admirable job making their code as performant as possible, but my first cut (instantiating a pile of tiny 1x1 Rects on each tick) simply couldn't cope once the number of pixels got significant:
This has led me down a quite-interesting rabbit-hole at the intersection of HTML5 Canvas, React, React-Konva, and general "performance" stuff which is familiar-yet-different. There's an interesting benchmark set up for this, and the results are all over the shop depending on browser and platform. Mobile results are predictably terrible but I'm deliberately not targeting them. This was a game for a "desktop" (before we called them that) and it needs keyboard input. I contemplated some kind of gestural control but it's just not good enough I think, so I'd rather omit it.
What I need to do, is find a way to automagically go from a big dumb pile of individual filled pixels into a suitable collection of optimally-shaped polygons, implemented as Konva Lines.
In code, what I first naïvely had was:
type Point = [number, number]

// get the latest flood fill result as array of points
const filledPixels:Array<Point> = toPointArray(sparseMap);

// Simplified a little - we use some extra options
// on Rect for performance...
return filledPixels.map((fp) =>
  <Rect x={fp[0]}
        y={fp[1]}
        width={1}
        height={1}
        lineCap="square"
        fillColor="red"
  />
);
With the above code, the worst-case render time while filling the worst-case shape (a box 120x180px) was 123ms. Unacceptable.
What I want is:
// Konva just wants a flat list of x1,y1,x2,y2,x3,y3
type Poly = Array<number>;

// get the latest flood fill result as array of polys
const polys:Array<number> = toOptimalPolyArray(sparseMap);

// far-fewer, much-larger polygons
return polys.map((poly) =>
  <Line points={poly}
        lineCap="square"
        fillColor="red"
        closed
  />
);
So how the hell do I write toOptimalPolyArray()?
My Googling for "pixel-to-polygon" and "pixel vectorisation" failed me, so I just went from first principles and tried a Run-Length-Encoding on each line of the area to be filled. As a first cut, this should dramatically reduce the number of Konva objects required. Here's the worst-case render time while filling the worst-case shape (a box 120x180px): 4.4ms
I'd consider this to be a kind of half-vectorisation. Each row of the area is optimally vectorised into a line with a start and end point. The next step would be to iterate over the lines, and simply merge lines that are "stacked" directly on top of each other. Given the nature of the shapes being filled is typically highly rectilinear, this felt like it would "win" quite often. Worst-case render time now became: 1.9ms
I felt there was still one more optimisation possible, and that is to exploit the fact that the game always picks the bottom-right-hand corner in which to start filling. Thus there is a very heavy bias towards the fill at any instant looking something like this:
----------------
|              |
|              |
|             P|
|            LL|
|           LLL|
|          LLLL|
|         LLLLL|
|        LLLLLL|
|       LLLLLLL|
|      LLLLLLLL|
|     LLLLLLLLL|
|    LLLLLLLLLL|
|   LLLLLLLLLLL|
|  LLLLLLLLLLLL|
| LLLLLLLLLLLLL|
|SSSSSSSSSSSSSS|
|SSSSSSSSSSSSSS|
|SSSSSSSSSSSSSS|
----------------
where
In the previous part of this series about implementing a "dispatchable" for solar-efficient charging of (AA and AAA) batteries, I'd worked out that with a combination of the Google Assistant's Energy Storage trait (made visible through the openHAB Google Assistant Charger integration) and a small amount of local state, it looked like in theory, I could achieve my aim of a voice-commanded (and -queryable) system that would allow efficient charging for a precise amount of time. Let's now see if we can turn theory into practice.
First step is to copy all the configuration from the openHAB Charger device type into an items file:
Group  chargerGroup
{ ga="Charger" [ isRechargeable=true, unit="SECONDS" ] }

Switch chargingItem         (chargerGroup)
{ ga="chargerCharging" }

Switch pluggedInItem        (chargerGroup)
{ ga="chargerPluggedIn" }

Number capacityRemainItem   (chargerGroup)
{ ga="chargerCapacityRemaining" }

Number capacityFullItem     (chargerGroup)
{ ga="chargerCapacityUntilFull" }
You'll note the only alterations I made was to change the unit to SECONDS as that's the best fit for our timing system, and a couple of renames for clarity. Here's what they're all representing:
If we look at the openHAB UI at this point we'll just have a pile of NULL values for all these items:

rule "Make charging flag true if wanted and in power surplus"
when
  Item currentPowerUsage changed
then
  if (pluggedInItem.state == ON) {
    if (currentPowerUsage.state > 0|W) {
      logInfo("dispatchable", "[CPU] Non-zero power usage");
      chargingItem.postUpdate(OFF);
    } else {
      logInfo("dispatchable", "[CPU] Zero power usage");
      chargingItem.postUpdate(ON);
    }
  }
end
This one looks pretty similar to the old naïve rule we had way back in version 1.0.0, and it pretty-much is. We've just wrapped it with the "intent" check (pluggedInItem) to make sure we actually need to do something, and offloaded the hardware control elsewhere. Which brings us to...
rule "Charge control toggled - drive hardware"
when
  Item chargingItem changed to ON or
  Item chargingItem changed to OFF
then
  logInfo("dispatchable", "[HW] Charger: " + chargingItem.state);
  SP2_Power.sendCommand(chargingItem.state.toString());
end
The simplest rule of all, it's a little redundant but it does prevent hardware control "commands" getting mixed up with software state "updates".
rule "Charge intent toggled (pluggedIn)"
when
  Item pluggedInItem changed
then
  if (pluggedInItem.state == ON) {
    // Human has requested charging
    logInfo("dispatchable", "[PIN] charge desired for: ");
    logInfo("dispatchable", capacityFullSecondsItem.state + "s");
    capacityRemainSecondsItem.postUpdate(0);
    // If possible, begin charging immediately:
    if (currentPowerUsage.state > 0|W) {
      logInfo("dispatchable", "[PIN] Awaiting power-neutrality");
    } else {
      logInfo("dispatchable", "[PIN] Beginning charging NOW");
      chargingItem.postUpdate(ON);
    }
  } else {
    logInfo("dispatchable", "[PIN] Cancelling charging");
    // Clear out all state
    capacityFullSecondsItem.postUpdate(0);
    capacityRemainSecondsItem.postUpdate(0);
    chargingItem.postUpdate(OFF);
  }
end
This rule is where things start to get a little trickier, but it's pretty straightforward. The key thing is setting or resetting the three other variables to reflect the user's intent.
rule "Update charging timers"
when
  Time cron "0 0/1 * * * ?"
then
  if (pluggedInItem.state == ON) {
    // Charging has been requested
    if (chargingItem.state == ON) {
      // We're currently charging
      var secLeft = capacityFullSecondsItem.state as Number - 60;
      capacityFullSecondsItem.postUpdate(secLeft);
      logInfo("dispatchable", "[CRON] " + secLeft + "s left");

      var inc = capacityRemainSecondsItem.state as Number + 60;
      capacityRemainSecondsItem.postUpdate(inc);

      // Check for end-charging condition:
      if (secLeft <= 0) {
        // Same as if user hit cancel:
        logInfo("dispatchable", "[CRON] Reached target.");
        pluggedInItem.postUpdate(OFF);
      }
    }
  }
end
This last rule runs once a minute, but only does anything if the user asked for charging AND we're doing so. If that's the case, we decrement the time left" by 60 seconds, and conversely increase the "how long have they been charging for" by 60 seconds. Yes, I know this might not be strictly accurate but it's good enough for my needs.This has ended up being quite the journey, and we haven't even got the Google integration going yet! The last thing for this installment is to knock up a quick control/status UI so that we can see that it actually works correctly. Here's what I've got in my openHAB "Overview" page:

[PIN] charge desired for: 420 seconds
[PIN] Beginning charging immediately
[HW] Charger: ON
[CRON] 360s left
...
[CRON] 120s left
[CRON] 60s left
[CRON] 0s left
[CRON] Reached desired charge. Stopping
[PIN] Cancelling charging
[HW] Charger: OFF
As usual with software, Dispatchables v1.0.0 wasn't ideal. In fact, it didn't really capture the "Dispatchable" idea at all. What if I don't have any batteries that need charging? Wouldn't it be better to only enable the charger if there was actually charging work to be done? And for how long? We need a way to specify intent.
Here's what I'd like to be able to tell the charging system:
To me, that looks like a perfect job for a voice-powered Google Assistant integration. Let's go!
First, let's equip our Broadlink smart power socket item with the required ga attribute so we can control it via the openHAB Google Assistant Action.
Switch SP2_Power "Battery Charger Power" {
  channel="broadlink:sp2:34-ea-34-84-86-d1:powerOn",
  ga="Switch"
}
If I go through the setup steps in the Google Assistant app on my phone, I can now see "Battery Charger Power" as a controllable device. And sure enough, I can say "Hey Google, turn on the battery charger" and it all works. Great!
Now, we need to add something to record the intent to perform battery-charging when solar conditions allow, and something else that will track the number of minutes the charger has been on for, since the request was made. Note that this may well be over multiple distinct periods, for example if I ask for 6 hours of charging but there's only one hour of quality daylight left in the day, I would expect the "dispatch" to be resumed the next day once conditions were favourable again. Once we've hit the desired amount of charging, the charger should be shut off and the "intent" marker reset to OFF. Hmmm... 🤔
Well, my first optimisation on the way to solving this is to streamline the state. I absolutely do not need to hold multiple distinct but highly-related bits of information:
We can actually do it all with one variable, the Dead Timer "pattern" (if you can call it such a thing) I learnt from an embedded developer (in C) almost 20 years ago:
  unsigned int warning_led_timer = 0;

  /* Inside main loop, being executed once per second */

  while (warning_led_timer > 0) {
    warning_led_timer--;

    /* Enable the LED, or turn it off if no longer needed */
    enable_led(WARNING_LED, warning_led_timer > 0);
  }

  /* ...
  * Somewhere else in the code that needs to show
  * the warning LED for 3 seconds
  */
  warning_led_timer = 3;
It encapsulates:
What I'd like to be able to do is have this conversation with the Google Assistant:
Hey Google, charge the batteries for five hours
"Okay, I'll charge the batteries for five hours"
... with all the underlying "dispatchable" stuff I've talked about being done transparently. And for bonus points:
Hey Google, how much charge time remaining?
"There are three hours and 14 minutes remaining"
So as it turns out, the Google Assistant has an Energy Storage trait which should allow the above voice commands (or similar) to work, as it can be mapped into the openHAB Charger Device Type. It's all starting to come together - I don't have a "smart charger" (i.e. for an electric vehicle) but I think I can simulate having one using my "dead timer"!
I read a while back about the concept of "dispatchable" energy sources - namely, ones that can be brought on- or off-stream at virtually no notice, at a desired output level. As an enthusiastic solar-power owner/operator, the idea of tuning my energy consumption to also be dispatchable, suited to the output of my rooftop solar cells, makes a lot of sense.
My first tiny exploration into this field will use OpenHAB to automate "dispatch" of a non-time-critical task: recharging some batteries, to a time that makes best use of the "free" solar energy coming from my roof.
Just to be clear, I'm referring to charging domestic AA and AAA batteries here; I'm not trying to run a PowerWall!
To get the necessary insight into whether my house is running "in surplus" power, I'm using my PowerPal PRO which offers a simple RESTful API. If you send off a GET with suitable credentials to
https://readings.powerpal.net/api/v1/device/{{SERIAL_NUMBER}}
you get something like:
{
    "serial_number": "000abcde",
    "total_meter_reading_count": 443693,
    "pruned_meter_reading_count": 0,
    "total_watt_hours": 4246285,
    "total_cost": 1380.9539,
    "first_reading_timestamp": 1627948800,
    "last_reading_timestamp": 1659495300,
    "last_reading_watt_hours": 0,
    "last_reading_cost": 0.00062791666,
    "available_days": 364,
    "first_archived_date": "2021-04-13",
    "last_archived_date": "2022-08-02"
}
It's pretty straightforward to translate that into an openHAB Thing definition using the HTTP Binding that will get us the current watt-hours reading every 60 seconds (which is how often the device phones home)
Thing http:url:powerpal "PowerPal" [
  baseURL="https://readings.powerpal.net",
  headers="Authorization=MyPowerPalAPIKey",
    "Accept=application/json",
  timeout=2000,
  bufferSize=1024,
  refresh=60] {
    Channels:
      Type number : powerUsage "Newest Power Usage"
      [ stateExtension="/api/v1/device/000abcde",
      stateTransformation="JSONPATH:$.last_reading_watt_hours",
      mode="READONLY" ]
}
You can get MyPowerPalAPIKey as used above, by opening the PowerPal mobile app and going to Guidance -> Generate an API Key.
Number:Power currentPowerUsage "Current Power Usage [%d W]"
  {channel="http:url:powerpal:powerUsage"}
... and if you're me, nothing will happen, and you will curse openHAB and its constant changes. Make sure you've actually got the HTTP Binding installed or it'll all just silently fail. I wasn't able to see the list of Official Bindings because of some weird internal issue. So I had to do a full sudo apt-get update && sudo apt-get upgrade openhab before I could get it.
Then, fun times ensued because the PowerPal API uses a slightly-strange way of providing authentication, which didn't fit very well with how the HTTP binding wants to do it. I had to go spelunking through the binding's source code to figure out how to specify the Authorization header myself.
Now we can finally get to the "home automation bus" bit of openHAB ... we define a rule that's watching for power usage changes, and triggers my Broadlink SP2 smart power switch on or off depending on whether we're net-zero.
rule "Charge batteries if in power surplus"
when
  Item housePowerUsage changed
then
  logInfo("dispatchable", "Power: " + housePowerUsage.state);

  if (SP2_Power.state === ON && housePowerUsage.state > 0|W) {
    logInfo("dispatchable", "Charger -> OFF");
    SP2_Power.sendCommand(OFF);
  }
  if (SP2_Power.state === OFF && housePowerUsage.state == 0|W) {
    logInfo("dispatchable", "Charger -> ON");
    SP2_Power.sendCommand(ON);
  }
end
And we're all done!
What's that weird |W stuff? that's an inline conversion to a Number:Power object, so that comparisons can be performed - a necessary, if slightly awkward aspect of openHAB's relatively-new "Units Of Measurement" feature.
What does it look like? Here's the logs from just after 9am:
09:06:37 [dispatchable] - Power: 3 W
09:07:37 [dispatchable] - Power: 2 W
09:08:37 [dispatchable] - Power: 3 W
09:09:37 [dispatchable] - Power: 2 W
09:12:37 [dispatchable] - Power: 3 W
09:13:37 [dispatchable] - Power: 2 W
09:16:37 [dispatchable] - Power: 1 W
09:18:37 [dispatchable] - Power: 0 W
09:18:37 [dispatchable] - Charger -> ON
So the query to PowerPal is obviously running on the 37th second of each minute. There are "missing" entries because we're only logging anything when the power figure has changed. You can see the panels gradually creating more power as the sun's incident angle/power improves, until finally at 9:18, we hit power neutrality and the charger is turned on. Not bad.
Working with hardware is fun; working with LEGO hardware is awesome. So before proceeding with the next part of my heating vent automation series, I took the opportunity to refine my vent manipulator, with the following aims:
As a reminder, here's the first hardware revision featuring a LEGO Technic XL motor and an extremely over-engineered - and tall - chassis.

Here's the respun version, which works as well as, if not better than, the original.

The changes:
Now we're in a really good position to get down-and-dirty with some firmware...
In the first part of this series I outlined what I'm trying to build - a smart vent on the cheap - so now it's time to build it! Here's what I'm working with - these are "period-style heating registers" as available from my local warehouse-style hardware store. A decorative "vintage" metal plate (scratched to hell) holds a rectangular plastic frame with two pivoting slats sitting in the airflow. A simple plastic slider protrudes through a slot in the metal plate for user control of slat angle.

In the grand tradition of absolutely-ridiculous first hardware versions (check out Mouse v1.0!), I've built this proof-of-concept out of LEGO Technic. In an excellent coincidence, the width of the vent is a perfect fit for the crab-claw-like clamping mechanism I've created, which is fortunate because it requires quite a decent bit of force to move the slider. This gizmo is heavily overbuilt using my best "LEGO Masters" techniques and doesn't flex, warp or bend one bit once it's in position. I'm using an "XL" LEGO Power Functions motor with a worm drive PLUS some extra gear reduction to make sure that:

Here it is all mounted up. It sits up about 5cm above the normal vent height, which is obviously less than ideal, but should be fine as the whole assembly sits under a sofa-bed which has copious amounts of space underneath it. The dual pinions (to spread the torque and keep everything level) drive the rack left or right, and the slider is "captured" between the red elements and opens or shuts the slats.

The remainder of the hardware is pretty simple - a butchered LEGO Power Functions cable connects the motor to a standard L293D H-bridge, and thence to the "embedded computer" part of the solution, which I'll talk about next...
It's winter here in Melbourne, and it's a cold one. Combined with the fact that everyone is spending a lot more time at home than before, it's time to start optimising for comfort and efficiency...
I've shared my house's floorplan before on this blog, but this time here it is overlaid with the "schema" of the gas central-heating system, which sends hot air through underfloor ducts into the house through eight vents (or "registers" if you prefer) - shown as red squares:
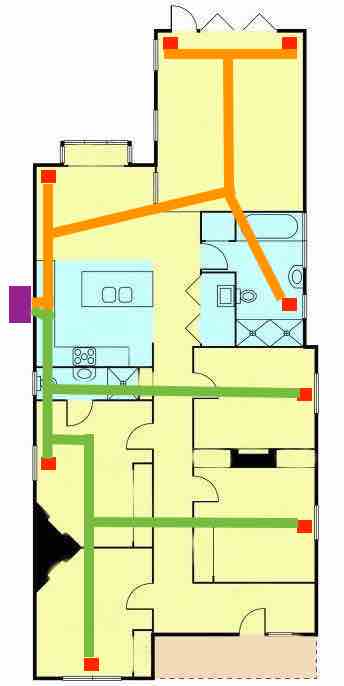
Now some houses *might* have "zones" implemented, where certain areas of the house are on a physically separated section of ducting and can be addressed and controlled individually. This house is not one of those. I've shown the two *notional* zones we'd probably *like* to have in orange (living spaces) and green (sleeping areas). If you're wondering, we've been advised that for technical reasons related to our heating unit (aka furnace) and available space under the house, a zoned system is not practicable. In any case, it would probably be a bit coarse-grained anyway, as these days I'm working pretty-much 5-days-a-week at home, from the study - the room at the bottom-left of the floorplan.
As such, I would like to be able to control the specific vent in my study, opening and closing it as needed so that it's warm to work in, particularly in the mornings, but also not wasting warm air that is better off being routed to elsewhere in the house in the evenings and on weekends. Also, if the temperature in the study is warm enough, I'd like the vent to shut itself off. It sounds like the height of laziness, but it happens that this vent is located underneath a large couch, so it's actually a major pain to adjust it by hand.
Off-the-shelf "smart vent" solutions have been available for a number of years, from Flair and Keen but they are Not Cheap, don't have any openHAB binding support, don't have stock available and/or don't ship to me in Australia. So it's a roll-your-own situation...