 As a side-effect of picking the "good bits" out of the many LEGO sets I've been gifted or bought, I've ended up with quite a number (over 11,000 at last count) less desirable (to me) LEGO pieces, and so those are in my "for sale" collection, available for perusal at both the major online LEGO marketplaces, [BrickLink](https://store.bricklink.com/trainfan#/shop) and [BrickOwl](https://trainfan.brickowl.com/). Which brings me to the first bit of home-cooked software.
### BrickSync
[BrickSync](http://www.bricksync.net/) does just what you'd expect inventory-management software to do in this instance; it keeps my inventory list in sync between the two marketplaces. Given that there are currently around 18,000 stores in BrickLink and 2,500 in BrickOwl (it's much younger, you can clearly see it in the UI), you would think that there would be, **at most** a worldwide market of 2,500 customers for this application. And yet here, completely free (although a donation is of course welcomed) is an open-source product that works extremely well, **just for us**.
It's a little rough around the edges, works in a weird *kinda-CLI, kinda-DOS-app* way and unfortunately *requires* to be run on an x86 platform (so no Raspberry Pi, but luckily I have an Intel NUC that fits the bill) but it deserves a shout-out for getting the job done. Something I've just added to my todo list is to download the [source](https://github.com/ZZJHONS/Bricksync) and make it much more like a traditional Unix CLI program, so that I can schedule synchronization runs with `cron` instead of having to leave a terminal window open while SSHed into my NUC.
### Brickognize
Closely-related to the first item. Historically, one of the most painful tasks when weeding out parts from my personal collection into my online for-sale inventory, has been **classification**. BrickLink has been around for a *very* long time, and being the only LEGO marketplace has led to certain naming conventions chosen by the original developer having "stuck". For example, *Light Bluish Gray* is *the* term used in the community, despite being completely different to the official LEGO colour name: *Medium Stone Gray*. Similarly, Bricklink groups similar parts into "categories" in ways that are sometimes difficult to follow. This made finding the right colour, category and part number for the given lump of ABS sitting in front of you quite the challenge. Until now.
[Brickognize](https://brickognize.com/) lets you take a picture (e.g. with your phone) of a LEGO part and will give you the most likely parts (including their BrickLink part number) that it corresponds to. There's obviously a very well-trained AI/LLM under there because in my experience (and I've used it probably a hundred times by now) it gets the part exactly right 98% of the time, and if it's not right, it's *very very* close.
And again, it's free. It even generously shares an [API](https://api.brickognize.com/docs) so you could build it into a workflow to streamline inventory additions yet further. Awesome.
Barefoot developers, you inspire and delight me. Thankyou.
Showing posts with label lego. Show all posts
Showing posts with label lego. Show all posts
Saturday, 15 June 2024
Home-Cooked and Delicious
I've just read a wonderful article by [Maggie Appleton](https://maggieappleton.com/about) calling out what she terms ["home-cooked" software](https://maggieappleton.com/home-cooked-software) and the "barefoot" developers who work on such things.
It really made me want to crack back into publishing *scratch-my-own-itch* software; I've done a [little](https://github.com/themillhousegroup/mondrian) [of](https://github.com/themillhousegroup/scoup) [it](https://github.com/themillhousegroup/react-chromakeyed-image) in the past but a lot of it remains unfinished, either due to being "good enough" or, in probably my most public flame-out, the [Broadlink binding](https://github.com/themillhousegroup/broadlink-openhab-binding) for [openHAB](https://github.com/themillhousegroup/openhab2-addons), being ground down by a PR process (to get the binding integrated into the main codebase) that took so long that it became too onerous for me to continue with it.
I've got a few things brewing in my Github that aren't quite ready for public consumption yet, but in the meantime, almost as a counterpoint to my [post at the start of this year](https://blog.themillhousegroup.com/2024/01/my-apps-2024.html) where I shared my totally-*un*-niche list of uncontroversial, mainstream tools I use regularly, here are a couple of **super-barefoot**, totally home-cooked bits of software that excellent people have crafted, that happen to intersect with my niches of interest.
I should preface this short list with some background. As keen longtime readers might have [deduced](https://blog.themillhousegroup.com/2022/04/automating-heating-vents-with-openhab.html), I am a lover of Danish plastic. Yep, I'm an AFOL, an Adult Fan Of LEGO. I'm actually such a fan that I have *two* distinct collections; my personal stash of umpteen pieces, which is gradually being formed into a rendition of a railway running through a mythical French town in the 1980s:
As a side-effect of picking the "good bits" out of the many LEGO sets I've been gifted or bought, I've ended up with quite a number (over 11,000 at last count) less desirable (to me) LEGO pieces, and so those are in my "for sale" collection, available for perusal at both the major online LEGO marketplaces, [BrickLink](https://store.bricklink.com/trainfan#/shop) and [BrickOwl](https://trainfan.brickowl.com/). Which brings me to the first bit of home-cooked software.
### BrickSync
[BrickSync](http://www.bricksync.net/) does just what you'd expect inventory-management software to do in this instance; it keeps my inventory list in sync between the two marketplaces. Given that there are currently around 18,000 stores in BrickLink and 2,500 in BrickOwl (it's much younger, you can clearly see it in the UI), you would think that there would be, **at most** a worldwide market of 2,500 customers for this application. And yet here, completely free (although a donation is of course welcomed) is an open-source product that works extremely well, **just for us**.
It's a little rough around the edges, works in a weird *kinda-CLI, kinda-DOS-app* way and unfortunately *requires* to be run on an x86 platform (so no Raspberry Pi, but luckily I have an Intel NUC that fits the bill) but it deserves a shout-out for getting the job done. Something I've just added to my todo list is to download the [source](https://github.com/ZZJHONS/Bricksync) and make it much more like a traditional Unix CLI program, so that I can schedule synchronization runs with `cron` instead of having to leave a terminal window open while SSHed into my NUC.
### Brickognize
Closely-related to the first item. Historically, one of the most painful tasks when weeding out parts from my personal collection into my online for-sale inventory, has been **classification**. BrickLink has been around for a *very* long time, and being the only LEGO marketplace has led to certain naming conventions chosen by the original developer having "stuck". For example, *Light Bluish Gray* is *the* term used in the community, despite being completely different to the official LEGO colour name: *Medium Stone Gray*. Similarly, Bricklink groups similar parts into "categories" in ways that are sometimes difficult to follow. This made finding the right colour, category and part number for the given lump of ABS sitting in front of you quite the challenge. Until now.
[Brickognize](https://brickognize.com/) lets you take a picture (e.g. with your phone) of a LEGO part and will give you the most likely parts (including their BrickLink part number) that it corresponds to. There's obviously a very well-trained AI/LLM under there because in my experience (and I've used it probably a hundred times by now) it gets the part exactly right 98% of the time, and if it's not right, it's *very very* close.
And again, it's free. It even generously shares an [API](https://api.brickognize.com/docs) so you could build it into a workflow to streamline inventory additions yet further. Awesome.
Barefoot developers, you inspire and delight me. Thankyou.
As a side-effect of picking the "good bits" out of the many LEGO sets I've been gifted or bought, I've ended up with quite a number (over 11,000 at last count) less desirable (to me) LEGO pieces, and so those are in my "for sale" collection, available for perusal at both the major online LEGO marketplaces, [BrickLink](https://store.bricklink.com/trainfan#/shop) and [BrickOwl](https://trainfan.brickowl.com/). Which brings me to the first bit of home-cooked software.
### BrickSync
[BrickSync](http://www.bricksync.net/) does just what you'd expect inventory-management software to do in this instance; it keeps my inventory list in sync between the two marketplaces. Given that there are currently around 18,000 stores in BrickLink and 2,500 in BrickOwl (it's much younger, you can clearly see it in the UI), you would think that there would be, **at most** a worldwide market of 2,500 customers for this application. And yet here, completely free (although a donation is of course welcomed) is an open-source product that works extremely well, **just for us**.
It's a little rough around the edges, works in a weird *kinda-CLI, kinda-DOS-app* way and unfortunately *requires* to be run on an x86 platform (so no Raspberry Pi, but luckily I have an Intel NUC that fits the bill) but it deserves a shout-out for getting the job done. Something I've just added to my todo list is to download the [source](https://github.com/ZZJHONS/Bricksync) and make it much more like a traditional Unix CLI program, so that I can schedule synchronization runs with `cron` instead of having to leave a terminal window open while SSHed into my NUC.
### Brickognize
Closely-related to the first item. Historically, one of the most painful tasks when weeding out parts from my personal collection into my online for-sale inventory, has been **classification**. BrickLink has been around for a *very* long time, and being the only LEGO marketplace has led to certain naming conventions chosen by the original developer having "stuck". For example, *Light Bluish Gray* is *the* term used in the community, despite being completely different to the official LEGO colour name: *Medium Stone Gray*. Similarly, Bricklink groups similar parts into "categories" in ways that are sometimes difficult to follow. This made finding the right colour, category and part number for the given lump of ABS sitting in front of you quite the challenge. Until now.
[Brickognize](https://brickognize.com/) lets you take a picture (e.g. with your phone) of a LEGO part and will give you the most likely parts (including their BrickLink part number) that it corresponds to. There's obviously a very well-trained AI/LLM under there because in my experience (and I've used it probably a hundred times by now) it gets the part exactly right 98% of the time, and if it's not right, it's *very very* close.
And again, it's free. It even generously shares an [API](https://api.brickognize.com/docs) so you could build it into a workflow to streamline inventory additions yet further. Awesome.
Barefoot developers, you inspire and delight me. Thankyou.

Sunday, 18 December 2022
Three D's of 3D Printing in 2022
I've been somewhat fascinated with 3D printing ever since becoming aware of it a decade ago, but it was prohibitively expensive to get into it when machines were in the four-digit USD$ range and seemed likely to be limited to somewhat-unreliably producing useless tchotchkes at vastly higher cost. Things have changed. A lot.
Declining costs
Cost of entry
My new(ish) printer is the Cocoon Create Modelmaker, a respin/reskin of the Wanhao i3 Mini - which if you follow the links, you'll note is USD$199 brand new, but I got mine second-hand on eBay for AUD$100. I'm a sucker for an eBay bargain. When I picked it up, the seller (who was upgrading to a model with a larger print bed) also gave me a crash course in printing and then threw in an almost-full 300m spool of filament to get me started - another AUD$20 saved. So I'm already at the f*@k it point as far as up-front investment goes.
Cost of materials
I'm picking up 300m rolls of PLA filament from eBay for AUD$20-$24 delivered, and I'm choosing local suppliers so they typically get delivered within 3 days. I could go even cheaper if I used Chinese suppliers. The biggest thing I've printed so far was a case for my Raspberry Pi 3B+, part of a 19" rack mount setup (I'm also a sucker for anything rackmounted) - that took 21 hours and used about 95c of filament. So really, it's starting to approach "free to make" as long as you don't place too much value on your own time...
Damn Fine Software
Seven years ago, Scott Hanselman documented his early experiences with 3D printing; there was a lot of rage and frustration. Maybe I've just been lucky, maybe buying a printer that had already been used, tweaked, and enhanced (with 3d-printed upgrade parts) was a galaxy-brain genius move, but honestly, I've had very little trouble, and I'd estimate less than 50c of material has ended up in the bin. Happy with that. I think the tools have moved on supremely in that time, and awesomely, they're all FREE and most are also Open-Source.
Cura
Ultimaker Cura takes an STL file and "slices" it into something your actual hardware can print, via a G-Code file. It's analogous to the JVM taking generic Java bytecodes and translating them to x86 machine language or whatever. Anyway, it does a great job, and it's free.
OctoPrint
My first 3D printing "toolchain" consisted of me slicing in Cura on my Mac followed by saving the file to a micro SD card (via an adapter), then turning around to place the (unsheathed) micro SD card into my printer's front-panel slot, and instructing it to print. This was fine, but the "sneakernet"-like experience was annoying (I kept losing the SD adapter) and the printer made a huge racket being on a table in the middle of the room. Then I discovered OctoPrint, an open-source masterpiece that network-enables any compatible 3D printer with a USB port. I pressed my otherwise-idle 5-series Intel NUC into service and it's been flawless, allowing me to wirelessly submit jobs to the printer, which now resides in a cupboard, reducing noise and increasing temperature stability (which is good for print quality)
Tinkercad
It didn't take long for me to want a little more than what Thingiverse et al could provide. Thingiverse's "Remix" culture is just awesome - a hardware equivalent to open-sourced software - but my experience of CAD was limited to a semester in university bashing up against Autodesk's AutoCAD, so I figured it would just be too hard for a hobbyist like me to create new things. Then I discovered Tinkercad, a free web application by, of all companies, Autodesk! This app features one of the best tutorial introductions I've ever seen; truly, I could get my 10-year old daughter productive in this software thanks to that tutorial. And the whole thing being on the web makes it portable and flexible. Massive kudos to Autodesk for this one.
Do It
The useless tchotchke era is over; I've been using my printer to replace lost board game tokens, organise cables, rackmount loose devices, and create LEGO parts that don't exist yet. As far as I'm concerned it's virtually paid for itself already, and I'm still getting better as a designer and operator of the machine. If you've been waiting for the right time to pounce, I strongly recommend picking up a used 3D printer and giving it a whirl.
Sunday, 29 May 2022
Automating heating vents with openHAB, esp8266 and LEGO - Part 3; Firmware intro
Continuing to work up the stack from my LEGO physical vent manipulator(V1), (V2), I decided to do something new for the embedded control software part of this solution and employ an Expressif ESP8266-based chipset and an accompanying L293D H-bridge daughterboard, primarily because they are just ridiculously cheap.
It took a little bit of finessing to find out exactly what to search eBay for (try ESP-12E + L293D) but listings like this, for AUD$12.55 including postage are simply incredible value. That's an 80MHz processor, motor driver board, USB cable and motor cable, all for less than I probably paid for the serial cable I would have used for my primitive robotics exercises back in university. Absolutely extraordinary.
As this setup uses the "NodeMCU" framework, it can be developed in the Arduino Studio IDE that I've used previously for Arduino experiments, in Arduino's C++-esque language that is simultaneously familiar, but also not ...

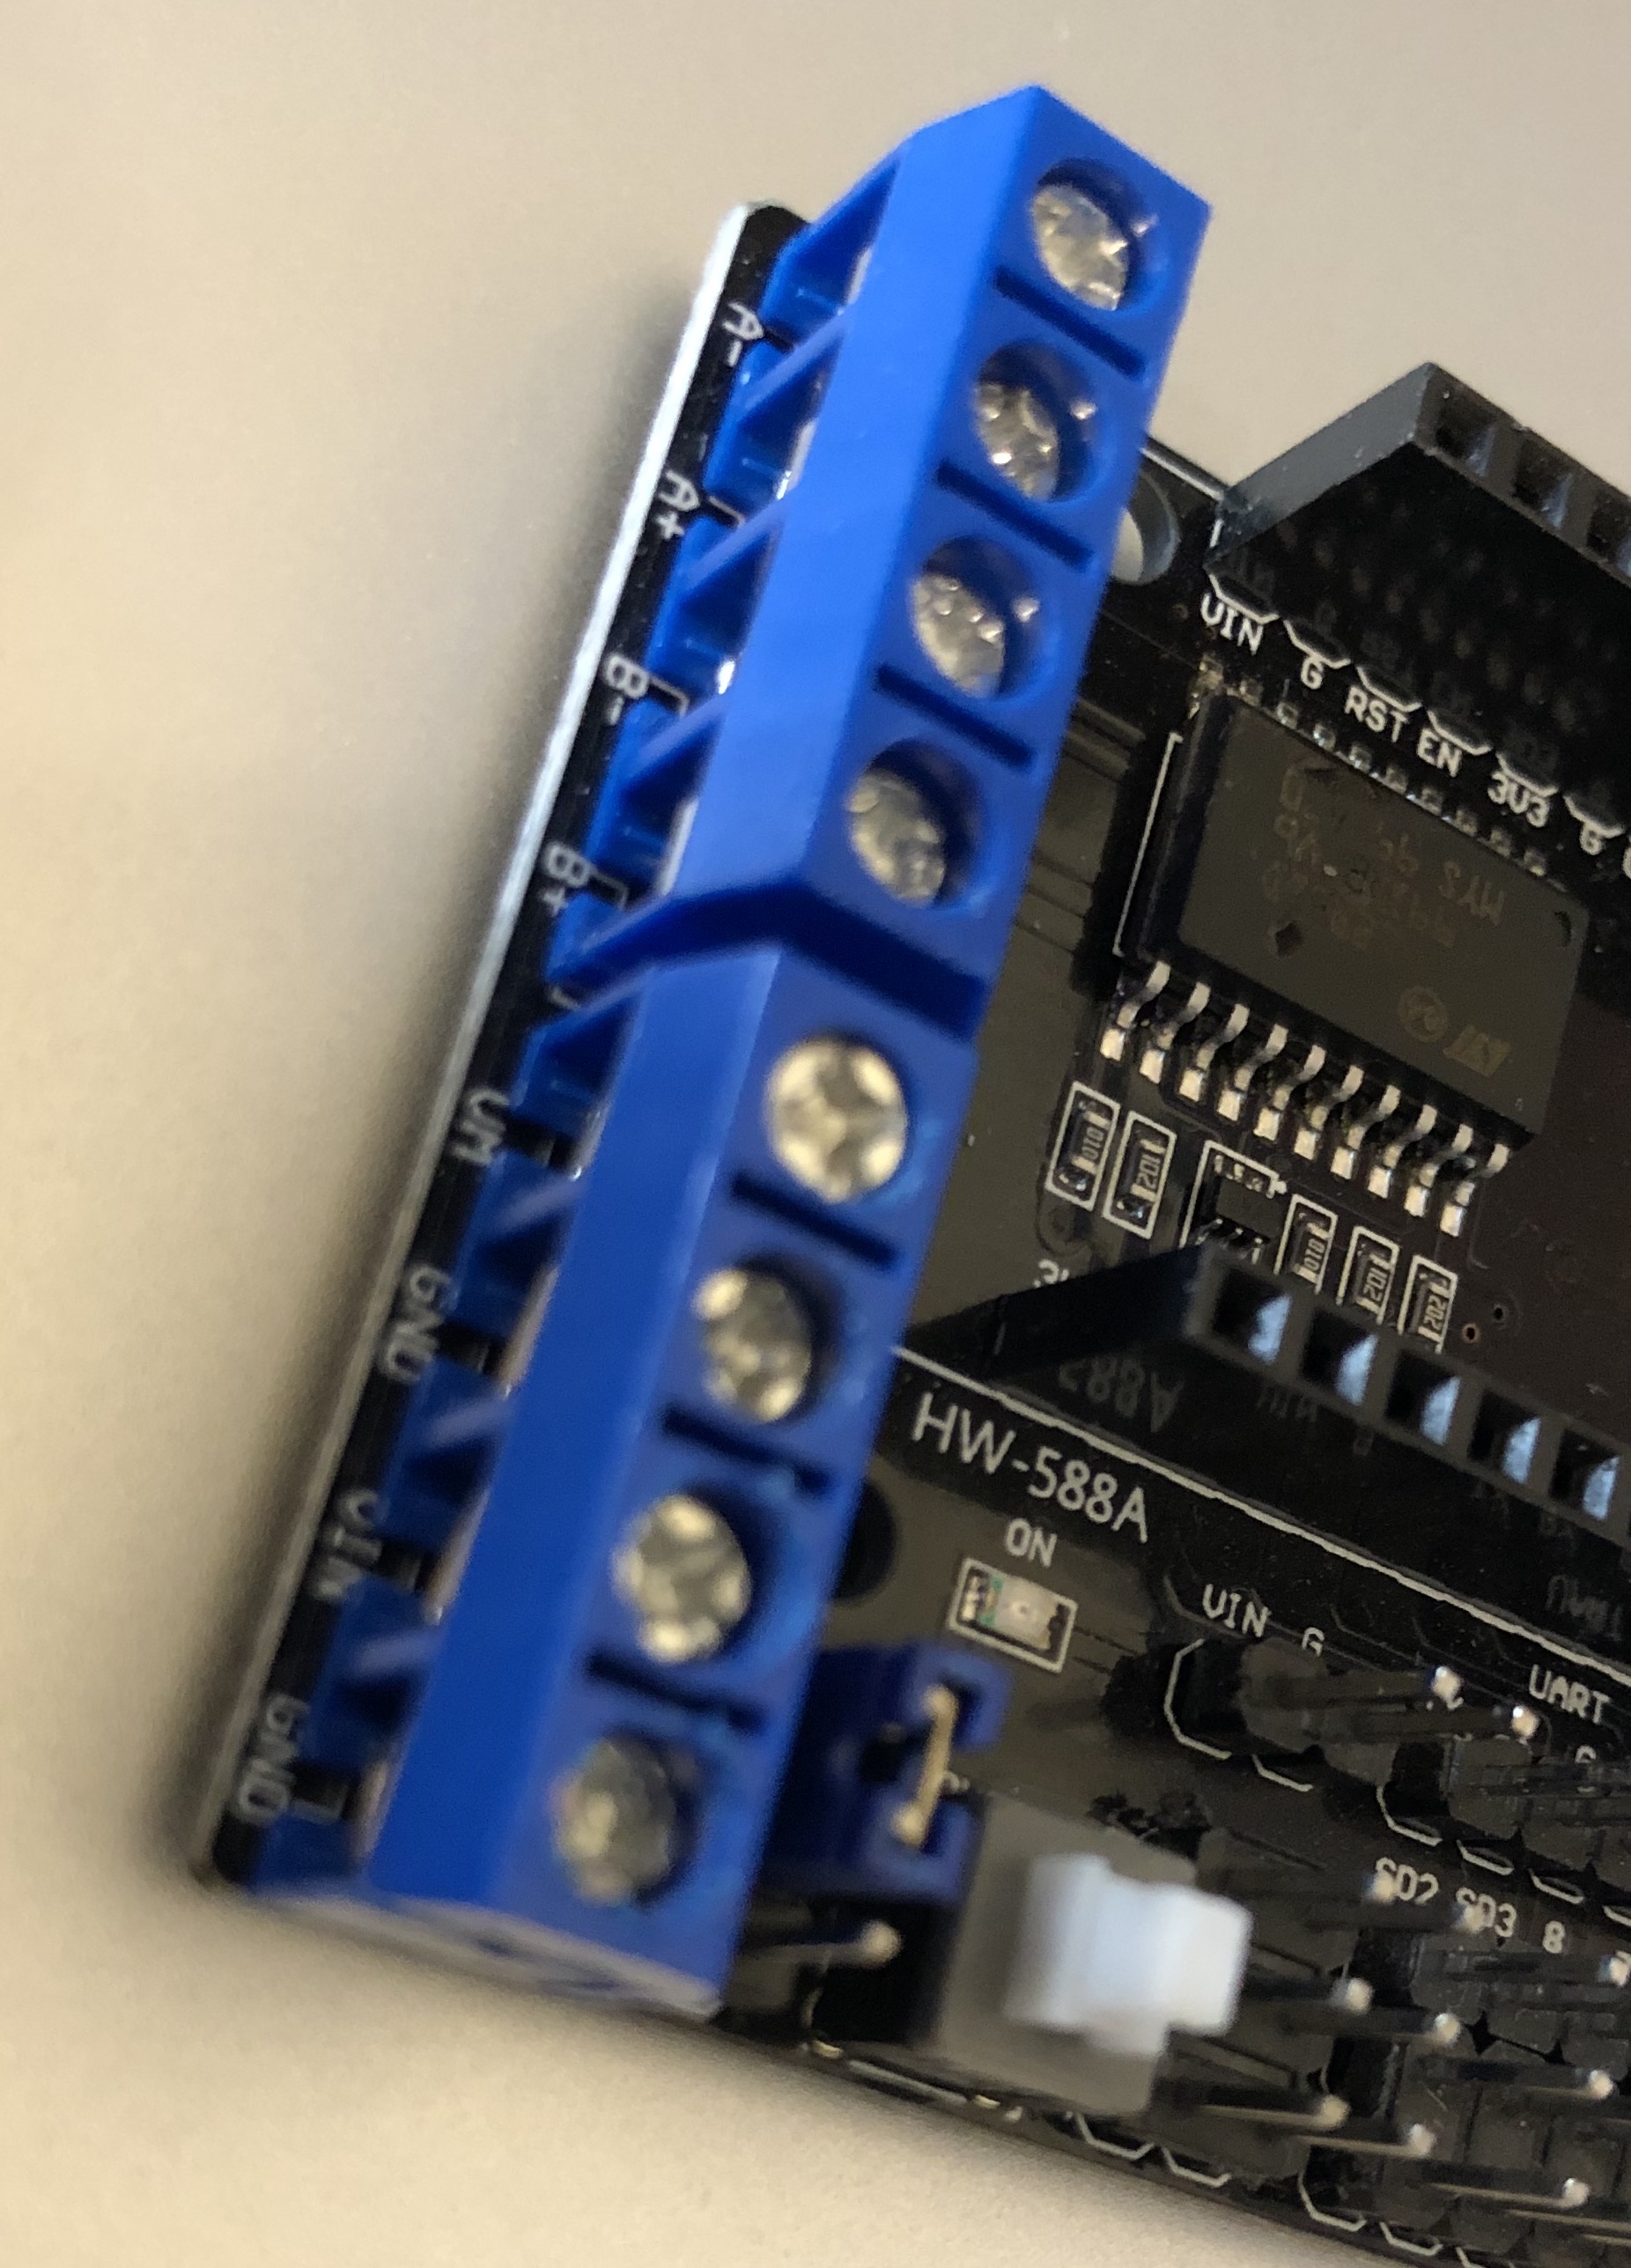
But I digress. The real trick with this board package is deducing from the non-existent documentation, exactly what you have and how it's meant to be used. For this particular combination, it's a "Node MCU 1.0 (ESP-12E Module)" that is accessed by using the CP210x "USB to UART" port driver available here. Once you've got the board installed, you can browse example code that should work perfectly for your hardware under File -> Examples -> Examples for NodeMCU 1.0. There's a generous selection here, all the way from "Blink" (which, as the "Hello World" of hardware, should always be the first sketch your hardware runs) all the way to "ESP8266WebServer" - which unsurprisingly ended up being the perfect jumping-off point for my own firmware.
After a frustrating and time-consuming detour getting the device to join my WiFi network (it transpires that the "Scan" sketch can find the SSIDs of 802.11b/g/n networks, but to actually connect, it's far better to be on 802.11n-only) it was time to drive some output, which meant more Googling to determine exactly how the L293D "Motor Driver Expansion Board" actually connects to the ESP's GPIO, and what that means in terms of software configuration.
Eventually I cobbled together the necessary knowledge from this board datasheet which talks about D1-D4, and the Arduino documentation for NodeMCU which indicates that these symbols should be magically available in my code. Then I took a tour through the ESP8266WebServer example code to find out what handler methods I had available. At last, I was ready to put it all together - as you'll see in the next blog post.
But before then, a cautionary tale - I fried both the motor shield board and an ESP board while developing this, and I suspect it was due to not being able to resist the temptation to run the whole thing off a single power supply. You can do this by moving this jumper to bridge the VIN (for the chip) pin to the VM (for the motor) pin. But I suspect the resulting exposure to back-EMF and all that grubby analogue stuff is not good for either the ESP chip nor the L293D motor driver on the shield board. You've been warned.


Saturday, 30 April 2022
Automating heating vents with openHAB, esp8266 and LEGO - Part 2.5; Hardware rework
Working with hardware is fun; working with LEGO hardware is awesome. So before proceeding with the next part of my heating vent automation series, I took the opportunity to refine my vent manipulator, with the following aims:
- Quieter operation; v1 sounded like a coffee-grinder
- Faster movement; to sound like a quieter coffee-grinder for less time
- Lower stack height above floor level; to avoid impeding the sofa-bed mechanism directly overhead
V1 Hardware
As a reminder, here's the first hardware revision featuring a LEGO Technic XL motor and an extremely over-engineered - and tall - chassis.

V2 Hardware
Here's the respun version, which works as well as, if not better than, the original.

The changes:
- The chassis is half as high above the vent surface
- The rack-and-pinion mechanism is centered in the chassis to reduce torque
- The rack is situated lower to reduce flex
- The motor is reduced in size to a LEGO Technic "M" motor (quieter and faster)
- The manipulator clamps to the vent with a Technic pulley wheel instead of a brick, further reducing height-above-floor
Now we're in a really good position to get down-and-dirty with some firmware...
Saturday, 25 September 2021
Automating heating vents with openHAB, esp8266 and LEGO - Part 2; Hardware implementation
In the first part of this series I outlined what I'm trying to build - a smart vent on the cheap - so now it's time to build it! Here's what I'm working with - these are "period-style heating registers" as available from my local warehouse-style hardware store. A decorative "vintage" metal plate (scratched to hell) holds a rectangular plastic frame with two pivoting slats sitting in the airflow. A simple plastic slider protrudes through a slot in the metal plate for user control of slat angle.

In the grand tradition of absolutely-ridiculous first hardware versions (check out Mouse v1.0!), I've built this proof-of-concept out of LEGO Technic. In an excellent coincidence, the width of the vent is a perfect fit for the crab-claw-like clamping mechanism I've created, which is fortunate because it requires quite a decent bit of force to move the slider. This gizmo is heavily overbuilt using my best "LEGO Masters" techniques and doesn't flex, warp or bend one bit once it's in position. I'm using an "XL" LEGO Power Functions motor with a worm drive PLUS some extra gear reduction to make sure that:
- I have the torque to move the slider
- The slats won't move unless I want them to (one of the best features of worm-drives); and
- The transition from shut-to-open (or vice versa) takes a while

Here it is all mounted up. It sits up about 5cm above the normal vent height, which is obviously less than ideal, but should be fine as the whole assembly sits under a sofa-bed which has copious amounts of space underneath it. The dual pinions (to spread the torque and keep everything level) drive the rack left or right, and the slider is "captured" between the red elements and opens or shuts the slats.

The remainder of the hardware is pretty simple - a butchered LEGO Power Functions cable connects the motor to a standard L293D H-bridge, and thence to the "embedded computer" part of the solution, which I'll talk about next...
Sunday, 25 July 2021
Automating heating vents with openHAB, esp8266 and LEGO - Part 1; rationale
It's winter here in Melbourne, and it's a cold one. Combined with the fact that everyone is spending a lot more time at home than before, it's time to start optimising for comfort and efficiency...
I've shared my house's floorplan before on this blog, but this time here it is overlaid with the "schema" of the gas central-heating system, which sends hot air through underfloor ducts into the house through eight vents (or "registers" if you prefer) - shown as red squares:
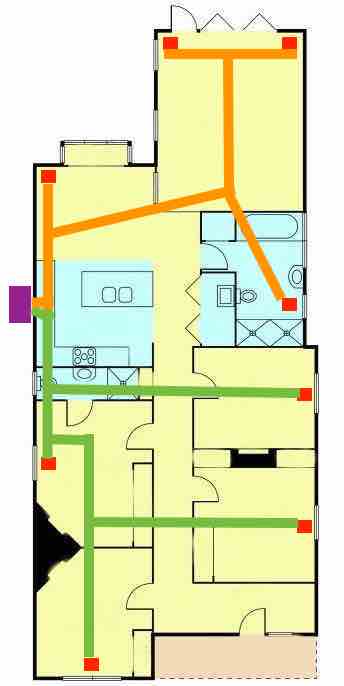
Now some houses *might* have "zones" implemented, where certain areas of the house are on a physically separated section of ducting and can be addressed and controlled individually. This house is not one of those. I've shown the two *notional* zones we'd probably *like* to have in orange (living spaces) and green (sleeping areas). If you're wondering, we've been advised that for technical reasons related to our heating unit (aka furnace) and available space under the house, a zoned system is not practicable. In any case, it would probably be a bit coarse-grained anyway, as these days I'm working pretty-much 5-days-a-week at home, from the study - the room at the bottom-left of the floorplan.
As such, I would like to be able to control the specific vent in my study, opening and closing it as needed so that it's warm to work in, particularly in the mornings, but also not wasting warm air that is better off being routed to elsewhere in the house in the evenings and on weekends. Also, if the temperature in the study is warm enough, I'd like the vent to shut itself off. It sounds like the height of laziness, but it happens that this vent is located underneath a large couch, so it's actually a major pain to adjust it by hand.
Off-the-shelf "smart vent" solutions have been available for a number of years, from Flair and Keen but they are Not Cheap, don't have any openHAB binding support, don't have stock available and/or don't ship to me in Australia. So it's a roll-your-own situation...
Subscribe to:
Posts (Atom)