Tuesday, 1 July 2025
Mikrotik - automation
Friday, 13 June 2025
Mikrotik RouterBoard - Kid Control


Saturday, 30 November 2024
Mac - when your disk is really, really full
Sunday, 16 April 2023
Micro-Optimisation #393: More Log Macros!
I've posted some of my VSCode Log Macros previously, but wherever there is repetitive typing, there are further efficiencies to be gleaned!
Log, Label and Prettify a variable - [ Ctrl + Option + Command + J ]
You know what's better than having the contents of your console.log() autogenerated?
Having the whole thing inserted for you!

How do I add this?
On the Mac you can use ⌘-K-S to see the pretty shortcut list, then hit the "Open Keyboard Shortcuts (JSON)" icon in the top-right to get the text editor to show the contents of keybindings.json. And by the way, execute the command Developer: Toggle Keyboard Shortcuts Troubleshooting to get diagnostic output on what various special keystrokes map to in VSCode-speak (e.g. on a Mac, what Ctrl, Option and Command actually do)
keybindings.json
// Place your key bindings in this file to override the defaults
[
{
    "key": "ctrl+meta+alt+j",
    "when": "editorTextFocus",
    "command": "runCommands",
    "args": {
      "commands": [
        {
          "command": "editor.action.copyLinesDownAction"
        },
        {
          "command": "editor.action.insertSnippet",
          "args": {
            "snippet": "\nconsole.log(`${TM_SELECTED_TEXT}: ${JSON.stringify(${TM_SELECTED_TEXT}$1, null, 2)}`);\n"
          }
        },
        {
          "command": "cursorUp"
        },
        {
          "command": "editor.action.deleteLines"
        },
        {
          "command": "cursorDown"
        },
        {
          "command": "editor.action.deleteLines"
        },
      ],
    }
  }
]
This one uses the new (for April 2023, VSCode v1.77.3) runCommands command, which, as you might infer, allows commands to be chained together in a keybinding. A really nice property of this is that you can Command-Z your way back out of the individual commands; very helpful for debugging the keybinding, but also potentially just nice-to-have.
The trick here is to retain the text selection so that ${TM_SELECTED_TEXT} can continue to contain the right thing, without clobbering whatever might be in the editor clipboard at this moment. We do this by copying the line down. This helpfully keeps the selection right on the variable where we want it. We then blast over the top of the selection with the logging line, but by sneakily inserting \n symbols at each end, we break up the old line into 3 lines, where the middle one is the only one we want to keep. So we delete the above and below.
Sunday, 29 May 2022
Automating heating vents with openHAB, esp8266 and LEGO - Part 3; Firmware intro
Continuing to work up the stack from my LEGO physical vent manipulator(V1), (V2), I decided to do something new for the embedded control software part of this solution and employ an Expressif ESP8266-based chipset and an accompanying L293D H-bridge daughterboard, primarily because they are just ridiculously cheap.
It took a little bit of finessing to find out exactly what to search eBay for (try ESP-12E + L293D) but listings like this, for AUD$12.55 including postage are simply incredible value. That's an 80MHz processor, motor driver board, USB cable and motor cable, all for less than I probably paid for the serial cable I would have used for my primitive robotics exercises back in university. Absolutely extraordinary.
As this setup uses the "NodeMCU" framework, it can be developed in the Arduino Studio IDE that I've used previously for Arduino experiments, in Arduino's C++-esque language that is simultaneously familiar, but also not ...

But I digress. The real trick with this board package is deducing from the non-existent documentation, exactly what you have and how it's meant to be used. For this particular combination, it's a "Node MCU 1.0 (ESP-12E Module)" that is accessed by using the CP210x "USB to UART" port driver available here. Once you've got the board installed, you can browse example code that should work perfectly for your hardware under File -> Examples -> Examples for NodeMCU 1.0. There's a generous selection here, all the way from "Blink" (which, as the "Hello World" of hardware, should always be the first sketch your hardware runs) all the way to "ESP8266WebServer" - which unsurprisingly ended up being the perfect jumping-off point for my own firmware.
After a frustrating and time-consuming detour getting the device to join my WiFi network (it transpires that the "Scan" sketch can find the SSIDs of 802.11b/g/n networks, but to actually connect, it's far better to be on 802.11n-only) it was time to drive some output, which meant more Googling to determine exactly how the L293D "Motor Driver Expansion Board" actually connects to the ESP's GPIO, and what that means in terms of software configuration.
Eventually I cobbled together the necessary knowledge from this board datasheet which talks about D1-D4, and the Arduino documentation for NodeMCU which indicates that these symbols should be magically available in my code. Then I took a tour through the ESP8266WebServer example code to find out what handler methods I had available. At last, I was ready to put it all together - as you'll see in the next blog post.
But before then, a cautionary tale - I fried both the motor shield board and an ESP board while developing this, and I suspect it was due to not being able to resist the temptation to run the whole thing off a single power supply. You can do this by moving this jumper to bridge the VIN (for the chip) pin to the VM (for the motor) pin. But I suspect the resulting exposure to back-EMF and all that grubby analogue stuff is not good for either the ESP chip nor the L293D motor driver on the shield board. You've been warned.


Saturday, 30 April 2022
Automating heating vents with openHAB, esp8266 and LEGO - Part 2.5; Hardware rework
Working with hardware is fun; working with LEGO hardware is awesome. So before proceeding with the next part of my heating vent automation series, I took the opportunity to refine my vent manipulator, with the following aims:
- Quieter operation; v1 sounded like a coffee-grinder
- Faster movement; to sound like a quieter coffee-grinder for less time
- Lower stack height above floor level; to avoid impeding the sofa-bed mechanism directly overhead
V1 Hardware
As a reminder, here's the first hardware revision featuring a LEGO Technic XL motor and an extremely over-engineered - and tall - chassis.

V2 Hardware
Here's the respun version, which works as well as, if not better than, the original.

The changes:
- The chassis is half as high above the vent surface
- The rack-and-pinion mechanism is centered in the chassis to reduce torque
- The rack is situated lower to reduce flex
- The motor is reduced in size to a LEGO Technic "M" motor (quieter and faster)
- The manipulator clamps to the vent with a Technic pulley wheel instead of a brick, further reducing height-above-floor
Now we're in a really good position to get down-and-dirty with some firmware...
Saturday, 25 September 2021
Automating heating vents with openHAB, esp8266 and LEGO - Part 2; Hardware implementation
In the first part of this series I outlined what I'm trying to build - a smart vent on the cheap - so now it's time to build it! Here's what I'm working with - these are "period-style heating registers" as available from my local warehouse-style hardware store. A decorative "vintage" metal plate (scratched to hell) holds a rectangular plastic frame with two pivoting slats sitting in the airflow. A simple plastic slider protrudes through a slot in the metal plate for user control of slat angle.

In the grand tradition of absolutely-ridiculous first hardware versions (check out Mouse v1.0!), I've built this proof-of-concept out of LEGO Technic. In an excellent coincidence, the width of the vent is a perfect fit for the crab-claw-like clamping mechanism I've created, which is fortunate because it requires quite a decent bit of force to move the slider. This gizmo is heavily overbuilt using my best "LEGO Masters" techniques and doesn't flex, warp or bend one bit once it's in position. I'm using an "XL" LEGO Power Functions motor with a worm drive PLUS some extra gear reduction to make sure that:
- I have the torque to move the slider
- The slats won't move unless I want them to (one of the best features of worm-drives); and
- The transition from shut-to-open (or vice versa) takes a while

Here it is all mounted up. It sits up about 5cm above the normal vent height, which is obviously less than ideal, but should be fine as the whole assembly sits under a sofa-bed which has copious amounts of space underneath it. The dual pinions (to spread the torque and keep everything level) drive the rack left or right, and the slider is "captured" between the red elements and opens or shuts the slats.

The remainder of the hardware is pretty simple - a butchered LEGO Power Functions cable connects the motor to a standard L293D H-bridge, and thence to the "embedded computer" part of the solution, which I'll talk about next...
Sunday, 25 July 2021
Automating heating vents with openHAB, esp8266 and LEGO - Part 1; rationale
It's winter here in Melbourne, and it's a cold one. Combined with the fact that everyone is spending a lot more time at home than before, it's time to start optimising for comfort and efficiency...
I've shared my house's floorplan before on this blog, but this time here it is overlaid with the "schema" of the gas central-heating system, which sends hot air through underfloor ducts into the house through eight vents (or "registers" if you prefer) - shown as red squares:
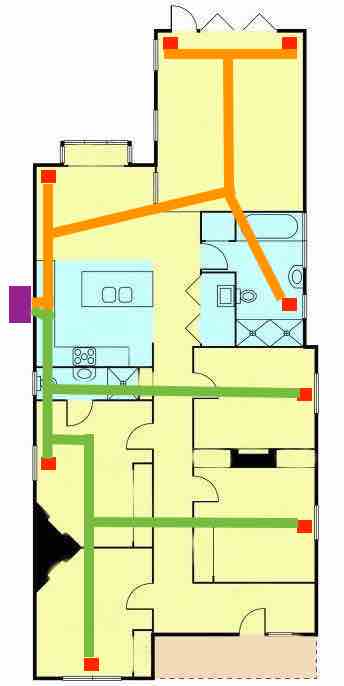
Now some houses *might* have "zones" implemented, where certain areas of the house are on a physically separated section of ducting and can be addressed and controlled individually. This house is not one of those. I've shown the two *notional* zones we'd probably *like* to have in orange (living spaces) and green (sleeping areas). If you're wondering, we've been advised that for technical reasons related to our heating unit (aka furnace) and available space under the house, a zoned system is not practicable. In any case, it would probably be a bit coarse-grained anyway, as these days I'm working pretty-much 5-days-a-week at home, from the study - the room at the bottom-left of the floorplan.
As such, I would like to be able to control the specific vent in my study, opening and closing it as needed so that it's warm to work in, particularly in the mornings, but also not wasting warm air that is better off being routed to elsewhere in the house in the evenings and on weekends. Also, if the temperature in the study is warm enough, I'd like the vent to shut itself off. It sounds like the height of laziness, but it happens that this vent is located underneath a large couch, so it's actually a major pain to adjust it by hand.
Off-the-shelf "smart vent" solutions have been available for a number of years, from Flair and Keen but they are Not Cheap, don't have any openHAB binding support, don't have stock available and/or don't ship to me in Australia. So it's a roll-your-own situation...
Sunday, 29 November 2020
Micro-optimisation #1874: NPM script targets
These days I spend most of my working day writing TypeScript/Node/React apps. I still love (and work with) Scala but in the main, it's the faster-moving Javascript world where most of the changes are taking place. One of the best things about the NPM/Yarn workflow that these apps all share, is the ability to declare "scripts" to shortcut common development tasks. It's not new (make has entered the chat) but it's very flexible and powerful. The only downside is, there's no definitive convention for naming the tasks.
One project might use start (i.e. yarn start) to launch the application in development mode (e.g. with hot-reload and suchlike) while another might use run:local (i.e. yarn run:local) for a similar thing. The upshot being, a developer ends up opening package.json in some way, scrolling down to the scripts stanza and looking for their desired task, before carefully typing it in at the command prompt. Can we do better?
Phase 1: The 's' alias
Utilising the wonderful jq, we can very easily get a very nice first pass at streamlining the flow:alias s='cat package.json | jq .scripts'
This eliminates scrolliing past all the unwanted noise of the package.json (dependencies, jest configuration, etc etc) and just gives a nice list of the scripts:
john$ s
{
  "build": "rm -rf dist && yarn compile && node scripts/build.js ",
  "compile": "tsc -p .",
  "compile:watch": "tsc --watch",
  "lint": "yarn eslint . --ext .ts",
  "start:dev": "source ./scripts/init_dev.sh && concurrently \"yarn compile:watch\" \"nodemon\"",
  "start": "source ./scripts/init_dev.sh && yarn compile && node dist/index",
  "test": "NODE_ENV=test jest --runInBand",
  "test:watch": "yarn test --watch",
  "test:coverage": "yarn test --coverage"
}
john$
A nice start. But now while you can see the list of targets, you've still got to (ugh) type one in.
What if ...
Phase 2: Menu-driven
TIL about the select BASH built-in command which will make an interactive menu out of a list of options. So let's do it!~/bin/menufy_package_json.sh
#!/bin/bash

# Show the scripts in alphabetical order, so as to match the
# numbered options shown later
cat package.json | jq '.scripts | to_entries | sort_by(.key) | from_entries'

SCRIPTS=$(cat package.json | jq '.scripts | keys | .[]' --raw-output)

select script in $SCRIPTS
do
  yarn $script
  break
done
I've got that aliased to sm (for "script menu") so here's what the flow looks like now:
john$ sm
{
  "build": "rm -rf dist && yarn compile && node scripts/build.js ",
  "compile": "tsc -p .",
  "compile:watch": "tsc --watch",
  "lint": "yarn eslint . --ext .ts",
  "start": "source ./scripts/init_dev.sh && yarn compile && node dist/index",
  "start:dev": "source ./scripts/init_dev.sh && concurrently \"yarn compile:watch\" \"nodemon\"",
  "test": "NODE_ENV=test jest --runInBand",
  "test:coverage": "yarn test --coverage",
  "test:watch": "yarn test --watch"
}
1) build	  4) lint	    7) test
2) compile	  5) start	    8) test:coverage
3) compile:watch  6) start:dev	    9) test:watch
#? 9
yarn run v1.21.1
$ yarn test --watch
$ NODE_ENV=test jest --runInBand --watch
... and away it goes.
For a typical command like yarn test:watch I've gone from 15 keystrokes plus [Enter] to sm[Enter]9[Enter] => five keystrokes, and that's not even including the time/keystroke saving of showing the potential targets in the first place instead of opening package.json in some way and scrolling. For something I might do tens of times a day, I call that a win!
Saturday, 31 October 2020
Micro-optimisation #392: Log-macros!
Something I find myself doing a lot in the Javascript/Node/TypeScript world is logging out an object to the console. But of course if you're not careful you end up logging the oh-so-useful [Object object], so you need to wrap your thing in JSON.stringify() to get something readable.
I got heartily sick of doing this so created a couple of custom keybindings for VS Code to automate things.
Wrap in JSON.stringify - [ Cmd + Shift + J ]
Takes the selected text and wraps it in a call to JSON.stringify() with null, 2 as the second and third args to make it nicely indented (because why not given it's a macro?); e.g.:
console.log(`Received backEndResponse`)becomes:
console.log(`Received ${JSON.stringify(backEndResponse, null, 2)}`)

Label and Wrap in JSON.stringify - [ Cmd + Shift + Alt + J ]
As the previous macro, but repeats the name of the variable with a colon followed by the JSON, for clarity as to what's being logged; e.g.:
console.log(`New localState`)becomes:
console.log(`New localState: ${JSON.stringify(localState, null, 2)}`)

How do I set these?
On the Mac you can use ⌘-K-S to see the pretty shortcut list, then hit the "Open Keyboard Shortcuts (JSON)" icon in the top-right to get the text editor to show the contents of keybindings.json. Then paste away!
// Place your key bindings in this file to override the defaults
[
  {
    "key": "cmd+shift+j",
    "command": "editor.action.insertSnippet",
    "when": "editorTextFocus",
    "args": {
      "snippet": "JSON.stringify(${TM_SELECTED_TEXT}$1, null, 2)"
    }
  },
  {
    "key": "cmd+shift+alt+j",
    "command": "editor.action.insertSnippet",
    "when": "editorTextFocus",
    "args": {
      "snippet": "${TM_SELECTED_TEXT}: ${JSON.stringify(${TM_SELECTED_TEXT}$1, null, 2)}"
    }
  }
]
Sunday, 13 September 2020
Micro-optimisation #9725: Checkout the mainline
Very soon (October 1, 2020) Github will be making main the default branch of all new repositories instead of master. While you make the transition over to the new naming convention, it's handy to have an abstraction over the top for frequently-issued commands. For me, git checkout master is one of my faves, so much so that I've already aliased it to gcm. Which actually makes this easier - main and master start with the same letter...
Now when I issue the gcm command, it'll check if main exists, and if not, try master and remind me that this repo needs to be migrated. Here's the script
~/bin/checkout-main-or-master.sh:
#!/bin/bash

# Try main, else master and warn about outdated branch name

MAIN_BRANCH=`git branch -l | grep main`

if [[ ! -z ${MAIN_BRANCH} ]]; then
  git checkout main
else
  echo "No main branch found, using master... please fix this repo!"
  git checkout master
fi
I run it using this alias:
alias gcm='~/bin/checkout-main-or-master.sh'
So a typical execution looks like this:
mymac:foo john$ gcm
No main branch found, using master... please fix this repo!
Switched to branch 'master'
Your branch is up to date with 'origin/master'.
mymac:foo john$
Monday, 24 August 2020
Micro-optimisation #6587: Git push to Github
I've said it before; sometimes the best automations are the tiny ones that save a few knob-twirls, keystrokes or (as in this case) a drag-copy-paste, each and every day.
It's just a tiny thing, but I like it when a workflow gets streamlined. If you work on a modern Github-hosted codebase with a Pull-Request-based flow, you'll spend more than a few seconds a week looking at this kind of output, which happens the first time you try to git push to a remote that doesn't have your branch:
mymac:foo john$ git push
fatal: The current branch red-text has no upstream branch.
To push the current branch and set the remote as upstream, use

    git push --set-upstream origin red-text

mymac:foo john$ git push --set-upstream origin red-text
Counting objects: 24, done.
Delta compression using up to 8 threads.
Compressing objects: 100% (16/16), done.
Writing objects: 100% (24/24), 2.79 KiB | 953.00 KiB/s, done.
Total 24 (delta 9), reused 0 (delta 0)
remote: Resolving deltas: 100% (9/9), completed with 9 local objects.
remote:
remote: Create a pull request for 'red-text' on GitHub by visiting:
remote:      https://github.com/my-org/foo/pull/new/red-text
remote:
To https://github.com/my-org/foo.git
 * [new branch]        red-text -> red-text
Branch 'red-text' set up to track remote branch 'red-text' from 'origin'.
The desired workflow is clear and simple:
- Push and set the upstream as suggested
- Grab the suggested PR URL
- Use the Mac open command to launch a new browser window for that URL
#!/bin/bash

# Try and push, catch the suggested action if there is one:

SUGG=`git push --porcelain 2>&1 | grep "git push --set-upstream origin"`

if [[ ! -z ${SUGG} ]]; then
  echo "Doing suggested: ${SUGG}"

  URL=`${SUGG} --porcelain 2>&1 | grep remote | grep new | grep -o "https.*"`

  if [[ ! -z ${URL} ]]; then
    echo "Opening URL ${URL}"
    open $URL
  else
    echo "No PR URL found, doing nothing"
  fi
fi
I run it using this alias:
alias gpgh='~/bin/push-to-github.sh'
So a typical execution looks like this:
mymac:foo john$ gpgh
Doing suggested:     git push --set-upstream origin mybranch
Opening URL https://github.com/my-org/someproject/pull/new/mybranch
mymac:foo john$
Sunday, 17 May 2020
Home Automation In The Small; Part 2
Continuing on the theme of home automation in the small, here's another tiny but pleasing hack that leverages the Chromecast and Yamaha receiver bindings in OpenHAB.
To conclude a happy Spotify listening session, we like to tell the Google Home to "stop the music and turn off the Living Room TV" - "Living Room TV" being the name of the Chromecast attached to HDMI2 of the Yamaha receiver.
While this does stop the music and turn off the television, the amplifier remains powered up. Probably another weird HDMI control thing. It's just a small detail, but power wastage annoys me, so here's the fix.
The trick with this one is ensuring we catch the correct state transition; namely, that the Chromecast's running "app" is the Backdrop and the state is "idling". If those conditions are true, but the amp is still listening to HDMI2, there's obviously nothing else interesting being routed through the amp so it's safe to shut it down. Note that the type of LivingRoomTV_Idling.state is an OnOffType so we don't compare to "ON", it has to be ON (i.e. it's an enumerated value) - some fun Java legacy there ...
rules/chromecast-powerdown.rules
rule "Ensure Yamaha amp turns off when Chromecast does"
when
  Item LivingRoomTV_App changed
then
  logInfo("RULE.CCP", "Chromecast app: " + LivingRoomTV_App.state)
  logInfo("RULE.CCP", "Chromecast idle: " + LivingRoomTV_Idling.state)
  logInfo("RULE.CCP", "Yamaha input: " + Yamaha_Input.state )

  if (LivingRoomTV_App.state == "Backdrop") {
    if (LivingRoomTV_Idling.state == ON) {
       if (Yamaha_Input.state == "HDMI2") {
         logInfo("RULE.CCP", "Forcing Yamaha to power off")
         Yamaha_Power.sendCommand("OFF")
       }
     }
  }
end
Sunday, 26 April 2020
Home Automation In The Small
When you say "Home Automation" to many people they picture some kind of futuristic Iron-Man-esque fully-automatic robot home, but often, the best things are really very small. Tiny optimisations that make things just a little bit nicer - like my "Family Helper" that remembers things for us. It's not for everyone, and it's not going to change the world, but it's been good for us.
In that vein, here's another little optimisation that streamlines out a little annoyance we've had since getting a Google Chromecast Ultra. We love being able to ask the Google Home to play something on Spotify, and with the Chromecast plugged directly into the back of my Yamaha AV receiver via HDMI, it sounds fantastic too. There's just one snag, and fixing it means walking over to the AV receiver and changing the input to HDMI2 ("Chromecast") manually, which (#firstworldproblems) kinda undoes the pleasure of being able to use voice commands.
It comes down to the HDMI CEC protocol, which is how the AV receiver is able to turn on the TV, and how the Chromecast turns on the AV receiver. It's cool, handy, and most of the time it works well. However, when all the involved devices are in standby/idle mode, and a voice command to play music on Spotify is issued, here's what seems to be happening:
| Time | Chromecast | AV receiver | Television |
|---|---|---|---|
| 0 | OFF | OFF | OFF |
| 1 | Woken via network | ||
| 2 | Sends CEC "ON" to AVR | ||
| 3 | Wakes | ||
| 4 | Switches to HDMI2 | ||
| 5 | AV stream starts | ||
| 6 | Detects video | ||
| 7 | Sends CEC "ON" to TV | ||
| 8 | Wakes | ||
| 9 | Routes video to TV | ||
| 10 | "Burps" via analog audio out | ||
| 11 | Hears the burp on AV4 | ||
| 12 | Switches to AV4 |
Yes, my TV (a Sony Bravia from 2009) does NOT have HDMI ARC (Audio Return Channel) which may or may not address this. However, I'm totally happy with this TV (not-"smart" TVs actually seem superior to so-called "smart" TVs in many ways).
The net effect is you get a few seconds of music from the Chromecast, before the accompanying video (i.e. the album art image that the Chromecast Spotify app displays) causes the TV to wake up, which makes the amp change to it, which then silences the music. It's extremely annoying, especially when a small child has requested a song, and they have to semi-randomly twiddle the amp's INPUT knob until they get back to the Chromecast input.
But, using the power of the Chromecast and Yamaha Receiver OpenHAB bindings, and OpenHAB's scripting and transformation abilities, I've been able to "fix" this little issue, such that there is less than a second of interrupted sound in the above scenario.
The approach
The basic approach to solve this issue is:
- When the Chromecast switches to the Spotify app
- Start polling (every second) the Yamaha amp
- If the amp input changes from HDMI2, force it back
- Once 30s has elapsed or the input has been forced back, stop polling
Easy right? Of course, there are some smaller issues along the way that need to be solved, namely:
- The Yamaha amp already has a polling frequency (10 minutes) which should be restored
- There's no way to (easily) change the polling frequency
The solution
Transformation
First of all, we need to write a JavaScript transform function, because in order to change the Yamaha polling frequency, we'll need to download the Item's configuration as JSON, alter it, then upload it back into the Item:
transform/replaceRefreshInterval.js
(function(newRefreshValuePipeJsonString) {
  var logger = Java.type("org.slf4j.LoggerFactory").getLogger("rri");
  logger.warn("JS got " + newRefreshValuePipeJsonString);
  var parts = newRefreshValuePipeJsonString.split('|');
  logger.warn("JS parts: " + parts.length);
  var newRefreshInterval = parts[0];
  logger.warn("JS new refresh interval: " + newRefreshInterval);
  var entireJsonString = parts[1];
  logger.warn("JS JSON: " + entireJsonString);
  var entireThing = JSON.parse(entireJsonString);
  var config = entireThing.configuration;
  logger.warn("JS config:" + JSON.stringify(config, null, 2));

  // Remove the huge and noisy album art thing:
  config.albumUrl = "";
  config.refreshInterval = newRefreshInterval;

  logger.warn("JS modded config:" + JSON.stringify(config, null, 2));

  return JSON.stringify(config);
})(input)
Apologies for the verbose logging, but this is a tricky thing to debug. The signature of an OpenHAB JS transform is effectively (string) => string so if you need to get multiple arguments in there, you've got to come up with a string encoding scheme - I've gone with pipe-separation, and more than half of the function is thus spent extracting the args back out again!
Basically this function takes in [new refresh interval in seconds]|[existing Yamaha item config JSON], does the replacement of the necessary field, and returns the new config JSON, ready to be uploaded back to OpenHAB.
Logic
Some preconditions:
- A Chromecast Thing is set up in OpenHAB
- With #appName channel configured as item LivingRoomTV_App
- A Yamaha AVReceiver Thing is set up in OpenHAB
- With (main zone) #power channel configured as item Yamaha_Power and
- (Main zone) #input channel configured as item Yamaha_Input
rules/chromecast.rules
val AMP_THING_TYPE="yamahareceiver:yamahaAV"
val AMP_ID="5f9ec1b3_ed59_1900_4530_00a0dea54f93"
val AMP_THING_ID= AMP_THING_TYPE + ":" + AMP_ID
val AMP_URL = "http://localhost:8080/rest/things/" + AMP_THING_ID

var Timer yamahaWatchTimer = null
rule "Ensure AVR is on HDMI2 when Chromecast starts playing music"
when
  Item LivingRoomTV_App changed
then
  logInfo("RULE.CCAST", "Chromecast app is: " + LivingRoomTV_App.state)

  if(yamahaWatchTimer !== null) {
    logInfo("RULE.CCAST", "Yamaha is already being watched - ignoring")
    return;
  }

  if (LivingRoomTV_App.state == "Spotify") {
    logInfo("RULE.CCAST", "Forcing Yamaha to power on")
    Yamaha_Power.sendCommand("ON")

    // Fetch the Yamaha thing's configuration:
    var yamahaThingJson = sendHttpGetRequest(AMP_URL)
    logInfo("RULE.CCAST", "Existing config is: " + yamahaThingJson)

    // Replace the refresh interval field with 1 second:
    var newYamahaConfig = transform(
      "JS",
      "replaceRefreshInterval.js",
      "1|" + yamahaThingJson
    )

    logInfo("RULE.CCAST", "New config is: " + newYamahaConfig)

    // PUT it back using things/config:
    sendHttpPutRequest(
      AMP_URL + "/config",
      "application/json",
      newYamahaConfig.toString())

    logInfo("RULE.CCAST", "Forcing Yamaha to HDMI2")
    Yamaha_Input.sendCommand("HDMI2")
    logInfo("RULE.CCAST", "Forced Yamaha to HDMI2")

    logInfo("RULE.CCAST", "Will now watch the Yamaha for the next 30")
    logInfo("RULE.CCAST", "sec & force it back to HDMI2 if it wavers")
    val DateTimeType ceasePollingTime = now.plusMillis(30000)

    yamahaWatchTimer = createTimer(now, [ |
      if(now < ceasePollingTime){
        Yamaha_Input.sendCommand("REFRESH")
        logInfo("RULE.CCAST", "Yamaha input: " + Yamaha_Input.state)
        if (Yamaha_Input.state.toString() != "HDMI2") {
          logInfo("RULE.CCAST", "Force PUSH")
          Yamaha_Input.sendCommand("HDMI2")
        }
        yamahaWatchTimer.reschedule(now.plusMillis(1000))
      }
      else {
        logInfo("RULE.CCAST", "Polling time has expired.")
        logInfo("RULE.CCAST", "Will not self-schedule again.")
        var revertedYamahaConfig = transform(
          "JS", "replaceRefreshInterval.js",
          "600|" + yamahaThingJson
        )
        sendHttpPutRequest(
          AMP_URL + "/config",
          "application/json",
          revertedYamahaConfig.toString()
        )
        logInfo("RULE.CCAST", "Yamaha polling reverted to 10 minutes.")
        yamahaWatchTimer = null
      }
    ])
  }
end
Some things to note. This uses the "self-triggering-timer" pattern outlined in the OpenHAB community forums, reads the configuration of a Thing using the REST interface as described here, and is written in the XTend dialect which is documented here.
Friday, 22 November 2019
Micro-optimisations
I finally got around to setting up some aliases for git commands that I issue many, many times a day. Can't believe it's taken me this long to do it. I've also placed them in a file in my Dropbox so I'll always be able to add them to any machine I work on regularly.
alias gs="git status"
alias gcm="git checkout master"
alias gp="git pull"
alias gd="git diff"
alias gcam="git commit -am"
Although I have a few other oft-used and favourite git commands, namely:
- git push - to push code to the server
- git merge master - to merge the code from master with code on this branch
- git checkout - - to switch to the previously-used branch (analogous to cd -)
This actually harks back to my first ever job as a professional engineer; we were using the mighty and fearsome ClearCase version control system, and I was tempted to shortcut some of the arcane commands required, but my manager (very wisely) cautioned similarly against aliasing away complexity. Don't underestimate the power of repetition for both muscle- and conventional memory!
Tuesday, 28 May 2019
Whose Turn Is it? An OpenHAB / Google Home / now.sh Hack (part 4 - The Rethink)
The "whose turn is it?" system was working great, and the kids loved it, but the SAF (Spousal Acceptance Factor) was lower than optimal, because she didn't trust that it was being kept up-to-date. We had a number of "unusual" weekends where we didn't have a Movie Night, and she was concerned that the "roll back" (which of course, has to be manually performed) was not being done. The net result of which being, a human still had to cast their mind back to when the last movie night was, whose turn it was, and what they chose! FAIL.
Version 2 of this system takes these human factors into account, and leverages the truly "conversational" aspect of using DialogFlow, to actually extract NOUNS from a conversation and store them in OpenHAB. Instead of an automated weekly rotation scheme which you ASK for information, the system has morphed to a TELL interaction. When it IS a Movie Night, a human TELLS the Google Home Mini somewhat like this:
Hey Google, for Movie Night tonight we watched Movie Name. It was Person's choice.
or;Hey Google, last Friday it was Person's turn for Movie Night. we watched Movie Name.
To do this, we use the "parameters" feature of DialogFlow to punch the nouns out of a templated phrase. It's not quite as rigid as it sounds due to the machine-learning magic that Google runs on your phrases when you save them in DialogFlow. Here's how it's set up; with the training phrases:

Kudos to Google for the UI and UX of this tricky stuff - it's extremely intuitive to set up, and easy to spot errors thanks to the use of coloured regions. Here's where the parameters get massaged into a suitable state for my webhook Lambda. Note the conversion into a single pipe-separated variable (requestBody) which is then PUT into the OpenHAB state for the item that has the same name as this Intent, e.g. LastMovieNight.

Within OpenHAB, almost all of the complexity in working out "who has the next turn" is now gone. There's just a tiny rule that, when the item called LastMovieNight is updated (i.e. by the REST interface), appends it to a "log" file for persistence purposes:
rule "Append Last Movie Night"
when
    Item LastMovieNight received update
then
    executeCommandLine(
      "/home/pi/writelog.sh /var/lib/openhab2/movienight-logs.txt " +
      LastMovieNight.state,
      5000)
end
(writelog.sh is just a script that effectively just does echo ${2} >> $1 - it seems like OpenHAB's executeCommandLine really should be called executeScript because you can't do anything directly).
The flip side is being able to query the last entry. In this case the querying side is very straightforward, but the trick is splitting out the |-separated data into something that the Google Home can speak intelligibly. I've seen this called "having a good VUI" (Voice User Interface) so let's call it that.
Given that the result of querying the MyOpenHAB's interface for /rest/items/LastMovieNight/state will return:
Sophie|2019-05-26T19:00:00+10:00|Toy Story 2
I needed to be able to "slice" up the pipe-separated string into parts, in order to form a nice sentence. Here's what I came up with in the webhook lambda:
...
const { restItem, responseForm, responseSlices } =
  webhookBody.queryResult.parameters;
...
// omitted - make the REST call to /rest/items/${restItem}/state,
// and put the resulting string into "body"
...
if (responseSlices) {
   const expectedSlices = responseSlices.split('|');
   const bodySlices = body.split('|');
   if (expectedSlices.length !== bodySlices.length) {
     fulfillmentText = `Didn't get ${expectedSlices.length} slices`;
   } else {
     const responseMap = expectedSlices.map((es, i) => {
       return { name: es, value: bodySlices[i] }
     });

     fulfillmentText = responseMap.reduce((accum, pair) => {
       const regex = new RegExp(`\\\$${pair.name}`);
       let replacementValue = pair.value;
       if (pair.name === 'RELATIVE_DATE') {
         replacementValue = moment(pair.value).fromNow();
       }
       return accum.replace(regex, replacementValue);
     }, responseForm);
   }
}
Before I try and explain that, take a look at how it's used:

The whole thing hinges on the pipe-separators. By supplying a responseSlices string, the caller sets up a mapping of variable names to array slices, the corresponding values of which are then substituted into the responseForm. It's completely neutral about what the variable names are, with the one exception: if it finds a variable named RELATIVE_DATE it will treat the corresponding value as a date, and apply the fromNow() function from moment.js to give a nicely VUI-able string like "3 days ago". The result of applying these transformations to the above pipe-separated string is thus:
"The last movie night was 3 days ago, when Sophie chose Toy Story 2"
Job done!
Sunday, 28 April 2019
Whose Turn Is it? An OpenHAB / Google Home / now.sh Hack (part 3)
In this third part of my mini-series on life-automation via hacking home-automation, I want to show how I was able to ask our Google Home whose turn it was for movie night, and have "her" respond with an English sentence.
First a quick refresher on what we have so far. In part 1, I set up an incredibly-basic text-file-munging "persistence" system for recording the current person in a rota via OpenHAB. We can query and rotate (both backwards and forwards) the current person, and there's also a cron-like task that rotates the person automatically once a week. The basic pattern can be (and has been!) repeated for multiple weekly events.
In part 2, I exposed the state of the MovieNight item to the "outside world" via the MyOpenHAB RESTful endpoint, and then wrote a lambda function that translates a Google Dialogflow webhook POST into a MyOpenHAB GET for any given "intent"; resulting in the following architecture:

Here are the pertinent screens in Dialogflow where things are set up.
First, the "training phrases" which guide Google's machine-learning into picking the correct Intent:

On the Fulfillment tab is where I specify the URL of the now.sh webhook handler and feed in the necessary auth credentials (which it proxies through to OpenHAB):

From Integrations -> Google Assistant -> Integration Settings is where I "export" the Intents I want to be usable from the Google Home:

The final piece of the puzzle is invoking this abomination via a voice command. Within the Dialogflow console it is very straightforward to test your 'fulfillment' (i.e. your webhook functionality) via typing into the test panel on the side, but actually "going live" so you can talk with real hardware requires digging in a little deeper. There's a slightly-odd relationship between the Google Actions console (which is primarily concerned with getting an Action into the Actions Directory) and the Dialogflow console (which is all about having conversations with "agents"). They are aware of each other to a pretty-good extent (as you'd hope for two sibling Google products) but they are also a little confusing to get straight in your head and/or working together.
You need to head over to the Actions Console to actually "release" your helper so that a real-life device can use it. An "Alpha" release makes sure random people on the internet can't start using your private life automation software!

I really wanted to be able to ask the Google Assistant in a conversational style; "Hey Google, whose turn is it for Movie Night this week?" - in the same way one can request a Spotify playlist. But it turns out to be effectively-impossible to have a non-publicly-released "app" work in this way.
Instead the human needs to explicitly request to talk to your app. So I renamed my app "The Marshall Family Helper" to make it as natural-sounding as it can be. A typical conversation will now look like this:
Human: "Hey Google, talk to The Marshall Family Helper"
Google: "Okay, loading the test version of The Marshall Family Helper"
(Short pause)
{beep} "You can ask about Movie Night or Take-Away"
"Whose turn is it for movie night?"
(Long pause)
"It's Charlotte's turn"
{beep}
Some things to note. The sentence after the first {beep} is what I've called my "Table of Contents" intent - it is automatically invoked when the Marshall Family Helper is loaded - as discovery is otherwise a little difficult. The "short pause" is usually less than a second, and the "long pause" around 3-4 seconds - this is a function of the various latencies as you can see in the system diagram above - it's something I'm going to work on tuning. At the moment now.sh automatically selects the Sydney point-of-presence as the host for my webhook lambda, which would normally be excellent, but as it's being called from Google and making a call to MyOpenHAB, I might spend some time finding out where geographically those endpoints are and locating the lambda more appropriately.
But, it works!
Saturday, 30 March 2019
Whose Turn Is it? An OpenHAB / Google Home / now.sh Hack (part 2)
So in the first part of this "life-automation" mini-series, we set up some OpenHAB items that kept track of whose turn it was to do a chore or make a decision. That's fine, but not super-accessible for the whole family, which is where our Google Home Mini comes in.
First, (assuming you've already configured and enabled the OpenHAB Cloud service to expose your OpenHAB installation at myopenhab.org) we add our MovieNight to our exposed items going out to the MyOpenHAB site. To do this, use the PaperUI to go to Services -> MyOpenHAB and add MovieNight to the list. Note that it won't actually appear at myopenhab.org until the state changes ...
Next, using an HTTP client such as Postman, we hit https://myopenhab.org/rest/items/MovieNight/state (sending our email address and password in a Basic Auth header) and sure enough, we get back Charlotte.
Unfortunately, as awesome as it would be, the Google Home Assistant can't "natively" call a RESTful API like the one at MyOpenHAB, but it *can* if we set up a custom Action to do it, via a system called Dialogflow. This can get very involved as it is capable of amazing levels of "conversation" but here's how I solved this for my simple interaction needs:
So over in the Dialogflow console, we set up a new project, which will use a webhook for "fulfillment", so that saying "OK Google, whose turn is it for movie night?"* will result in the MovieNight "Intent" firing, making a webhook call over to a now.sh lambda, which in turn makes the RESTful request to the MyOpenHAB API. Phew!
I've mentioned now.sh before as the next-generation Heroku - and until now have just used it as a React App serving mechanism - but it also has sleek backend deployment automation (that's like Serverless minus the tricksy configuration file) that was just begging to be used for a job like this.
The execution environment inside a now.sh lambda is super-simple. Define a function that takes a Node request and response, and do with them what you will. While I really like lambdas, I think they are best used in the most straightforward way possible - no decision-making, no state - a pure function of its inputs that can be reasoned about for all values over all time at once (a really nice way of thinking about the modern "declarative" approach to writing software that I've stolen from the amazing Dan Abramov).
This particular one is a little gem - basically proxying the POSTed webhook call from Google, to a GET of the OpenHAB API. Almost everything this lambda needs is given to it - the Basic authentication header from Google is passed straight through to the OpenHAB REST call, the URL is directly constructed from the name of the intent in the webhook request, and the response from OpenHAB gets plopped into an English sentence for the Google Assistant to say. The only real snag is that the body of the POST request is not made directly available to us, so I had to add a little helper to provide that:
'use strict';

const bent = require('bent');

// Helper function to get the body from a POST
function processPost(request, response, callback) {
  var queryData = "";
  if (typeof callback !== 'function') return null;

  if (request.method == 'POST') {
    request.on('data', function (data) {
      queryData += data;
      if (queryData.length > 1e6) {
        queryData = "";
        response.writeHead(413, { 'Content-Type': 'text/plain' }).end();
        request.connection.destroy();
      }
    });

    request.on('end', function () {
      callback(queryData);
    });

  } else {
    response.writeHead(405, { 'Content-Type': 'text/plain' });
    response.end();
  }
}

// Proxy a Dialogflow webhook request to an OpenHAB REST call
module.exports = async (request, response) => {
  processPost(request, response, async (bodyString) => {
    const requestBody = JSON.parse(bodyString);
    const intent = requestBody.queryResult.intent.displayName;
    const uri = `https://myopenhab.org/rest/items/${intent}/state`;
    const auth = request.headers['authorization'];

    console.log(`About to hit OpenHAB endpoint: ${uri}`);

    const getString = bent('string', { 'Authorization': auth });
    const body = await getString(uri);

    console.log(`OpenHAB response: ${body}`);

    const json = {
      fulfillmentText: `It's ${body}'s turn.`,
    };
    const jsonString = JSON.stringify(json, null, 2);
    response.setHeader('Content-Type', 'application/json');
    response.setHeader('Content-Length', jsonString.length);
    response.end(jsonString);
  });
};
It returns the smallest valid JSON response to a Dialogflow webhook request - I did spend some time with the various client libraries available to do this, but they seemed like overkill when all that is needed is grabbing one field from the request and sending back one line of JSON!
We're almost there! Now to wire up this thing so we can voice-command it ...
(*) That's the theory at least - see Part 3 for the reality ...
Thursday, 28 February 2019
Whose Turn Is it? An OpenHAB Hack (part 1)
As my young family grows up, we have our little routines - one of which is the weekly Movie Night. On a rotating basis, each family-member gets to choose the movie that we'll watch, as a family, on a Saturday night. Looking at other screens is not allowed during this time - it's a Compulsory Family Fun Night if you like. The thing is, maybe I'm getting too old, but it frequently seems very difficult to remember whose turn it is. Maybe we skipped a week due to some other activity, or nobody can remember exactly because it was a group decision. Anyway, something that computers are especially good at is remembering things, so I decided to extend my existing OpenHAB home (device) automation to include home process automation too!
Unlike the similarly-named Amazon Alexa "skill" which appears to a) be totally random and b) not actually work very well, I wanted something that would intelligently rotate the "turn" on a given schedule (weekly being my primary requirement). I also wanted to keep the essentials running locally, on the Raspberry Pi that runs my OpenHAB setup. I'm sure you could move this entirely into the cloud should you wish, but doing it this way has allowed me to start with the basics and scale up.
First step; create a simple text file with one participant name per line: ${OPENHAB_USERDATA}/movienight.txt (i.e. /var/lib/openhab2/movienight.txt on my system):
Charlotte
Mummy
Daddy
Sophie
Make sure that the openhab user can read and write it.
Now we use the exec binding to create a Thing that reads the first line of this file via the head command-line tool, once every 6 hours (21600 seconds). Unfortunately as you'll see in all the snippets below, there seems to be no way to access environment variables when defining these file locations; so while I'd love to write ${OPENHAB_USERDATA}/movienight.txt, I have to use the hard-coded path: /var/lib/openhab2/movienight.txt.
$OPENHAB_CONF/things/householdrota.things:
Thing exec:command:movienight "Movie Night" @ "Living Room"
  [command="head -1 /var/lib/openhab2/movienight.txt",
   interval=21600,
   timeout=5,
   autorun=true
]
Here are the items that fetch, display and adjust the current movie night, respectively. It's useful to be able to adjust the rotation, for example if we skipped a week, so need to back out the automatically-changed value.
$OPENHAB_CONF/items/householdrota.items:
Switch FetchMovieNight {channel="exec:command:movienight:run"}

String MovieNight "Whose turn is it?"
  {channel="exec:command:movienight:output"}

Switch AdjustMovieNight
We expose the items in the sitemap:
$OPENHAB_CONF/sitemaps/default.sitemap:
  ...
  Frame label="Household rotas" {
    Text item=MovieNight label="Whose Movie Night is it?"
    Switch item=AdjustMovieNight
           label="Adjust Movie Night"
           mappings=[ON="Rotate", OFF="Unrotate"]
  }
  ...
Which results in the following in Basic UI:
Now for the weekly-rotation part. First, a simple Bash script to rotate the lines of a text file such as the one above. That is, after running ./rotate.sh movienight.txt, the topmost line becomes the bottom-most:
Mummy Daddy Sophie Charlotte/home/pi/rotate.sh:
#!/bin/bash

TMPFILE=$(mktemp)
if [[ $# -eq 2 ]]
then
        # Assume a -r flag provided: Reverse mode
        TAIL=`tail -n 1 $2`
        echo ${TAIL} > $TMPFILE
        head -n -1 $2 >> $TMPFILE
        mv $TMPFILE $2
else
        HEAD=`head -1 $1`
        tail -n +2 $1 > $TMPFILE
        echo ${HEAD} >> $TMPFILE
        mv $TMPFILE $1
fi
And now we can automate it using a time-based rule in OpenHAB - each Saturday night at 9pm, as well as supporting rotation "by hand":
$OPENHAB_CONF/rules/householdrota.rules:
rule "Rotate Movie Night - weekly"
when
  Time cron "0 0 21 ? * SAT *"
then
  logInfo("cron", "Rotating movie night...")
  executeCommandLine(
    "/home/pi/rotate.sh /var/lib/openhab2/movienight.txt"
  )
  FetchMovieNight.sendCommand(ON);
end


rule "Adjust Movie Night"
when
  Item AdjustMovieNight received command
then

  val reverseFlag = if (receivedCommand == ON) "" else "-r"

  val results = executeCommandLine(
    "/home/pi/rotate.sh " +
    reverseFlag +
    " /var/lib/openhab2/movienight.txt", 5000)

  # If anything went wrong it will be displayed in the log:
  logInfo("AdjustMovieNight", "Results: " + results)
  FetchMovieNight.sendCommand(ON);
end
Now this is fine, but believe me when I tell you that having a text field available in a web page somewhere is simply not enough to achieve a winning SAF (Spousal Acceptance Factor). So onwards we must plunge into being able to ask the Google Home whose turn it is ...