Showing posts with label linux. Show all posts

Sunday, 31 October 2021

Bravia, Bravia, wherefore art thou Bravia

Just a quick post that might help anyone with a Sony Bravia X70G/X70xxG family LCD TV.

We just upgraded our 12-year old 40" Bravia to the KD-55X7000G model, which I got almost-new for half price, because I can't resist a bargain. It's not a very high-end TV, but it's got Netflix etc and it puts out a good picture. The operating system is described as "Linux", and it's functional* and snappy, which is all I really want. As a reluctant "Smart TV" purchaser, I'd rather a "dumb" smart TV than one that shows me advertisements.

One of the ways it is unacceptably dumb though, is doing DHCP while it's doing something else. Yes, a TV capable of showing 4K content at 60Hz (that's 4096x2160 * 60 = 530,841,600 pixels per second if you're counting) can't handle obtaining a new DHCP lease - an exchange of 2 simple UDP datagrams over the network.

This was manifesting itself very annoyingly during Netflix sessions. The pattern would be: we'd turn on the TV, then get sidetracked for a bit, then finally settle down and watch a 22-minute episode of "Superstore" on Netflix. All fine. Then, reliably as clockwork, if we decided to watch a second episode, at some point during the show we'd get a "can't access Netflix servers" error, which was completely unrecoverable. Even a swift reboot of the TV wouldn't be enough - leaving it off for about five minutes seemed to be required to flush out the problem.

It turned out that I hadn't explicitly added the TV's MAC address to my dnsmasq configuration, so it was being given an IP address with the default lease time of one hour. Now dnsmasq is pretty smart and won't assign a different IP address to a device once it's seen it (unless it absolutely has to) so it wasn't even anything as nasty as the TV getting a different IP. No, it was simply asking to renew the lease. Obviously the straw that broke the camel's back.

So the "solution" I'm using (and has been flawless so far) is to:

  1. give the TV a static IP address; and
  2. give it a 24 hour lease time
24 hours is more than enough time to cover any foreseeable Netflix binge and the TV will do a DHCPDISCOVER on boot the next time anyway, so we're covered nicely.

(*) Oh there is one other thing - the TV unfathomably doesn't seem to be able to set its clock from the network - I'm looking at fixing that soon, fingers crossed...

Sunday, 29 August 2021

Switching to git switch

A recent OS upgrade resulted in my Git version being bumped up to 3.x, an interesting feature of which is the new git switch command, which replaces part of the heavily overloaded git checkout functionality with something much clearer.

Now, to switch to branch foo you can just invoke git switch foo

And to create a new branch, instead of git checkout -b newbranch,
it's git switch -c newbranch

These are small changes, to be sure, but worthwhile in bringing more focus to individual commands, and relieving some of the incredibly heavy lifting being done by the flags passed to git checkout, which hopefully now can be my "tool of last resort" as it usually leaves me stranded in "detached head hell" ... my fault, not Git's!

I've also updated my gcm alias/script to use git switch, so accordingly it's now gsm.

Sunday, 8 September 2019

I like to watch

Remember how computers were supposed to do the work, so people had time to think?

Do you ever catch yourself operating in a tight loop, something like:

  10 Edit file
  20 Invoke [some process] on file
  30 Read output of [some process]
  40 GOTO 10
Feels a bit mechanical, no? Annoying having to switch from the text editor to your terminal window, yes?

Let's break down what's actually happening in your meatspace loop*:

  10 Edit file in text editor
  15 Save file (e.g. Ctrl-S)
  17 Change active window to Terminal (e.g. Cmd/Alt+Tab)
  20 Press [up-arrow] once to recall the last command
  22 Visually confirm it's the expected command
  25 Hit [Enter] to execute the command
  30 Wait for the command to complete
  35 Interpret the output of the command
  40 Cmd/Alt+Tab back to the editor
  45 GOTO 10
That's even more blatant! Most of the work is telling the computer what to do next, even though it's exactly the same as the last iteration.
(*) Props to anyone recognising the BASIC line-numbering reference 😂

Wouldn't something like this be better?

  10 Edit file in text editor
  15 Save file (e.g. Ctrl-S)
  20 Swivel eyeballs to terminal window
  30 Wait for the command to complete
  35 Interpret the output of the command
  40 Swivel eyeballs back to editor
  45 GOTO 10

It can be better

If you've got npm on your system somewhere it's as simple as:

  $ npm install -g watch
and arranging your UI windows suitably. Having multiple monitors is awesome for this. Now by invoking:
  $ watch '[processing command with arguments]' dir1 dir2 ... dirN
you have the machine on your side. As soon as you save any file in dir1, dir2 etc, the command will be run for you. Here are some examples:

Validate a CircleCI build configuration
You're editing the circleci/config.yml of a CircleCI continuously-integrated project. These YAML files are notoriously tricky to get right (whitespace matters...🙄) - so you can get the circleci command-line tool to check your work each time you save the file:
  $ brew install circleci
  $ watch 'circleci config validate' .circleci
Validate a Terraform configuration
You're working on a Terraform infrastructure-as-code configuration. These .TF files can have complex interrelationships - so you can get the terraform command-line tool to check your work each time you save the file:
  $ brew install terraform
  $ watch 'terraform validate' .
Auto-word-count an entire directory of files
You're working on a collection of files that will eventually be collated together into a single document. There's a word-limit applicable to this end result. How about running wc to give you a word-count whenever you save any file in the working directory?:
  $ watch 'wc -w *.txt' .

Power tip

Sometimes, the command in your watch expression is so quick (and/or its output so terse), you can't tell whether you're seeing the most-recent output. One way of solving this is to prefix the time-of-day to the output - a quick swivel of the eyeballs to the system clock will confirm which execution you're looking at:

  $ watch 'echo `date '+%X'` `terraform validate`' .
  > Watching .
  13:31:59 Success! The configuration is valid. 
  13:32:23 Success! The configuration is valid.
  13:34:41 Success! The configuration is valid.
  

Saturday, 31 August 2019

Serviio 2.0 on Raspbian "Buster"

After a recent SD card corruption (a whole-house power outage while the Raspberry Pi Model 3B must have been writing to the SD card), I have been forced to rebuild the little guy. It's been a good opportunity to get the latest-and-greatest, even if it means sometimes the various instructional guides are slightly out-of-date. Here's what I did to get the Serviio Media Streamer, version 2.0, to work on Raspbian Buster [Lite](*):

Install dependencies

Coming from the "lite" install, we'll need a JDK, plus the various encode/decode tools Serviio uses to do the heavy lifting:

$ sudo su
# apt-get update
# apt-get install ffmpeg x264 dcraw
# apt-get install --no-install-recommends openjdk-11-jdk

Download and unpack Serviio 2.0

This will result in serviio being located in /opt/serviio-2.0:
# wget http://download.serviio.org/releases/serviio-2.0-linux.tar.gz
# tar -xvzf serviio-2.0-linux.tar.gz -C /opt

Set up the Serviio service in systemd

Create a serviio user, and give them ownership of the install directory:
# useradd -U -s /sbin/nologin serviio
# chown -R serviio:serviio /opt/serviio-2.0
Create the a file serviio.service with the following contents:
[Unit]
Description=Serviio media Server
After=syslog.target network.target

[Service]
User=serviio
ExecStart=/opt/serviio-2.0/bin/serviio.sh
ExecStop=/opt/serviio-2.0/bin/serviio.sh -stop

[Install]
WantedBy=multi-user.target
Copy it into position, enable the service, and reboot:
# cp serviio.service /etc/systemd/system
# systemctl enable serviio.service
# reboot

Verify, Configure, Enjoy

After reboot, check things are happy:
$ sudo systemctl status serviio.service 
● serviio.service - Serviio media Server
   Loaded: loaded (/etc/systemd/system/serviio.service; enabled;)
   Active: active (running) since Sat 2019-08-31 16:54:48 AEST; 7min ago
   ...
It's also very handy to watch the logs while using Serviio:
$ tail -f /opt/serviio-2.0/logs/serviio.log
This is also a good time to set up the filesystem mount of the video media directory from my NAS, which the NAS user naspi has been given read-only access to:
 
  $ sudo apt-get install cifs-utils
  $ sudo vim /etc/fstab

(add line:)

//mynas/video /mnt/NAS cifs username=naspi,password=naspi,auto
Next, use a client app (I enjoy the Serviidroid app for Android devices) to locate and configure the instance, remembering that paths to media directories are always from the Pi's point of view, e.g. /mnt/NAS/movies if using the above example mount.

* This guide is very much based on the linuxconfig.org guide for Serviio 1.9, with updates as needed.

Friday, 4 May 2018

Raspberry Pi 3 Model B+

My Synology NAS is coming up to 10 years of age, and asking it to do all its usual functions, plus run a few solid Java apps: ... was all a bit much for its 700MHz ARM processor, and particularly its 256Mb of RAM. Jenkins was the final straw, so I was looking around for other low-power devices that could run these apps comfortably. One gigabyte of RAM being a definite requirement. My Googling came up with Raspberry Pi devices, which surprised me as I'd always considered them a little "weak" as general purpose servers, more for doing single duties or as clients.

But that was before I knew about the Raspberry Pi 3, Model B+. This little rocket boots up its Raspbian (tweaked Debian) OS in a few seconds, has 1Gb of RAM and a quad-core 1.4GHz ARM processor that does a great job with the Java workloads I'm throwing at it. And look at the thing - it's about the size of a pack of cards:
A quad-core server with 1Gb of RAM, sitting on 3TB of storage. LEGO piece for scale. I wonder what 1998-me would have made of that!

With wired and wireless Ethernet, scads of USB 3.0 ports and interesting GPIO pin possibilities, this thing is ideal for my home automation projects. And priced so affordably that (should it become necessary) running a fleet of these little guys is quite plausible. If like me, you had thought the Raspberry Pi was a bit of a toy, take another look!

Saturday, 30 July 2016

Vultr Jenkins Slave GO!

I was alerted to the existence of VULTR on Twitter - high-performance compute nodes at reasonable prices sounded like a winner for Jenkins build boxes. After the incredible flaming-hoop-jumping required to get OpenShift Jenkins slaves running (and able to complete builds without dying) it was a real pleasure to have the simplicity of root-access to a Debian (8.x/Jessie) box and far-higher limits on RAM.

I selected a "20Gb SSD / 1024Mb" instance located in "Silicon Valley" for my slave. Being on the opposite side of the US to my OpenShift boxes feels like a small, but important factor in preventing total catastrophe in the event of a datacenter outage.

Setup Steps

(All these steps should be performed as root):

User and access

Create a jenkins user:
addgroup jenkins
adduser jenkins --ingroup jenkins

Now grab the id_rsa.pub from your Jenkins master's .ssh directory and put it into /home/jenkins/.ssh/authorized_keys. In the Jenkins UI, set up a new set of credentials corresponding to this, using "use a file from the Jenkins master .ssh". (which by the way, on OpenShift will be located at /var/lib/openshift/{userid}/app-root/data/.ssh/jenkins_id_rsa).
I like to keep things organised, so I made a vultr.com "domain" container and then created the credentials inside.

Install Java

echo "deb http://ppa.launchpad.net/webupd8team/java/ubuntu xenial main" | tee /etc/apt/sources.list.d/webupd8team-java.list
echo "deb-src http://ppa.launchpad.net/webupd8team/java/ubuntu xenial main" | tee -a /etc/apt/sources.list.d/webupd8team-java.list
apt-key adv --keyserver hkp://keyserver.ubuntu.com:80 --recv-keys EEA14886
apt-get update
apt-get install oracle-java8-installer

Install SBT

apt-get install apt-transport-https
echo "deb https://dl.bintray.com/sbt/debian /" | tee -a /etc/apt/sources.list.d/sbt.list
apt-key adv --keyserver hkp://keyserver.ubuntu.com:80 --recv 642AC823
apt-get update
apt-get install sbt

More useful bits

Git
apt-get install git
NodeJS
curl -sL https://deb.nodesource.com/setup_4.x | bash -
apt-get install nodejs

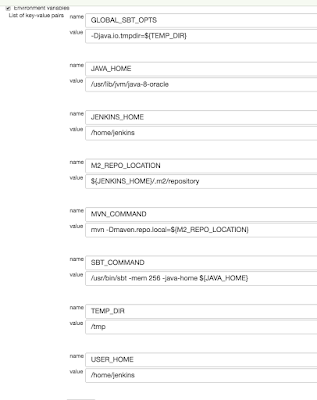
This machine is quite dramatically faster and has twice the RAM of my usual OpenShift nodes, making it extra-important to have those differences defined per-node instead of hard-coded into a job. One thing I was surprised to have to define was a memory limit for the JVM (via SBT's -mem argument) as I was getting "There is insufficient memory for the Java Runtime Environment to continue" errors when letting it choose its own upper limit. For posterity, here are the environment variables I have configured for my Vultr slave:

Thursday, 27 August 2015

SSH Tunnels: The corporate developer's WD40 + Gaffer Tape


So at my current site the dreaded Authenticating Proxy policy has been instigated - one of those classic corporate network-management patterns that may make sense for the 90% of users with their locked-down Windows/Active Directory/whatever setups, but makes life a miserable hell for those of us playing outside on our Ubuntu boxes.

In a nice display of classic software-developer passive-aggression we've been keeping track of the hours lost due to this change - we're up to 10 person-days since the policy came in 2 months ago. Ouch.

Mainly the problems are due to bits of open-source software that simply haven't had to deal with such proxies - these generally cause things like Jenkins build boxes and other "headless" (or at least "human-less") devices to have horrendous problems.

I got super-tied-up today trying to get one of these build boxes to install something via good-old apt-get in Ubuntu. In the end I used one of my old favourite tricks, the SSH Tunnel backchannel to use the proxy that my dev box has authenticated with, to get the job done.

Here's how it goes:
Preconditions:
  • dev-box is my machine, which is happily using the authenticated proxy via some other mechanism (e.g. kinit)
  • build-box is a build slave that is unable to use apt-get due to proxy issues (e.g. 407 Proxy Authentication Required)
  • proxy-box is the authenticating proxy, listening on port 8080


 proxy-box            dev-box            build-box
    ---                 ---                ---
    | |                 | |                | |
    | |                _____               | |
    | 8080    < < <    _____    < < <   7777 |
    | |                 | |                | |
    | |                 | |                | |
    ---                 ---                ---


From dev-box
ssh build-box -R7777:proxy-box:8080

Welcome to build-box
> sudo vim /etc/apt/apt.conf
.. and create/modify apt.conf as follows:
Acquire::http::proxy "http://localhost:7777/";
At which point, apt-get should start working, via your own machine (and your proxy credentials). Once you're done, you may want to revert your change to apt.conf, or you could leave it there, with an explanatory comment of how and why it has been set up like this (or just link to this post!)

Saturday, 1 November 2014

Walking away from Run@Cloud Part 3: Pause and Reflect

As a happy free-tier CloudBees user, my "build ecosystem" looked like this:


As CloudBees seem to have gone "Enterprise" in the worst possible way (from my perspective) and don't have any free offerings any more, I was now looking for:
  • Git repository hosting (for private repos - my open-source stuff is on GitHub)
  • A private Nexus instance to hold closed-source library artifacts
  • A public Nexus instance to hold open-source artifacts for public consumption
  • A "cloud" Jenkins instance to build both public- and private-repo-code when it changes;
    • pushing private webapps to Heroku
    • publishing private libs to the private Nexus
    • pushing open-source libs to the public Nexus
... and all for as close to $0 as possible. Whew!

I did a load of Googling, and the result of this is an ecosystem that is far more "diverse" (a charitable way to say "dog's breakfast") but still satisfies all of the above criteria, and it's all free. More detail in blog posts to come, but here's what I've come up with:

Thursday, 23 May 2013

nginx as a CORS-enabled HTTPS proxy

So you need a CORS frontend to your HTTPS target server that is completely unaware of CORS.

I tried doing this with Apache but it couldn't support the creation of a response to the "preflight" HTTP OPTIONS request that is made by CORS-compliant frameworks like jQuery.

Nginx turned out to be just what I needed, and furthermore it felt better too - none of that module-enabling stuff required, plus the configuration file feels more programmer-friendly with indenting, curly-braces for scope and if statements allowing a certain feeling of control flow.

So without any further ado (on your Debian/Ubuntu box, natch) :

Get Nginx:
sudo apt-get install nginx

Get the Nginx HttpHeadersMore module which allows the CORS headers to be applied whether the request was successful or not (important!)
sudo apt-get install nginx-extras

Now for the all-important config (in /etc/nginx/sites-available/default ) - We'll go through the details after this:

#
# Act as a CORS proxy for the given HTTPS server(s)
#
server {
  listen 443 default_server ssl;
  server_name localhost;

  # Fake certs - fine for development purposes :-)
  ssl_certificate /etc/ssl/certs/ssl-cert-snakeoil.pem;
  ssl_certificate_key /etc/ssl/private/ssl-cert-snakeoil.key;

  ssl_session_timeout 5m;

  # Make sure you specify all the methods and Headers 
  # you send with any request!
  more_set_headers 'Access-Control-Allow-Origin: *';
  more_set_headers 'Access-Control-Allow-Methods: GET, POST, OPTIONS, PUT, DELETE';
  more_set_headers 'Access-Control-Allow-Credentials: true';
  more_set_headers 'Access-Control-Allow-Headers: Origin,Content-Type,Accept';

  location /server1/  {
    include sites-available/cors-options.conf;
    proxy_pass https://<actual server1 url>/;
  }

  location /server2/  {
    include sites-available/cors-options.conf;
    proxy_pass https://<actual server2 url>/;
  }
}

And alongside it, in /etc/nginx/sites-available/cors-options.conf:
    # Handle a CORS preflight OPTIONS request 
    # without passing it through to the proxied server 
    if ($request_method = OPTIONS ) {
      add_header Content-Length 0;
      add_header Content-Type text/plain;
      return 204;
    }
What I like about the Nginx config file format is how it almost feels like a (primitive, low-level, but powerful) controller definition in a typical web MVC framework. We start with some "globals" to indicate we are using SSL. Note we are only listening on port 443 so you can have some other server running on port 80. Then we specify the standard CORS headers, which will be applied to EVERY request, whether handled locally or proxied through to the target server, and even if the proxied request results in a 404:
  more_set_headers 'Access-Control-Allow-Origin: *';
  more_set_headers 'Access-Control-Allow-Methods: GET, POST, OPTIONS, PUT, DELETE';
  more_set_headers 'Access-Control-Allow-Credentials: true';
  more_set_headers 'Access-Control-Allow-Headers: Origin,Content-Type,Accept';

This last point can be important - your JavaScript client might need to inspect the body of an error response to work out what to do next - but if it doesn't have the CORS headers applied, the client is not actually permitted to see it!
The little if statement that is included for each location provides functionality that I simply couldn't find in Apache. This is the explicit response to a preflighted OPTIONS:
  
    if ($request_method = OPTIONS ) {
      add_header Content-Length 0;
      add_header Content-Type text/plain;
      return 204;
    }
The target server remains blissfully unaware of the OPTIONS request, so you can safely firewall them out from this point onwards if you want. A 204 No Content is the technically-correct response code for a 200 OK with no body ("content") if you were wondering.
The last part(s) can be repeated for as many target servers as you want, and you can use whatever naming scheme you like:
 location /server1/  {
    include sites-available/cors-options.conf;
    proxy_pass https://server1.example.com;
  }

This translates requests for:
    https://my.devbox.example.com/server1/some/api/url
to:
    https://server1.example.com/some/api/url

This config has proven useful for running some Jasmine-based Javascript integration tests - hopefully it'll be useful for someone else out there too.

Monday, 15 April 2013

Ubuntu Wubi: Here Be Dragons

After being handed a rather low-spec ThinkPad at my new gig, and attempting to get work done in a locked-down corporate Windows 7 installation, I gave up after two days. The main reason being Cygwin. It's cool and all, but it's not Linux. All the cool kids write install/run scripts that almost work in Cygwin, but not quite. Usually something to do with slashes and backslashes. The third time I had to go diving into someone else's shell script which would *just work* on Linux/Mac, I'd had enough.

Off to the Ubuntu site I trundled, and my eye was caught by the Wubi option - Install Ubuntu from "inside" Windows, thus minimising my unproductive "watch the progress meter" time.

So here is my advice for anyone who does more with their computer than light web-browsing or a spot of word-processing, strictly one app at a time:

Do NOT, under any circumstances, use Wubi to get Ubuntu onto your machine.

What you get after a Wubi Ubuntu installation is a disk image stored in your Windows directory, which you can choose from a boot loader, and it feels "just like Ubuntu". Because it is Ubuntu. Being run in a virtual disk, mounted from an NTFS partition. There are a lot of moving parts in that last sentence, and therein lies the problem.

Undoubtedly is a remarkable and clever achievement to be able to do all of the boot-record-jiggery and virtual-file-system-pokery from within a "hostile" operating system. But just because you can, doesn't mean you should.

My experience of the Ubuntu 12.10 OS running from a Wubi install was universally positive, until I started actually multitasking. Like this (each bullet being an "async task" as it were):

  • Open new Terminal -> Start pulling down new and large git updates
  • Open new Terminal tab ->Start pulling new and large SVN updates
  • Open new Terminal tab -> Kick off a grails application build and test
  • Open Chrome -> GRIND. BANG. LOCKUP
It seems the filesystem-intensive work being done in the terminal (particularly the Grails job that does a lot of temporary file twiddling) makes the virtual disk driver work hard, which in turn makes the NTFS filesystem driver do a lot of work. And between the two of them, they lock up THE ENTIRE MACHINE. Lights-on, nobody-home style. Press-and-hold-the-power-button style.

Then, after deciding you've had enough of your Wubi-based install, you have a very considerable number of fiery hoops to jump through to get your stuff out of its clutches and into a real disk mounted on a real filesystem.

So when (not if) you decide to liberate a corporate machine from Windows, take the hit and do the job properly - boot into the installer the way God/Shuttleworth intended, partition the disk correctly and enjoy.

Tuesday, 28 June 2011

Debian on a NetVista N2200

While Puppy Linux has been a solid base for this web server for quite some time now, before bringing up a second NetVista N2200 unit, I was looking to move OS to something a little more familiar - a Debian-based OS. I'd found myself wishing for the ease of the deb package management and cursing the way the entire Puppy OS was copied into RAM on startup - very clever and fast, but I don't really want my precious 256Mb filled up with unused instances of /usr/bin/xeyes ...*


I wasted an entire weekend hacking PusPus, which claimed to be able get Debian Etch onto the NetVista. This claim was true, but the OS was all but unusable - any attempt to apt-get install some useful components (like ssh), or even running apt-get update was enough for a segmentation fault and complete system halt. Tweaking the PusPus Makefiles to fetch and build a Debian Lenny image resulted in exactly the same problem.


The Single Point of Truth on all things N2200 is, rather bizarrely, the comment thread at the foot of This Guy's Blog Post, but there is some great stuff there. My saviour was the replacement boot loader and OS image by der_odenwaelder (username: NetVista, password N22008363). This guy has done a sterling job in papering over the nastiest deficiencies in the NetVista's quirky hardware.


Finally I have a (relatively) up-to-date Debian build (Lenny) on my new machine, and it goes beautifully. My local APT Cache is really starting to pay dividends now, and will be even more valuable once I migrate this machine to the same platform.


Now that I can run a more "conventional" Linux OS, I'm getting excited again about the server potential of this all-but-forgotten black box. You can pick them up from eBay's Workstations category all the time for a pittance, and with a suitable RAM and CF Card injection, you've got a handy-dandy general-purpose server that you can leave switched on 24/7 while it uses less power than your broadband router.


(*) Just an example - I removed all of the XWindows stuff from the Puppy image as soon as I got it working.

Tuesday, 3 May 2011

Ultimate Ubuntu Build Server Guide, Part 4

Sync Thine Clocks
Note from future self; Although this setup guide is now superseded by cloud-based tools, certain elements are still useful simply as good practice, such as the "groundwork" in the early stages of this guide. As such, this article has been spared the chop

This is Part 4 of my Ultimate Ubuntu Build Server Guide.


Although it's less critical these days than it was in the bad old days of makefiles, it's still not optional that ALL your machines MUST be NTP-synced to a machine on the local network.


Think about how annoying it is when you login to a remote server to do some logfile-trawling but discover that the server's concept of "wall clock time" is actually 3 minutes, 37.234 seconds behind your local machine's. Ugh. I've noticed this is a particular issue with Virtual Machines - clock drift seems to be a perennial issue there.


Again, getting this stuff working doesn't have to be a big deal and certainly doesn't have to involve A Big Linux Box.


Your common-or-garden DSL router can almost certainly be "pimped" with a more-useful firmware image from one of the many open-source projects. On my NetGear DG834G, I'm using the DGTeam firmware image (unfortunately that project seems to have died, but a very kind soul is mirroring their excellent final versions here).


This offers a fully-working, webpage-configured implementation of OpenNTPD which is the exact same software Big Linux/BSD Servers run anyway.

Owners of DSL routers from other manufacturers (like Cisco/Linksys, D-Link, Buffalo and non-DG- NetGear equipment) can get similar functionality boosts from:

  • dd-wrt - I'm personally using this with success on a Linksys wireless AP. Supported device list
  • OpenWRT - requires more powerful hardware than dd-wrt but has the potential to act as a full Linux server should you desire...

Friday, 29 April 2011

Ultimate Ubuntu Build Server Guide, Part 3

Groundwork, Phase 3: Calling Names
Note from future self; Although this setup guide is now superseded by cloud-based tools, certain elements are still useful simply as good practice, such as the "groundwork" in the early stages of this guide. As such, this article has been spared the chop

This is Part 3 of my Ultimate Ubuntu Build Server Guide.


A productive network needs a comprehensible naming convention and a reliable mechanism for dishing out and looking up these names.


Naming Thine Boxen

On my first day at my current workplace I asked what the URL of the Wiki was. "wiki" was the reply. That kind of smile-inducing, almost-discoverable name is exactly the kind of server name we are looking for. At the other end of the scale is the completely-unmemorable, partly-implemented corporate server-farm naming scheme that means your build box is psal04-vic-virt06-r2 and your wiki lives on 12dev_x64_v227a. Ugh.


DNS and DHCP

The cornerstone of being able to talk to machines "by name" is of course, DNS. You need your own DNS server somewhere on the network. I know what you're thinking - that means a big, noisy, power-sucking Unix box and bind and resolf.conf and ... argh!.


Not necessarily.


Unless you've been living under a rock for the last 10 years, you'll have noticed that there are now rather a lot of small networked devices around, all running some flavour of Linux. Your DSL router is almost certainly one of them, but while it probably offers DHCP services, it probably won't be able to serve up DNS entries (as aside from proxying DNS entries from upstream). That's OK. There are other small Linux boxen that will do the job.


I speak of NAS devices. I'm personally using a Synology DS209, which is the kind of web-configured, one-box-solution, Linux-powered network überdevice I could have only dreamt about 10 years ago. In addition to storing mountains of media files and seamlessly acting as a Time Capsule for my MacBook, this neat little unit also runs SynDnsMasq, a port of the amazing dnsmasq DHCP/DNS server.


dnsmasq

A simple, elegant and functional tool that runs off one superbly-commented configuration file, dnsmasq will make your local network much more navigable thanks to local DNS addresses - ssh user@buildbox is much better than ssh user@10.12.14.16, don't you think?


Having full control of your DHCP server (as opposed to the primitive on/off on most domestic routers) also allows you to set up effectively-permanent address allocations based on MAC addresses. This gives you all of the advantages of static IP addresses for servers, but allows you to have a centralised repository of who-is-who, and even change things on the fly, if a server goes offline for example.


By running this software on my NAS, I get all of these features, plus I save scads of power as it's a low-power unit AND it switches itself on and off according to a Power Schedule so it's not burning any juice while I'm asleep. I've configured the DHCP server to actually tell clients about two DNS servers - the primary being the NAS itself, the secondary being my ADSL router. That way, if I start using a client at 10.55pm, I can keep surfing the web after the NAS goes to sleep at 11pm - the client will just "fail over" to the main gateway.


Name Your Poison

The actual names you use for servers and clients are of course a very personal choice. One of the best schemes I've used was based on animals, with increasing levels of maturity and/or decreasing domesticity based on their function. A table's worth a thousand words here I think!


FunctionSpeciesDevTestProd
App ServerCaninePuppyDogWolf
Web ServerEquineFoalHorseZebra
Database ServerCapraKidGoatIbex

While this caused much hilarity amongst non-technical people ("Horse will be down until we bounce the Goat" is not something you hear in many offices!), it actually worked very well.


The scheme I'm using at home is a simple "big cat" scheme - lion, tiger, cheetah, leopard etc - but I've taken the opportunity to "overload" the names in my dnsmasq configuration - so buildbox currently resolves to the same machine as cheetah - but of course should that duty ever change, it's just a one-line change on the NAS to fix it.

Tuesday, 26 April 2011

Ultimate Ubuntu Build Server Guide, Part 2

Groundwork, Phase 2: Sensible IP Addresses
Note from future self; Although this setup guide is now superseded by cloud-based tools, certain elements are still useful simply as good practice, such as the "groundwork" in the early stages of this guide. As such, this article has been spared the chop

This is Part 2 of my Ultimate Ubuntu Build Server Guide.


First things first. If you're running a development network on a 192.168.x.y network, you're going to want to change that, stat. Why? Because you simply don't (or won't) have enough numbers to go around.

Yes, you're going to hit your very own IPv4 address exhaustion crisis. Maybe not today, maybe not tomorrow, but consider the proliferation of WiFi-enabled devices and virtualised machines in the last few years. If you've only got 250-odd addresses, minus servers (real and virtualised), minus workstations (real and virtualised), minus bits of networking equipment, and each developer has at least one WiFi device in her pocket, you're probably going to have to start getting pretty creative to fit everyone in. And I haven't even mentioned the possibility of being a mobile shop and having a cupboard full of test devices!


To me, it makes much more sense to move to the wide open spaces of the 10.a.b.c local network range. Then not only will you have practically-unlimited room for expansion, but you can also start encoding useful information into machine addresses. Allow me to demonstrate with a possible use of the bits in the a digit:

 7 6 5 4 3 2 1 0
 | | | |
 | | | \- "static IP"
 | | \--- "wired"
 | \----- "local resource access OK"
 \------- "firewalled from internet"


Which leads to addresses like:

AddressMeaningExample Machine Type
10.240.b.cfully-trusted, wired, static-IPDev Servers
10.224.b.cfully-trusted, wired, DHCPDev Workstations
10.192.b.cfully-trusted, WiFi, DHCPKnown Wireless Devices
10.128.b.cpartly trusted WiFi DHCPVisitor Laptops etc
10.48.b.cuntrusted wired static-IPDMZ


You've still got scads of room to create further subdivisions (dev/test/staging for example in the servers group) and access-control is as simple as applying a suitable netmask.


In the above case, sensitive resources could require a /10 (trusted, firewalled) IP address. Really private stuff might require access from a wired network - i.e. a /11. Basically, the more secure the resource, the more bits you need in your a octet.


It might be a bit painful switching over from your old /24 network but I think in the long term it'll be well worth it.


Next time, we'll look at how to name all these machines.

Friday, 22 April 2011

Ultimate Ubuntu Build Server Guide, Part 1

Groundwork, Phase 1: A Quality Local Network
Note from future self; Although this setup guide is now superseded by cloud-based tools, certain elements are still useful simply as good practice, such as the "groundwork" in the early stages of this guide. As such, this article has been spared the chop

OK, so for the next I-don't-know-how-long I'm going to devote this blog to a comprehensive step-by-step guide to setting up an absolutely rock-solid Continuous-Integration/Continuous Delivery-style build server.
Fundamentally it'll be based around the latest release of Ubuntu Server, but there are a number of steps that we need to address before we even introduce an ISO to a CD-ROM.


Possibly the dullest, but most potentially useful is Getting Our Local Network Sorted Out. What do I mean by that?

  • Working out a sensible IP addressing scheme
  • Maintaining a comprehensible naming convention for machines
  • Dedicating an (almost-)always-on box to do DNS lookups and DHCP handouts
  • Having as few statically-addressed machines as feasible
  • Keeping DHCP clients on as stable an IP address as possible
  • Having good bandwidth where it's needed
  • Using the simplest-possible network infrastructure
  • Offering simple options for both backed-up and transient file storage


You might be surprised how many "proper" system-administered networks fail on at least one of these hurdles; so while we wait patiently for the Natty Narwhal I'm going to take the next few weeks to go through them.

Friday, 8 April 2011

NetVista Update

"Hey, how's that ultra-small, ultra-quiet, ultra-low-power app server going?" I don't hear you ask.


Awesome, thanks for not asking!

  root@netvista1 # uptime
    20:12:01 up 166 days, 3:11, load average: 0.10, 0.03, 0.02
  root@netvista1 #

Yep, that little black box has been a great success. Any effect on the household electricity bill has been negligible, and it's been a fantastic platform to host public-facing (if untrafficked) Java experiments.


I'm in the process of bringing up netvista2, emphatically not as a load-balanced production server but rather as a public-facing "staging" server so I can begin A/B production environment switching as part of a Continuous Delivery approach.


Something else I want to look at is using Java SE for Embedded to give a bit more RAM space for webapps. Stay tuned.