Showing posts with label jenkins. Show all posts

Friday, 4 May 2018

Raspberry Pi 3 Model B+

My Synology NAS is coming up to 10 years of age, and asking it to do all its usual functions, plus run a few solid Java apps: ... was all a bit much for its 700MHz ARM processor, and particularly its 256Mb of RAM. Jenkins was the final straw, so I was looking around for other low-power devices that could run these apps comfortably. One gigabyte of RAM being a definite requirement. My Googling came up with Raspberry Pi devices, which surprised me as I'd always considered them a little "weak" as general purpose servers, more for doing single duties or as clients.

But that was before I knew about the Raspberry Pi 3, Model B+. This little rocket boots up its Raspbian (tweaked Debian) OS in a few seconds, has 1Gb of RAM and a quad-core 1.4GHz ARM processor that does a great job with the Java workloads I'm throwing at it. And look at the thing - it's about the size of a pack of cards:
A quad-core server with 1Gb of RAM, sitting on 3TB of storage. LEGO piece for scale. I wonder what 1998-me would have made of that!

With wired and wireless Ethernet, scads of USB 3.0 ports and interesting GPIO pin possibilities, this thing is ideal for my home automation projects. And priced so affordably that (should it become necessary) running a fleet of these little guys is quite plausible. If like me, you had thought the Raspberry Pi was a bit of a toy, take another look!

Thursday, 25 January 2018

OpenShift - the 'f' is silent

So it's come to this.

After almost-exactly four years of free-tier OpenShift usage for Jenkins purposes, I have finally had to throw up my hands and declare it unworkable.

The first concern was earlier in 2017 when, with minimal notice, they announced the end-of-life of the OpenShift 2.0 platform which was serving me so well. Simultaneously they dropped the number of nodes available to free-tier customers from 3 to 1. A move I would have been fine with if there had been any way for me to pay them down here in Australia - a fact I lamented about almost 2 years ago.

Then, in the big "upgrade" to version 3, OpenShift disposed of what I considered to be their best feature - having the configuration of a node held under version control in Git; push a change, the node restarts with the new config. Awesome. Instead, version 3 handed us a complex new ecosystem of pods, containers, services, images, controllers, registries and applications, administered through a labyrinth of somewhat-complete and occasionally-buggy web pages. Truly a downgrade from my perspective.

The final straw was the extraordinarily fragile and flaky nature of the one-and-only node (or is it "pod"? Or "application"? I can't even tell any more) that I have running as a Jenkins master. Now this is hardly a taxing thing to run - I have a $5-per-month Vultr instance actually being a slave and doing real work - yet it seems to be unable to stay up reliably while doing such simple tasks as changing a job's configuration. It also makes "continuous integration" a bit of a joke if pushing to a repository doesn't actually end up running tests and building a new artefact because the node was unresponsive to the webhook from Github/Bitbucket. Sigh.

You can imagine how great it is to see this page when you've just hit "save" on the meticulously-detailed configuration for a brand new Jenkins job...

So, in what I hope is not a taste of things to come, I'm de-clouding my Jenkins instance and moving it back to the only "on-premises" bit of "server hardware" I still own - my Synology DS209 NAS. Stay tuned.

Saturday, 30 July 2016

Vultr Jenkins Slave GO!

I was alerted to the existence of VULTR on Twitter - high-performance compute nodes at reasonable prices sounded like a winner for Jenkins build boxes. After the incredible flaming-hoop-jumping required to get OpenShift Jenkins slaves running (and able to complete builds without dying) it was a real pleasure to have the simplicity of root-access to a Debian (8.x/Jessie) box and far-higher limits on RAM.

I selected a "20Gb SSD / 1024Mb" instance located in "Silicon Valley" for my slave. Being on the opposite side of the US to my OpenShift boxes feels like a small, but important factor in preventing total catastrophe in the event of a datacenter outage.

Setup Steps

(All these steps should be performed as root):

User and access

Create a jenkins user:
addgroup jenkins
adduser jenkins --ingroup jenkins

Now grab the id_rsa.pub from your Jenkins master's .ssh directory and put it into /home/jenkins/.ssh/authorized_keys. In the Jenkins UI, set up a new set of credentials corresponding to this, using "use a file from the Jenkins master .ssh". (which by the way, on OpenShift will be located at /var/lib/openshift/{userid}/app-root/data/.ssh/jenkins_id_rsa).
I like to keep things organised, so I made a vultr.com "domain" container and then created the credentials inside.

Install Java

echo "deb http://ppa.launchpad.net/webupd8team/java/ubuntu xenial main" | tee /etc/apt/sources.list.d/webupd8team-java.list
echo "deb-src http://ppa.launchpad.net/webupd8team/java/ubuntu xenial main" | tee -a /etc/apt/sources.list.d/webupd8team-java.list
apt-key adv --keyserver hkp://keyserver.ubuntu.com:80 --recv-keys EEA14886
apt-get update
apt-get install oracle-java8-installer

Install SBT

apt-get install apt-transport-https
echo "deb https://dl.bintray.com/sbt/debian /" | tee -a /etc/apt/sources.list.d/sbt.list
apt-key adv --keyserver hkp://keyserver.ubuntu.com:80 --recv 642AC823
apt-get update
apt-get install sbt

More useful bits

Git
apt-get install git
NodeJS
curl -sL https://deb.nodesource.com/setup_4.x | bash -
apt-get install nodejs

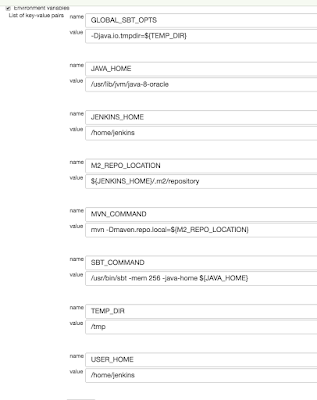
This machine is quite dramatically faster and has twice the RAM of my usual OpenShift nodes, making it extra-important to have those differences defined per-node instead of hard-coded into a job. One thing I was surprised to have to define was a memory limit for the JVM (via SBT's -mem argument) as I was getting "There is insufficient memory for the Java Runtime Environment to continue" errors when letting it choose its own upper limit. For posterity, here are the environment variables I have configured for my Vultr slave:

Thursday, 12 May 2016

Cloudy Continuous Integration Part 2 - Trigger-Happy

In Part 1 of this highly-sporadic series, I specified No Polling as a must-have for your build box. I have seen countless examples where otherwise-great toolchains are let down by dumb polling on behalf of the build server. Even worse is when a heap of jobs all go polling at the same time (e.g. a */5 * * * * cron expression or similar), resulting in terrible load spiking, and unfair (and possibly even wrong) build order.

Why do otherwise-excellent and smart engineers end up doing the kind of dumb polling in Jenkins that would keep them up at night if it was their code? Mainly because historically, it's been substantially harder to get properly-triggered job execution going in Jenkins. But things are getting better. The Jenkins GitHub Plugin does a terrific job of simplifying triggering, thanks to its convention-over-configuration approach - once you've nominated where your GitHub repo is, getting triggering is as simple as checking a box. Lovely.


Now, finally, it seems BitBucket have almost caught up in this regard. Naturally, as they offer (free) private repositories, there is a little bit more configuration required on the SCM side, but I can confirm that in May 2016, it works. There seem to have been a lot of changes going on under the hood at BitBucket, and the reliability of their triggering has suffered from week-to-week at times, but hopefully things will be solid now.

The 2016 Way to trigger Jenkins from BitBucket
  1. Firstly, there is now no need to configure a special user for triggering purposes
  2. Install the Jenkins BitBucket plugin. For your reference, I have 1.1.5
  3. In jobs that you want to be triggered, note there is a new "BitBucket" option under Build Triggers. You want this. If it was checked, uncheck the "polling" option and feel clean
  4. That's the Jenkins side done. Now flip to your BitBucket repo, and head to the Settings
  5. Under Integrations -> Webhooks add a new one, and fill it out something like this:
    Where jjj.rhcloud.com is your (in this case imaginary-OpenShift) Jenkins URL.
  6. Make sure you've included that trailing slash, and then you're done! Push some code to test
One of the nicest features of this Webhook-powered way of triggering is that you can actually view the details of each request and the response that came back from your Jenkins. This was completely opaque when using the Services integration that was until-recently the best option.
Hat-Tips to the following (but sadly outdated) bloggers

Wednesday, 27 April 2016

Happy and Healthy Heterogeneous Build Slaves in Jenkins

After moving off the CloudBees platform, one thing that quickly became apparent was that an OpenShift Jenkins build slave simply runs out of resources when asked to build moderately-complex Scala software, on two fronts - the 500Mb RAM hard limit is quickly hit during SBT builds (particularly during tests) and the 1Gb of disk space is also very limiting once a few dependencies have been pulled into the Ivy cache.

So a second slave was brought on line - my old Dell Inspiron 9300 laptop from 2006 - which (after an upgrade to 2Gb of RAM for a handful of dollars online) has done a sterling job. Running Ubuntu 14.04 Desktop edition seems to not tax the Intel Pentium M too badly, and it seemed crazy to get rid of that amazing 17" 1920x1200 screen for a pittance on eBay. Now at this point I had two slaves on line, with highly different capabilities.
Horses for Courses
The OpenShift node (slave1) has low RAM, slow CPU, very limited persistent storage but exceptionally quick network access (being located in a datacenter somewhere on the US East Coast), while the laptop (slave2) has a reasonable amount of RAM, moderate CPU, tons of disk but relatively slow transfer rates to the outside world, via ADSL2 down here in Australia. How to deal with all these differences when running jobs that could be farmed out to either node?

The solution is of course the classic layer of indirection that allows the different boxes to be addressed consistently. Here is the configuration for my slave1 Redhat box on OpenShift:


Note the -mem argument in the SBT_COMMAND which sets the -Xmx and -Xms to this number and PermGen to 2* this number, keeping a lid on resource usage. And here's slave2, the Ubuntu laptop, with no such restriction needed:


And here's what a typical build job looks like:


Caring for Special-needs Nodes
Finally, my disk-challenged slave1 node gets a couple of Jenkins jobs to tend to it. The first periodically runs a git gc in each .git directory under the Jenkins workspace (as per a Stack Overflow answer) - it runs quota before-and-after to show how much (if anything) was cleared up:


The second job periodically removes the target directory wherever it is found - SBT builds leave a lot of stuff in here that can really add up. Here's what it looks like:

Friday, 4 March 2016

Unbreaking the Heroku Jenkins Plugin

TL;DR: If you need a Heroku Jenkins Plugin that doesn't barf when you Set Properties, here you go.

CI Indistinguishable From Magic

I'm extremely happy with my OpenShift-based Jenkins CI setup that deploys to Heroku. It really does do the business, and the price simply cannot be beaten.

Know Thy Release

Too many times, at too many workplaces, I have faced the problem of trying to determine Is this the latest code? from "the front end". Determined not to have this problem in my own apps, I've been employing a couple of tricks for a few years now that give excellent traceability.

Firstly, I use the nifty sbt-buildinfo plugin that allows build-time values to be injected into source code. A perfect match for Jenkins builds, it creates a Scala object that can then be accessed as if it contained hard-coded values. Here's what I put in my build.sbt:

buildInfoSettings

sourceGenerators in Compile <+= buildInfo

buildInfoKeys := Seq[BuildInfoKey](name, version, scalaVersion, sbtVersion)

// Injected via Jenkins - these props are set at build time: 
buildInfoKeys ++= Seq[BuildInfoKey](
  "extraInfo" -> scala.util.Properties.envOrElse("EXTRA_INFO", "N/A"),
  "builtBy"   -> scala.util.Properties.envOrElse("NODE_NAME", "N/A"),
  "builtAt"   -> new java.util.Date().toString)

buildInfoPackage := "com.themillhousegroup.myproject.utils"
The Jenkins Wiki has a really useful list of available properties which you can plunder to your heart's content. It's definitely well worth creating a health or build-info page that exposes these.

Adding Value with the Heroku Jenkins Plugin

Although Heroku works spectacularly well with a simple git push, the Heroku Jenkins Plugin adds a couple of extra tricks that are very worthwhile, such as being able to place your app into/out-of "maintenance mode" - but the most pertinent here is the Heroku: Set Configuration build step. Adding this step to your build allows you to set any number of environment variables in the Heroku App that you are about to push to. You can imagine how useful this is when combined with the sbt-buildinfo plugin described above!

Here's what it looks like for one of my projects, where the built Play project is pushed to a test environment on Heroku:

Notice how I set HEROKU_ENV, which I then use in my app to determine whether key features (for example, Google Analytics) are enabled or not.

Here are a couple of helper classes that I've used repeatedly (ooh! time for a new library!) in my Heroku projects for this purpose:

import scala.util.Properties

object EnvNames {
  val DEV   = "dev"
  val TEST  = "test"
  val PROD  = "prod"
  val STAGE = "stage"
}

object HerokuApp {
  lazy val herokuEnv = Properties.envOrElse("HEROKU_ENV", EnvNames.DEV)
  lazy val isProd = (EnvNames.PROD == herokuEnv)
  lazy val isStage = (EnvNames.STAGE == herokuEnv)
  lazy val isDev = (EnvNames.DEV == herokuEnv)
 
  def ifProd[T](prod:T):Option[T] = if (isProd) Some(prod) else None

  def ifProdElse[T](prod:T, nonProd:T):T = {
    if (isProd) prod else nonProd
  }
}

... And then it all went pear-shaped

I had quite a number of Play 2.x apps using this Jenkins+Heroku+BuildInfo arrangement to great success. But then at some point (around September 2015 as far as I can tell) the Heroku Jenkins Plugin started throwing an exception while trying to Set Configuration. For the benefit of any desperate Google-trawlers, it looks like this:

  at com.heroku.api.parser.Json.parse(Json.java:73)
  at com.heroku.api.request.releases.ListReleases.getResponse(ListReleases.java:63)
  at com.heroku.api.request.releases.ListReleases.getResponse(ListReleases.java:22)
  at com.heroku.api.connection.JerseyClientAsyncConnection$1.handleResponse(JerseyClientAsyncConnection.java:79)
  at com.heroku.api.connection.JerseyClientAsyncConnection$1.get(JerseyClientAsyncConnection.java:71)
  at com.heroku.api.connection.JerseyClientAsyncConnection.execute(JerseyClientAsyncConnection.java:87)
  at com.heroku.api.HerokuAPI.listReleases(HerokuAPI.java:296)
  at com.heroku.ConfigAdd.perform(ConfigAdd.java:55)
  at com.heroku.AbstractHerokuBuildStep.perform(AbstractHerokuBuildStep.java:114)
  at com.heroku.ConfigAdd.perform(ConfigAdd.java:22)
  at hudson.tasks.BuildStepMonitor$1.perform(BuildStepMonitor.java:20)
  at hudson.model.AbstractBuild$AbstractBuildExecution.perform(AbstractBuild.java:761)
  at hudson.model.Build$BuildExecution.build(Build.java:203)
  at hudson.model.Build$BuildExecution.doRun(Build.java:160)
  at hudson.model.AbstractBuild$AbstractBuildExecution.run(AbstractBuild.java:536)
  at hudson.model.Run.execute(Run.java:1741)
  at hudson.model.FreeStyleBuild.run(FreeStyleBuild.java:43)
  at hudson.model.ResourceController.execute(ResourceController.java:98)
  at hudson.model.Executor.run(Executor.java:374)
Caused by: com.heroku.api.exception.ParseException: Unable to parse data.
  at com.heroku.api.parser.JerseyClientJsonParser.parse(JerseyClientJsonParser.java:24)
  at com.heroku.api.parser.Json.parse(Json.java:70)
  ... 18 more 
Caused by: org.codehaus.jackson.map.JsonMappingException: Can not deserialize instance of java.lang.String out of START_OBJECT token
 at [Source: [B@176e40b; line: 1, column: 473] (through reference chain: com.heroku.api.Release["pstable"])
  at org.codehaus.jackson.map.JsonMappingException.from(JsonMappingException.java:160)
  at org.codehaus.jackson.map.deser.StdDeserializationContext.mappingException(StdDeserializationContext.java:198)
  at org.codehaus.jackson.map.deser.StdDeserializer$StringDeserializer.deserialize(StdDeserializer.java:656)
  at org.codehaus.jackson.map.deser.StdDeserializer$StringDeserializer.deserialize(StdDeserializer.java:625)
  at org.codehaus.jackson.map.deser.MapDeserializer._readAndBind(MapDeserializer.java:235)
  at org.codehaus.jackson.map.deser.MapDeserializer.deserialize(MapDeserializer.java:165)
  at org.codehaus.jackson.map.deser.MapDeserializer.deserialize(MapDeserializer.java:25)
  at org.codehaus.jackson.map.deser.SettableBeanProperty.deserialize(SettableBeanProperty.java:230)
  at org.codehaus.jackson.map.deser.SettableBeanProperty$MethodProperty.deserializeAndSet(SettableBeanProperty.java:334)
  at org.codehaus.jackson.map.deser.BeanDeserializer.deserializeFromObject(BeanDeserializer.java:495)
  at org.codehaus.jackson.map.deser.BeanDeserializer.deserialize(BeanDeserializer.java:351)
  at org.codehaus.jackson.map.deser.CollectionDeserializer.deserialize(CollectionDeserializer.java:116)
  at org.codehaus.jackson.map.deser.CollectionDeserializer.deserialize(CollectionDeserializer.java:93)
  at org.codehaus.jackson.map.deser.CollectionDeserializer.deserialize(CollectionDeserializer.java:25)
  at org.codehaus.jackson.map.ObjectMapper._readMapAndClose(ObjectMapper.java:2131)
  at org.codehaus.jackson.map.ObjectMapper.readValue(ObjectMapper.java:1481)
  at com.heroku.api.parser.JerseyClientJsonParser.parse(JerseyClientJsonParser.java:22)
  ... 19 more 
Build step 'Heroku: Set Configuration' marked build as failure
Effectively, it looks like Heroku has changed the structure of their pstable object, and that the baked-into-a-JAR definition of it (Map<String, String> in Java) will no longer work.

Open-Source to the rescue

Although the Java APIs for Heroku have been untouched since 2012, and indeed the Jenkins Plugin itself was announced deprecated (without a suggested replacement) only a week ago, fortunately the whole shebang is open-source on Github so I took it upon myself to download the code and fix this thing. A lot of swearing, further downloading of increasingly-obscure Heroku libraries and general hacking later, and not only is the bug fixed:
- Map<String, String> pstable;
+ Map<String, Object> pstable;
But there are new tests to prove it, and a new Heroku Jenkins Plugin available here now. Grab this binary, and go to Manage Jenkins -> Manage Plugins -> Advanced -> Upload Plugin and drop it in. Reboot Jenkins, and you're all set.

Friday, 26 February 2016

Making better software with Github

The first time I extracted a library from a private project and open-sourced it to Github was a purely practical decision; the project was simply getting too large for the puny build box I was using to build it with (an OpenShift free node*). The library was Arallon - you can read a bit more about what it does in my blog series about Strongly-Typed Time.

This solved my problem, in that I no longer ran out of PermGen on my build slave. But the repercussions were far-reaching. Any decent public-facing library needs documentation, and Github's README.md is an incredibly convenient place to put it all. I've lost count of the number of times I've found myself reading my own documentation up there on Github; if Arallon was still a hodge-podge of classes within my application, I'd have spent hours trying to deduce my own functionality ...

Of course, a decent open-source library must also have excellent tests and test coverage. Splitting Arallon into its own library gave the tests a new-found focus and similarly the test coverage (measured with JaCoCo) was much more significant.

Since that first library split, I've peeled off many other utility libraries from private projects; almost always things to make Play2 app development a little quicker and/or easier:

As a shameless plug, I use yet another of my own projects (I love my own dogfood!), sbt-skeleton to set up a brand new SBT project with tons of useful defaults like dependencies, repository locations, plugins etc as well as a skeleton directory structure. This helps make the decision to extract a library a no-brainer; I can have a library up-and-building, from scratch, in minutes. This includes having it build and publish to BinTray, which is simply just a matter of cloning an existing Jenkins job and changing the name of the source Github repo.

I've found the implied peer-pressure of having code "out there" for public scrutiny has a strong positive effect on my overall software quality. I'm sure I'm not the only one. I highly recommend going through the process of extracting something re-usable from private code and open-sourcing it into a library you are prepared to stand behind. It will make you a better software developer in many ways.

* This is not a criticism of OpenShift; I love them and would gladly pay them money if they would only take my puny Australian dollars :-(

Friday, 16 October 2015

Cloudy Continuous Integration: BitBucket-to-Jenkins-to-Heroku[-to-Heroku] - Part 1

I can't quite believe it but it's actually almost a year since I moved away from an entirely-Cloudbees-based build-and-deploy chain to a far more higgledy-piggledy, yet much more satisfactory, best-of-breed chain.

In that time this setup has built a helluva lot of software, both open-source libraries and closed-source moonlighting apps, and I've learnt a helluva lot too. Time to share.

John's Continuous Integration Rules

No Polling

The pipeline/flow should kick off the instant something is pushed to master. Waiting 59 seconds because we just missed the poll is wasteful. If we're using a modern source-control system, there is absolutely no reason to be periodically polling it for changes. It's the 21st century, last century's batch processing techniques aren't useful here.

Clean, Tagged Builds

The build must begin with a clean to ensure repeatability. Each and every successful build should be appropriately tagged so that the correlation between git commit ID and Jenkins build number is evident.

Versioning Includes Build Configuration

Things go wrong. Jenkins configurations get accidentally broken. It should be just as easy to roll back a misconfigured job as it is to roll back a bad code change.

If It Passes The Tests, It's In test

Yes the test environment will be volatile, but as long as the tests are good, it should be good-volatile; aka latest-and-greatest. This puts the onus on developers to write comprehensive, meaningful tests. The test environment should be a glittering showcase of all the awesome that is about to hit prod.

Fully-automated push-button test/staging-to-prod

No manual funny-business allowed. Repeatable, reliable, and (ideally) rollback-able from the Jenkins UI.

Desired Setup

The simplest thing that will deliver to the target environments, and abides by the above rules:

            [User] 
              |
      commits to master 
              |
              v
         [BitBucket]
              |
            pokes
              |
              v
  [Secured Jenkins Instance] 
              |
          commits to 
              |
              v
       [Heroku TEST/STAGING Env]
  
        (manual trigger)
              |
              v
       [Heroku PROD Env]       

How To Make It Happen

Sound good? Stand by for Part 2 where all is revealed...

Thursday, 27 August 2015

SSH Tunnels: The corporate developer's WD40 + Gaffer Tape


So at my current site the dreaded Authenticating Proxy policy has been instigated - one of those classic corporate network-management patterns that may make sense for the 90% of users with their locked-down Windows/Active Directory/whatever setups, but makes life a miserable hell for those of us playing outside on our Ubuntu boxes.

In a nice display of classic software-developer passive-aggression we've been keeping track of the hours lost due to this change - we're up to 10 person-days since the policy came in 2 months ago. Ouch.

Mainly the problems are due to bits of open-source software that simply haven't had to deal with such proxies - these generally cause things like Jenkins build boxes and other "headless" (or at least "human-less") devices to have horrendous problems.

I got super-tied-up today trying to get one of these build boxes to install something via good-old apt-get in Ubuntu. In the end I used one of my old favourite tricks, the SSH Tunnel backchannel to use the proxy that my dev box has authenticated with, to get the job done.

Here's how it goes:
Preconditions:
  • dev-box is my machine, which is happily using the authenticated proxy via some other mechanism (e.g. kinit)
  • build-box is a build slave that is unable to use apt-get due to proxy issues (e.g. 407 Proxy Authentication Required)
  • proxy-box is the authenticating proxy, listening on port 8080


 proxy-box            dev-box            build-box
    ---                 ---                ---
    | |                 | |                | |
    | |                _____               | |
    | 8080    < < <    _____    < < <   7777 |
    | |                 | |                | |
    | |                 | |                | |
    ---                 ---                ---


From dev-box
ssh build-box -R7777:proxy-box:8080

Welcome to build-box
> sudo vim /etc/apt/apt.conf
.. and create/modify apt.conf as follows:
Acquire::http::proxy "http://localhost:7777/";
At which point, apt-get should start working, via your own machine (and your proxy credentials). Once you're done, you may want to revert your change to apt.conf, or you could leave it there, with an explanatory comment of how and why it has been set up like this (or just link to this post!)

Saturday, 1 November 2014

Walking away from Run@Cloud Part 3: Pause and Reflect

As a happy free-tier CloudBees user, my "build ecosystem" looked like this:


As CloudBees seem to have gone "Enterprise" in the worst possible way (from my perspective) and don't have any free offerings any more, I was now looking for:
  • Git repository hosting (for private repos - my open-source stuff is on GitHub)
  • A private Nexus instance to hold closed-source library artifacts
  • A public Nexus instance to hold open-source artifacts for public consumption
  • A "cloud" Jenkins instance to build both public- and private-repo-code when it changes;
    • pushing private webapps to Heroku
    • publishing private libs to the private Nexus
    • pushing open-source libs to the public Nexus
... and all for as close to $0 as possible. Whew!

I did a load of Googling, and the result of this is an ecosystem that is far more "diverse" (a charitable way to say "dog's breakfast") but still satisfies all of the above criteria, and it's all free. More detail in blog posts to come, but here's what I've come up with:

Tuesday, 28 October 2014

Walking away from Run@Cloud. Part 2: A Smooth Transition

So, having selected Heroku as my new runtime platform, how to move my stuff on there?

On the day of their announcement, Cloudbees provided an FAQ and a Migration Guide for their current customers.

In addition, Heroku most considerately have a CloudBees-to-Heroku migration guide (updated on the day of the CloudBees announcement, nice).

Setting up on Heroku proved delightfully simple, and with a git push heroku master from my machine, my first app was "migrated". Up and running, and actually (according to my simple metrics) responding more quickly than when it was hosted on CloudBees. Epic win, amirite?

Well, not entirely. The git push deploy method is all very well, but I dislike the implied trust it puts in the "pusher". How does anybody know what is in that push? Does it pass the tests? Does it even compile? When CloudBees was my end-to-end platform, I had the whole CI/CD chain thing happening so only verified, test-passing code actually made it through the gate. But Heroku doesn't offer such a thing - they just run what you push to them.

Well, if CloudBees wants to become the cloud Jenkins instance, and they continue to have a free offering, I will continue to use it. So let's get CloudBees building and testing my stuff, and then fire it over to Heroku to run it, all from a Jenkins instance on CloudBees.

Oh dear. CloudBees are no longer offering a free Jenkins service.

Back to the drawing-board!

Wednesday, 18 June 2014

Scala By Stealth, Part 1: SBTifying your Mavenized Build

I was faced with updating and extending some old Java code of mine recently, and it seemed like much more of a chore than it used to. The code in question does a lot of collection manipulation, and I was looking at the Java code (which was, if I say so myself, not too bad - clean, thoroughly-tested and using nice libraries like Google Guava where at all possible) thinking "ugh - that would be a couple of lines in Scala and way more readable at the same time".

At this point I realised it would be a perfect candidate for a step-by-step guide for converting a simple Maveni[sz]ed Java library project (e.g. resulting in a JAR file artifact) to an SBT-based, Scala library.

Shortly after that I realised this could be a terrific way for a traditional "Java shop" where everything up until now has been delivered as JARs (and/or WARs) into a private Nexus to get its feet wet with Scala without having to go with a risky "big-bang" approach. An iterative migration, if you will. So let's get started!

A tiny bit of background first though - I'm not going to bother anonymising the library I'll be migrating, because I will almost certainly forget to do so somewhere in the example snippets I'll be including. So I'll say it here: the library is called brickhunter, and it's the "engine" behind the web-scraping LEGO search engine you can use at brickhunter.net. The site itself is a Java/Spring MVC/JQuery webapp that I launched in late 2012, and was the last significant bit of Java I ever wrote. It includes brickhunter.jar as a standard Maven dependency, pulling it from my private Maven repo hosted by CloudBees.

Step 0 (A Precondition): A Cared-For Maven Java Project

You need to be doing this migration for a library that has redeeming qualities, and not one that suffers from neglect, lack of test coverage, or a non-standard building process. Generally, using Maven will have made the latter difficult, but if, somehow, weird stuff is still going on, fix that. And make sure your tests are in order - comprehensive, relevant and not disabled!

Step 1: An SBTified Java Project

  • Create a new directory alongside the "legacy" project directory with a suitable name. For me, the obvious one was brickhunter-scala.
  • Now recursively copy everything under src from legacy to new. Hopefully that gets everything of importance; if not, see Step 0 and decide what should be done.
  • While a number of people have written helpers to automate the creation of a build.sbt from a pom.xml, unless you have a truly enormous number of dependencies, you're probably better-off just writing it yourself. For one thing, it's the obvious entry point to the enormous world of SBT, and there's plenty to learn;
  • In a typical Maven shop you may have quite a stack of parent POMs bringing in various dependencies - I found the quickest way to get all of them into SBT style was by invoking mvn dependency:tree which for my project, gave me:
    [INFO] +- org.jsoup:jsoup:jar:1.6.1:compile
    [INFO] +- commons-lang:commons-lang:jar:2.6:compile
    [INFO] +- com.google.guava:guava:jar:11.0.1:compile
    [INFO] |  \- com.google.code.findbugs:jsr305:jar:1.3.9:compile
    [INFO] +- log4j:log4j:jar:1.2.16:compile
    [INFO] +- org.slf4j:slf4j-api:jar:1.6.4:compile
    [INFO] +- org.slf4j:slf4j-log4j12:jar:1.6.4:compile
    [INFO] +- com.themillhousegroup:argon:jar:1.1-SNAPSHOT:compile
    [INFO] +- org.testng:testng:jar:6.3.1:test
    [INFO] |  +- junit:junit:jar:3.8.1:test
    [INFO] |  +- org.beanshell:bsh:jar:2.0b4:test
    [INFO] |  +- com.beust:jcommander:jar:1.12:test
    [INFO] |  \- org.yaml:snakeyaml:jar:1.6:test
    [INFO] +- org.mockito:mockito-all:jar:1.9.0:test
    [INFO] \- org.hamcrest:hamcrest-all:jar:1.1:test
    
  • Anything transitive (i.e. indented once or more) can be omitted as SBT will work that out for us just as Maven did.
  • The eagle-eyed might notice an in-house dependency (argon) which clearly isn't going to be found in the usual public repos - it will need its own resolver entry in build.sbt.
  • Here's how mine looked at this point:
  • name := "brickhunter-scala"
    
    organization := "com.themillhousegroup"
    
    version := "0.1"
    
    scalaVersion := "2.10.3"
    
    credentials += Credentials(Path.userHome / ".ivy2" / ".credentials")
    
    resolvers += "tmg-private-repo" at "https://repository-themillhousegroup.forge.cloudbees.com/private/"
    
    libraryDependencies ++= Seq(
      "org.jsoup"             % "jsoup"           % "1.6.1",
      "commons-lang"          % "commons-lang"    % "2.6",
      "com.google.guava"      % "guava"           % "11.0.1",
      "log4j"                 % "log4j"           % "1.2.16",
      "org.testng"            % "testng"          % "6.3.1"         % "test",
      "org.mockito"           % "mockito-all"     % "1.9.0"         % "test",
      "com.themillhousegroup" % "argon"           % "1.1-SNAPSHOT"  % "test"
    )
    
  • At this point, firing up SBT and giving it a compile command should be successful. If so, pat yourself on the back, and commit all pertinent files in source control. This is a good milestone!


Step 2: A Tested SBTified Java Project

  • Compiling is all very well but you can't really be sure your SBT-ification has been a success until all the tests are passing, just like they did in Maven. They did all pass in Maven, didn't they?
  • Here's where I hit my first snag, as my Java tests were written using the TestNG framework, which SBT has no idea how to invoke. And thus, the brickhunter-scala project gets its first plugin, the sbt-testng-interface.
  • But now when running sbt test, instead of "0 Tests Found", I get a big stack trace - the plugin is expecting to find a src/test/resources/testng.yaml and I don't have one, because Maven "just knows" how to run a load of TestNG-annotated tests it finds in src/test/java, and I've never needed to define what's in the default test suite.
  • The fix is to create the simplest possible testng.yaml that will pick up all the tests:
    name: BrickhunterSuite
    threadCount: 4
     
    tests:
      - name: All
        packages:
        - com.themillhousegroup.brickhunter
    
  • And now we should have the same number of tests running as under Maven, and all passing. Commit all the changes!


Next time: Publishing the new artifact to your private repository.

Tuesday, 25 June 2013

Publishing from SBT to CloudBees

As I'm a massive CloudBees fan, I'm starting to use more and more of their offerings. I've got a number of Play! Framework 2.1 apps (Scala flavour, natch) hosted up there and they Just Work, but I wanted to write a Scala library on Github and push it up to a CloudBees-hosted Maven repo for general consumption.

SBT is a nice tool for developing Scala, and will happily publish to a Nexus or other such Maven/Ivy repository, but CloudBees is a little trickier than that, because it's best suited to hosting CloudBees-built stuff (i.e. the output of their Jenkins-In-The-Cloud builds).

Their support for uploading "external" dependencies is limited to the WebDAV protocol only - a protocol that SBT doesn't natively speak. Luckily, some excellent person has minimised the yak-shaving required by writing a WebDAV SBT plugin - here's how I got it working for my build:

In project/plugins.sbt, add the WebDAV plugin:
resolvers += "DiversIT repo" at "http://repository-diversit.forge.cloudbees.com/release"

addSbtPlugin("eu.diversit.sbt.plugin" % "webdav4sbt" % "1.3")


To avoid plastering your CloudBees credentials all over Github, create a file in ~/.ivy2/.credentials:
realm={account} repository
host=repository-{account}.forge.cloudbees.com
user={account}
password=
Where {account} is the value you see in the drop-down at the top right when you login to CloudBees Grand Central. Don't forget the Realm, this is just as important as the username/password!

Next, add this to the top of your build.sbt:
import eu.diversit.sbt.plugin.WebDavPlugin._
and this later on:
credentials += Credentials(Path.userHome / ".ivy2" / ".credentials")

seq(WebDav.globalSettings : _*)

publishTo := Some("Cloudbees releases" at "https://repository-{account}.forge.cloudbees.com/"+ "release")
What this does: The first line tells SBT where to find that credentials file we just added.
The second line makes the webdav:publish task replace the default publish task, which is most-likely what you want. If it's not, use WebDav.scopedSettings and invoke the task with webdav:publish.
The third line specifies where to publish to, replacing all other targets. I found if I used the notation in the WebDAV plugin documentation:
publishTo <<= version { v: String =>
  val cloudbees = "https://repository-diversit.forge.cloudbees.com/"
  if (v.trim.endsWith("SNAPSHOT"))
    Some("snapshots" at cloudbees + "snapshot")
  else
    Some("releases" at cloudbees + "release")
}
...SBT would attempt to upload my artifact to not-just CloudBees, but any other extra repository I had configured with the resolvers expression higher up in build.sbt, and hence try and upload to oss.sonatype.org, which I'm not ready for just yet! "Releases" is sufficient for me, I don't need the "snapshots" option.

And with that, it should just work like a charm:
> publish
[info] WebDav: Check whether (new) collection need to be created.
[info] WebDav: Found credentials for host: repository-{account}.forge.cloudbees.com
[info] WebDav: Creating collection 'https://repository-{account}.forge.cloudbees.com/release/net'
[info] WebDav: Creating collection 'https://repository-{account}.forge.cloudbees.com/release/net/foo'
[info] WebDav: Creating collection 'https://repository-{account}.forge.cloudbees.com/release/net/foo/bar_2.9.2'
[info] WebDav: Creating collection 'https://repository-{account}.forge.cloudbees.com/release/net/foo/bar_2.9.2/0.1'
[info] WebDav: Done.
...
[info]  published bar_2.9.2 to https://repository-{account}.forge.cloudbees.com/release/net/foo/bar_2.9.2/0.1/bar_2.9.2-0.1.pom
[info]  published bar_2.9.2 to https://repository-{account}.forge.cloudbees.com/release/net/foo/bar_2.9.2/0.1/bar_2.9.2-0.1.jar
[info]  published bar_2.9.2 to https://repository-{account}.forge.cloudbees.com/release/net/foo/bar_2.9.2/0.1/bar_2.9.2-0.1-sources.jar
[info]  published bar_2.9.2 to https://repository-{account}.forge.cloudbees.com/release/net/foo/bar_2.9.2/0.1/bar_2.9.2-0.1-javadoc.jar

Thursday, 20 June 2013

Missing Jenkins Feature?

I really like Jenkins. If you are disciplined and treat him well, he gives you a tremendous amount of building power for the princely sum of $0.00. I've used Bamboo a little bit and it was fine, but I really can't see the value proposition when Jenkins does the same job and offers over 600 plugins to do just about everything you could possibly think of with a software build.

One thing that does seem to be missing (as far as I can tell) from Jenkins is "smart" detection of the current build killer. A colleague of mine spotted this today. Of course, this is a situation that shouldn't happen if people did the right thing and didn't check in on a broken build, but hey, we're all human. So here's the normal break-fix situation:

User adolf commits bad code
Build runs and breaks (3 test fails)
adolf correctly identified as breaker
User bob commits good code into broken build
Build runs and breaks the same way (3 test fails)
adolf remains correctly identified as breaker
User caz commits fixed code/tests
Build runs and passes
Build is green, huzzah for caz


Note that of course the items in the 3 columns don't necessarily occur perfectly sequentially as shown above. In fact, a far more common mode of failure would be an "innocent mistake" from bob who didn't realise a build was in progress when he pushed his changes, viz:

User adolf commits bad code
Build runs and breaks (3 test fails)User bob commits good code
adolf correctly identified as breakerBuild runs and breaks the same way (3 test fails)
adolf remains correctly identified as breaker
User caz commits fixed code/tests
Build runs and passes
Build is green, huzzah for caz


OK. Now for the not-so-great, but definitely not-too-uncommon "firestorm of crap checkins" - this often actually happens when builds are unstable and/or slow and so people have almost no choice but to Russian-Roulette their pushes:

User adolf commits bad code
Build runs and breaks (3 test fails)User boris commits MORE bad code
adolf correctly identified as original breakerBuild runs and breaks even more (4 new test fails, 7 test fails total)
adolf remains correctly identified as original breaker
User caz commits fixed code/tests for adolf's breakage
Build runs but 4 tests still fail (boris' breakage)
Build is still red, but still identifies adolf as the culprit (incorrectly)


Because the build never fully recovered, Jenkins just leaves the original culprit as the bad guy. Of course, a little bit of further investigation will show that boris is now to blame, but it would be much better (especially if your name is up on a Big Screen of Shame that Important People might see!) if Jenkins could calculate the true culprit correctly.

New Jenkins plugin, anyone?