Sunday, 29 May 2022

Automating heating vents with openHAB, esp8266 and LEGO - Part 3; Firmware intro

Continuing to work up the stack from my LEGO physical vent manipulator(V1), (V2), I decided to do something new for the embedded control software part of this solution and employ an Expressif ESP8266-based chipset and an accompanying L293D H-bridge daughterboard, primarily because they are just ridiculously cheap.

It took a little bit of finessing to find out exactly what to search eBay for (try ESP-12E + L293D) but listings like this, for AUD$12.55 including postage are simply incredible value. That's an 80MHz processor, motor driver board, USB cable and motor cable, all for less than I probably paid for the serial cable I would have used for my primitive robotics exercises back in university. Absolutely extraordinary.

As this setup uses the "NodeMCU" framework, it can be developed in the Arduino Studio IDE that I've used previously for Arduino experiments, in Arduino's C++-esque language that is simultaneously familiar, but also not ...

But I digress. The real trick with this board package is deducing from the non-existent documentation, exactly what you have and how it's meant to be used. For this particular combination, it's a "Node MCU 1.0 (ESP-12E Module)" that is accessed by using the CP210x "USB to UART" port driver available here. Once you've got the board installed, you can browse example code that should work perfectly for your hardware under File -> Examples -> Examples for NodeMCU 1.0. There's a generous selection here, all the way from "Blink" (which, as the "Hello World" of hardware, should always be the first sketch your hardware runs) all the way to "ESP8266WebServer" - which unsurprisingly ended up being the perfect jumping-off point for my own firmware.

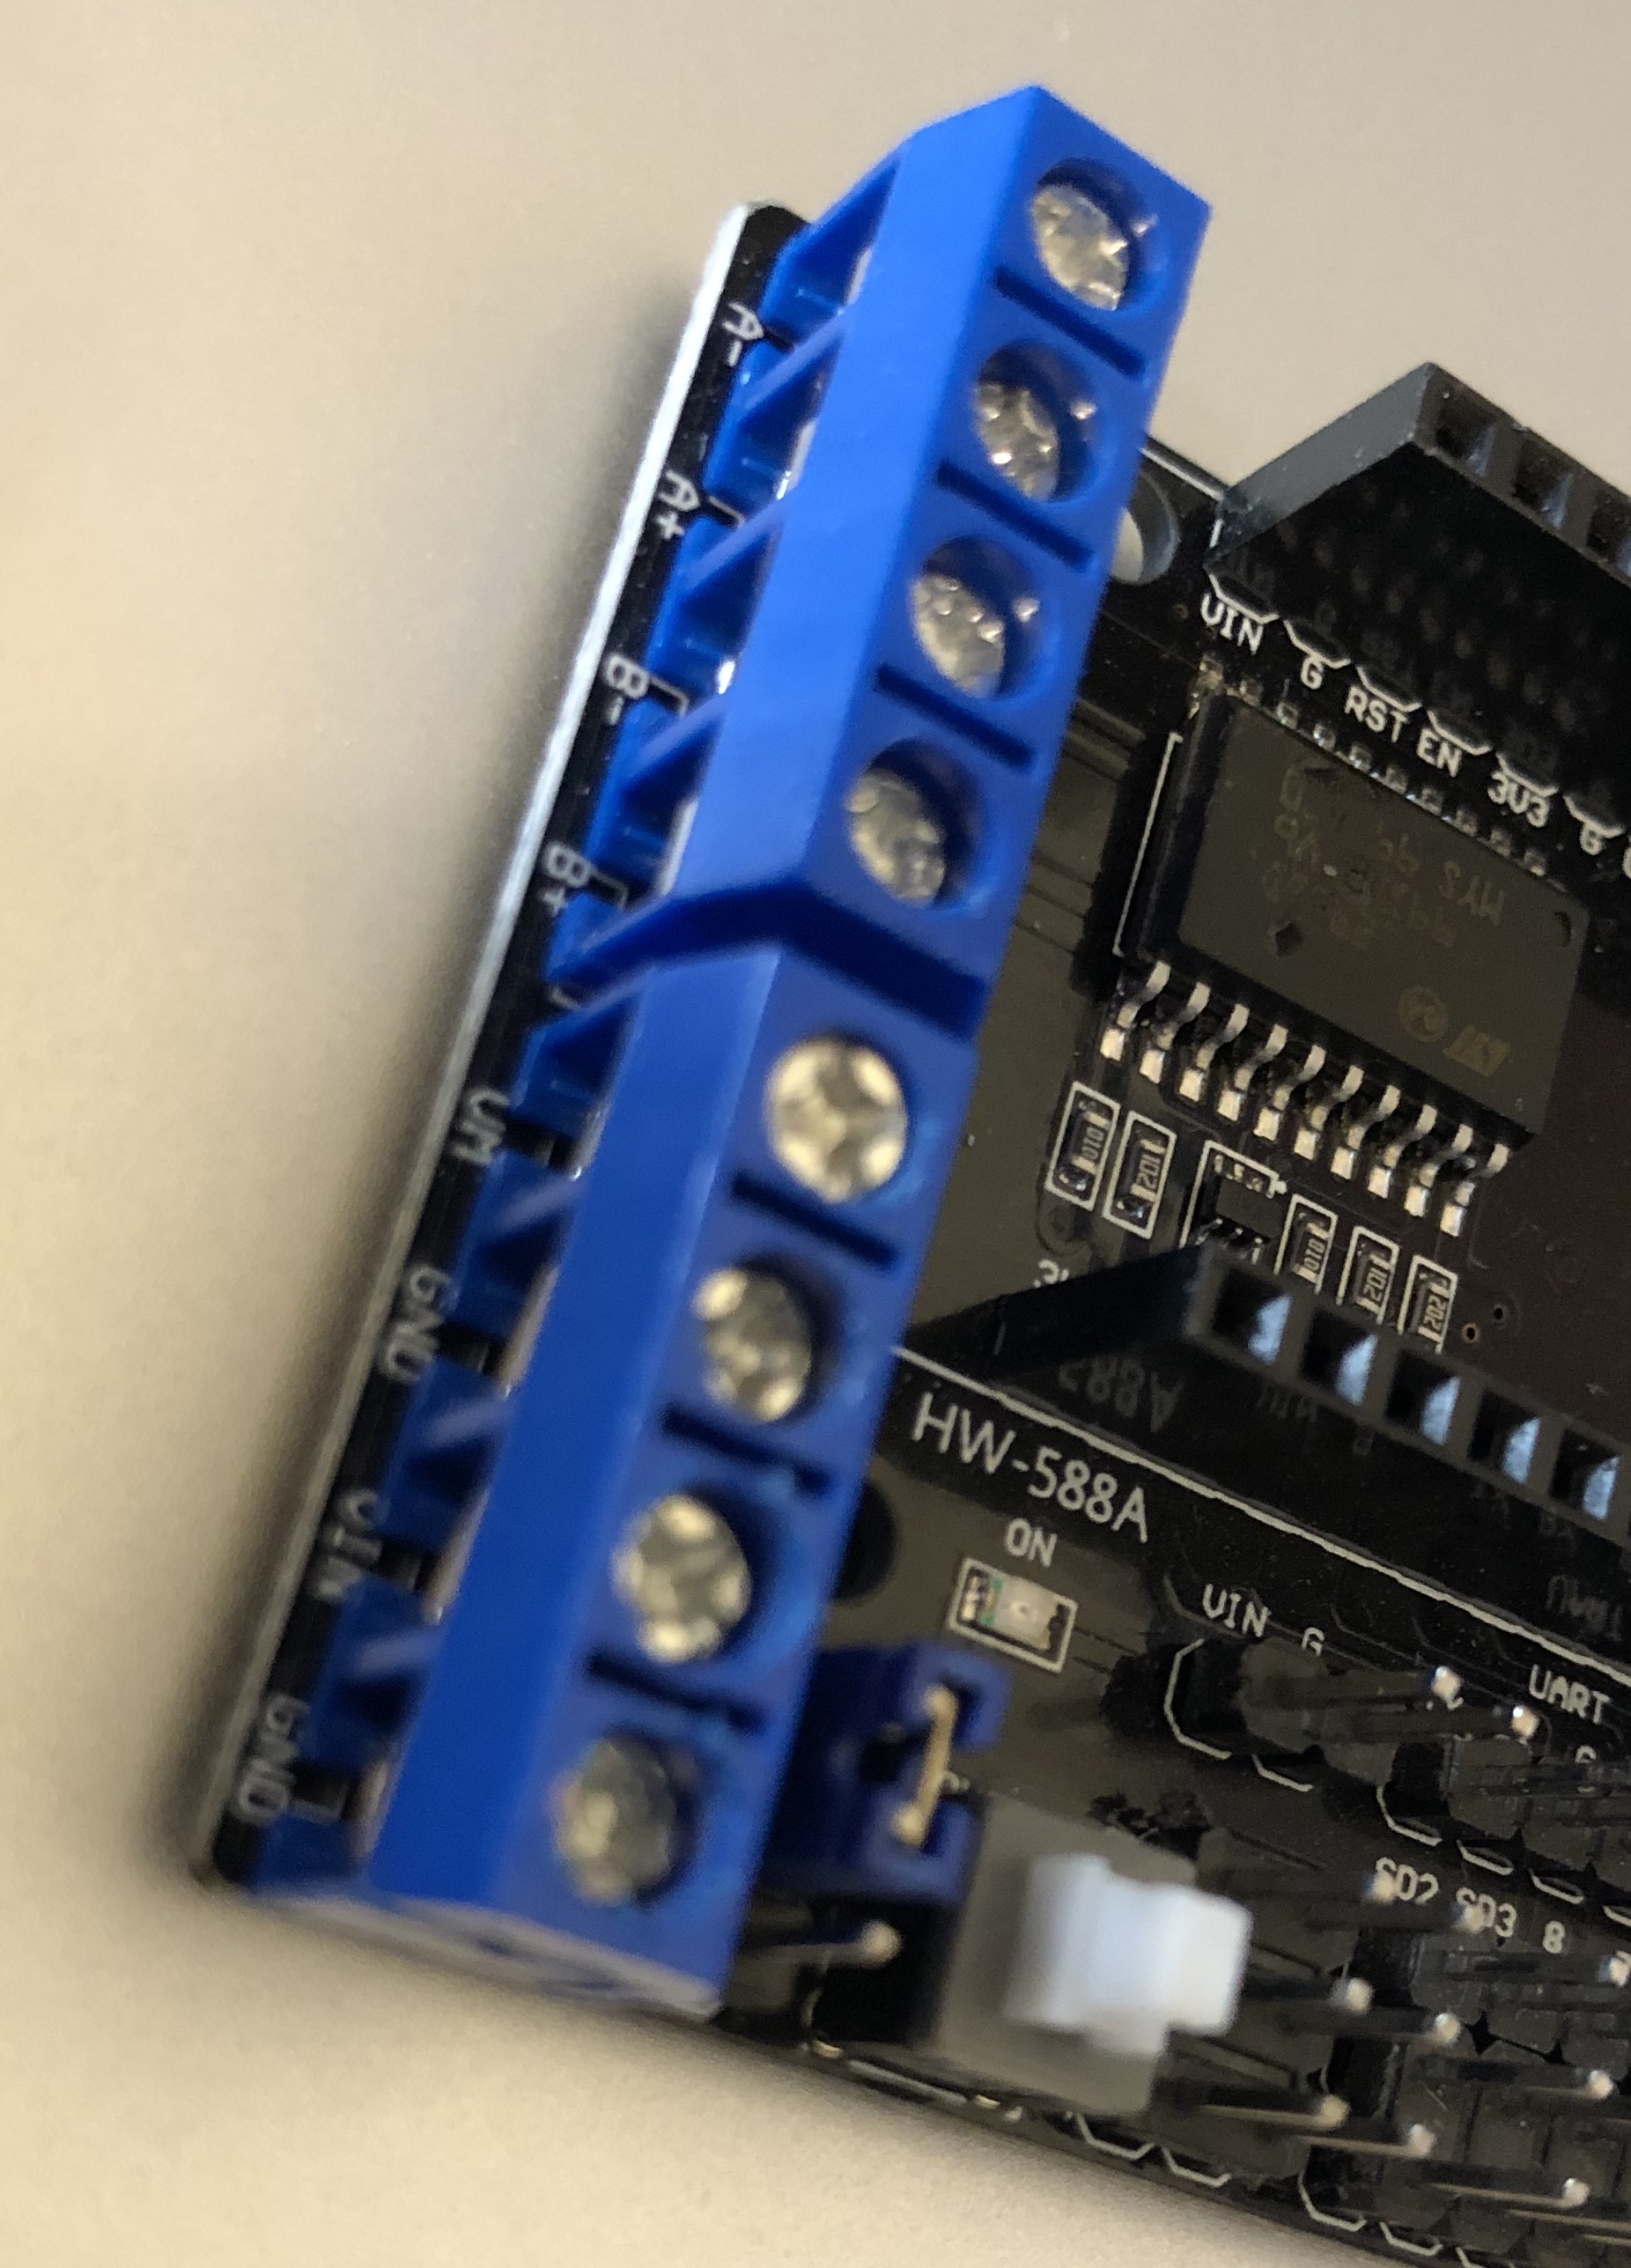
After a frustrating and time-consuming detour getting the device to join my WiFi network (it transpires that the "Scan" sketch can find the SSIDs of 802.11b/g/n networks, but to actually connect, it's far better to be on 802.11n-only) it was time to drive some output, which meant more Googling to determine exactly how the L293D "Motor Driver Expansion Board" actually connects to the ESP's GPIO, and what that means in terms of software configuration.

Eventually I cobbled together the necessary knowledge from this board datasheet which talks about D1-D4, and the Arduino documentation for NodeMCU which indicates that these symbols should be magically available in my code. Then I took a tour through the ESP8266WebServer example code to find out what handler methods I had available. At last, I was ready to put it all together - as you'll see in the next blog post.

But before then, a cautionary tale - I fried both the motor shield board and an ESP board while developing this, and I suspect it was due to not being able to resist the temptation to run the whole thing off a single power supply. You can do this by moving this jumper to bridge the VIN (for the chip) pin to the VM (for the motor) pin. But I suspect the resulting exposure to back-EMF and all that grubby analogue stuff is not good for either the ESP chip nor the L293D motor driver on the shield board. You've been warned.

Use 2 separate power supplies here, or just one, but beware ...
Putting the jumper across here allows using just one of the Vx/GND input pairs ...
The L293D chip looking worse for wear, having overheated and/or died
(from the eBay listing) this should probably say maximise interference...

Saturday, 30 April 2022

Automating heating vents with openHAB, esp8266 and LEGO - Part 2.5; Hardware rework

Working with hardware is fun; working with LEGO hardware is awesome. So before proceeding with the next part of my heating vent automation series, I took the opportunity to refine my vent manipulator, with the following aims:

  • Quieter operation; v1 sounded like a coffee-grinder
  • Faster movement; to sound like a quieter coffee-grinder for less time
  • Lower stack height above floor level; to avoid impeding the sofa-bed mechanism directly overhead

V1 Hardware

As a reminder, here's the first hardware revision featuring a LEGO Technic XL motor and an extremely over-engineered - and tall - chassis.

V2 Hardware

Here's the respun version, which works as well as, if not better than, the original.

The changes:

  • The chassis is half as high above the vent surface
  • The rack-and-pinion mechanism is centered in the chassis to reduce torque
  • The rack is situated lower to reduce flex
  • The motor is reduced in size to a LEGO Technic "M" motor (quieter and faster)
  • The manipulator clamps to the vent with a Technic pulley wheel instead of a brick, further reducing height-above-floor

Now we're in a really good position to get down-and-dirty with some firmware...

Saturday, 26 March 2022

Things people have trouble with in React / Javascript, part 1: Too much React state

I've been on a bit of a Stack Overflow rampage recently, most commonly swooping in and answering questions/fixing problems people are having with their React apps. I'm going to spend my next few blog posts going over what seems to be giving people the most trouble in 2022.

Episode 1: In which things are overstated

This problem typically manifests itself as a question like "why doesn't my UI update" or the inverse "my UI is always updating" (which is almost always related to useEffect - see later in this series). With the useState hook, state management becomes so easy, it's tempting to just scatter state everywhere inside a component instead of thinking about whether it belongs there, or indeed if it's needed at all.

If I see more than 3 useState hooks in one component, I get nervous, and start looking for ways to:

  • Derive the state rather than store it
  • Push it up
  • Pull it down
The React docs (and Dan Abramov himself) talk a lot about pulling-up and pushing-down state, but I think deriving state may actually be more important than either of those.

What do I mean? Well, I see people doing this:

    const [cars, setCars] = useState([]);
    const [preferredColor, setPreferredColor] = useState(undefined);
    const [preferredMaker, setPreferredMaker] = useState(undefined);
    // DON'T DO THIS:
    const [filteredCars, setFilteredCars] = useState([]);
    ...
  
Obviously I've left out tons of code where the list of cars is fetched and the UI is wired up, but honestly, you can already see the trouble brewing. The cars list and the filteredCars list are both held as React state. But filteredCars shouldn't be - it's the result of applying the user's selections (preferred color and maker) and so can be trivially calculated at render time. As soon as you realise this, all kinds of UI problems with staleness, flicker, and lag just melt away:
    const [cars, setCars] = useState([]);
    const [preferredColor, setPreferredColor] = useState(undefined);
    const [preferredMaker, setPreferredMaker= = useState(undefined);
    // Derive the visible list based on what we have and what we know
    const filteredCars = filterCars(cars, preferredColor, preferredMaker);
    ...
  

I think some people have trouble with their mental model around functional components, and are afraid to have a "naked const" sitting there in their function - somehow it's a hack or a lesser variable than one that useState handed you. Quite the reverse I think.

Another argument might be that it's "inefficient" to derive the data on each and every render. To that, I counter that if you are maintaining the cars and filteredCars lists properly (and this is certainly not guaranteed), then the number of renders should be exactly the same, and thus the amount of work being done is the same. However there's a strong chance that deriving-on-the-fly will actually save you unnecessary renders. I might keep using this car-filtering analogy through this series to explain why this is.

Saturday, 26 February 2022

New Toy

I just received this from the good folk at PowerPal:

This is a cool device that basically should give me real-time API-based access to the power usage of my house. The next logical step for me is to then bundle it up into my openHAB setup. I'll probably begin with just using the HTTP binding to get what I need, and maybe (and it's a BIG maybe) turn it into a genuine binding at some point in the future. My experience trying to get the Broadlink binding merged into the openHAB addons codebase has turned me off that process a little...

Saturday, 29 January 2022

2022 To-Do List

There's just never enough time and/or motivation to do all the things I've got on the back-burner, but some of these have been around for just too long. Hopefully listing them here (and ideally ticking them off with suitable links) will be motivating...

  • The openHAB Broadlink Binding still hasn't been merged into the openHAB codebase. Every week it becomes harder - with such a busy upstream repository, with very exacting code-review standards, it's like nailing jelly to the wall ... of a moving train.
  • frenzy.js my browser-based retro 8-bit arcade game has been rotting for years now. It needs a full React upgrade and some deep thought (or reading-up, or both) about some of the basic game algorithms (like collision-detection, for example)
  • Tons of openHAB mini-projects to automate things around the house - blinds, heating vents, all sorts of stuff

Wish me luck...

Thursday, 30 December 2021

Computers I Have Known - Part 4

For the final instalment of my Computers I Have Known series, a fun distraction from the 2021 dumpster fire, I present my first ever "work computer", the Hewlett-Packard PA-RISC 9000. I was working as a software engineer at a division of Hewlett Packard's network test organisation, writing C code to be executed on test equipment.

This was truly a "tool" of a machine - totally locked down via the Common User Environment, and with very little horsepower onboard beyond what was needed to bring up XWindows, my 21" screen typically consisted of myriad XTerm windows running Telnet sessions into gcc and/or vim on various servers and target boxes.

It was that anonymous that I don't even know what model it was, nor how much RAM or disk capacity it had. But some Googling makes me think it was probably a Series 700 model, most likely a 712:

This is pretty-much exactly how mine looked (even the 4033A monitor designation rings a bell) - we'd sit them vertically for the simple reason that they looked less obviously-PC-like, and thus weirder, and thus cooler...

I'm shocked now reading how much these things cost - $USD8000 or so in 1994 dollars is a lot - but I guess being in a division of Hewlett Packard we'd have been getting them essentially free.

Alongside this workstation, my desk at the time would have had a black HP 14" (Omnibook?) Windows 2000 laptop, with a wired 10/100 Ethernet card sitting in its PCMCIA slot. The laptop would also have been tightly locked-down with a common operating environment and would really only be used for email, web browsing and opening Office documents. I would suspend the PC at the end of each day by shutting its lid, but the HP-UX box would stay permanently powered-on; it took *forever* to boot up.

[HP 46011A keyboard image from deskthority.net]

I still recall being weirdly fond and proud of this machine, with its odd not-quite-a-PC keyboard and enormous (for the time) screen. Having come straight from a UNIX-heavy computer science/engineering university course, it was awesome to actually have my own UNIX workstation, and I customised whatever I was able to in terms of window management and the shell startup files to optimise it to my tastes.

It was no SGI Indy but it was mine, it didn't cost me anything, and it allowed me to earn income converting coffee into code. So it was cool.

Sunday, 28 November 2021

Importing/capturing digital video (DV) for FREE on a Mac in 2021

Like many others, I have a giant box of Mini DV video cassettes from 10+ years ago that I fairly-urgently need to get onto a more long-term-safe medium. As it's a pretty tedious job I have tended to do this in batches, when I can be bothered getting all the necessary bits together. Fortunately my trusty 2012 MacBook Pro has Thunderbolt ports that with just a couple of cheap adapters, can connect to the 4-pin Firewire port of my still-functional Panasonic NV-GS27 camcorder and do the job.

But while the hardware is willing, sometimes the software is not. It's all too easy to get on the upgrade treadmill and forget about applications you only use once every couple of years. In the past I used Vidi, which was minimal but $0, and thus excellent. But it won't work on 64-bit MacOS and appears unmaintained so I needed something new.

All I needed was something that could capture the raw data from each cassette and dump it into a .dv file that I can stash away on a hard drive.After a very dismaying tour through Google and YouTube made me think I'd either need to pay for a software package, or kludge something together using libdc1394 (which would be massive overkill) I finally found what I needed by searching Github directly: vrecord by AMIA Open Source.

vrecord works beautifully on my Catalina (OSX 10.15) MacBook Pro - follow the Basic Usage guide and you'll be capturing those precious memories in no time.