Showing posts with label retro. Show all posts

Sunday, 25 April 2021

Computers I Have Known - Part 3.11 (For Workgroups)

(This is Part 3 of my Computers I Have Known series)

The 1990s lurched into existence and my Dad again was pivotal in my computing education. As a secondhand bookseller, he had a need to catalog his ever-increasing stock and also write a monthly column for a trade journal. Through school friends I'd become fairly familiar with the PC and Windows 3.0 had finally made it friendly enough that I figured my Dad would be able to point-and-click his way around.

I'd also become acquainted with the Intel 286/386/486 PC landscape through the magic of the Melbourne (Australia) Age newspaper's "Green Guide", ostensibly the TV guide, but more interestingly a hotbed of small computer shops frantically advertising for your beige-box business, dropping prices a handful of dollars week-on-week. Sadly there seems to be virtually no online record available of this weekly bonanza (that probably had equivalents in almost every major city) - but trust me, in an effectively pre-internet era, it was the nearest thing to a Google search for "Clone PC". We ended up with a very solid upper-mid-end choice - a MicroArts 486-DX33 mini-tower, with 4 megabytes of RAM, 1Mb Super-VGA card on its VESA Local Bus, double-speed CD-ROM drive, a whopping (if memory serves correctly) 340Mb Western Digital hard drive, 15" Viewsonic CRT and a superb HP LaserJet 4L desktop laser printer. The only thing better at the time would have been the DX2-66MHz version, which commanded a large premium for its mind-bogglingly fast CPU, but actually talked to everything else at the same speed as the 33MHz brother I'd selected.

I set the machine up to go straight to Windows on boot (the old WIN at the bottom of AUTOEXEC.BAT ... ah memories) and suitably butchered the Windows 3.0 Program Manager to offer my Dad precisely two things to click on - Write (the primitive yet more-than-sufficient-for-his-needs default word processor), and the proprietary book-cataloguing software which was the standard in the trade.

And with that, he was away. That PC had an extraordinary innings of some 15(!) years, gradually gaining a fax/modem, scanner, network card, more RAM, ticking up to Windows 3.11 (surely the most significant operating system point-release in history) and transitioning from "only computer" to "front desk computer" and finally "back office computer". The Internet came along, and my Dad moved his catalogue of books online through increasingly-sophisticated mechanisms, the first of which was a hand-rolled series of templated HTML pages coded by yours truly, which would get "mail merged" with the output of the proprietary book catalog system, and the resulting family of pages FTPed up to his shop website. People would scroll through the listings, which were by-category only (Art, Music, History, etc) and email him with their order. If they were local, they'd come in and pick them up, but he'd box and ship orders internationally on a regular basis. His "secure credit card option" (his words) was getting customers to send him their credit card number in several separate emails; it was ... a simpler time ...

Yep, my Dad, the luddite, was selling books on the web in 1992 - two years before there was an amazon.com. But I digress.

Pictures of my Dad's website, coded by yours truly, from the earliest available Wayback Machine scrape in December 1998. The Wayback Machine and the Internet Archive are an incredible resource - please donate to them if you can!

Every byte of the above (hilariously-primitive) website was honed (on Notepad or Paintbrush) and uploaded (with WS_FTP) from that 486. This machine was the last box I could confidently say I knew like the back of my hand. From its carefully-tuned BIOS settings through its lovingly-crafted CONFIG.SYS and up into Windows from Character Map to Write, I knew this thing inside-out and tended to it like a cherished pet - which was probably how it managed to survive well into the Pentium 4 era before making its way to the great Beige Box in the sky ...

Monday, 22 February 2021

Computers I Have Known - Part IIe

Next up in my Computers I Have Known "journey" (ugh) is the classic Apple IIe, in this case the final, "Platinum" edition with 128Kb of RAM, numeric keypad, light grey case, matching monitor and 5.25" floppy drive.
By this time, my family and I had migrated from the UK to Australia, and the Electron, although it had come with us, may as well have been made of cheese. Nobody had heard of it, nobody used it, it was a dead end. My Dad, still working off the "buy what they use at school" advice from before, went completely bananas with a full IIe "educational pack" which bundled in a Star NL-10 9-pin dot matrix printer and a ton of "educational software" (most of which was shareware, but had at least been gathered together and well-organised)

Having a printer was Very Exciting, and considerable amounts of ink were consumed with the classic Print Shop banners being the main culprit. I vividly remember the THINKING ... THINKING ... THINKING ... PRINTING screens that Print Shop displayed while you waited 15, 20 or more minutes for a big banner to tractor-feed its way into the world.


The Apple II was already a bit long-in-the-tooth when we got it around 1989 - it had an amazing run for such an "average" 8-bit machine - no doubt helped by Apple's strategy of getting it into schools. It was certainly quite depressing seeing far cheaper Commodore Amigas in department stores running demos of high-resolution bouncing balls, reflective surfaces and relatively high-fidelity music. The 16-bitters were coming and it was impossible not to be impressed by how far the goalposts had moved on. The flipside for me was the popularity of the Apple with my peers (and the ease of copying its disks) made it far easier to expand my software portfolio than I had ever experienced before.

Some more of my favourite software for the Apple: (all screenshots from Moby Games)

Choplifter

A clever example of how great playability can completely offset some pretty ordinary (tiny, horribly-coloured) graphics. You can play it on the Internet Archive here.

California Games

Radical! Tubular! You're wild and crazy! A nice collection of action sports that didn't take itself too seriously. You can play side 1, which includes my favourite, BMX, at the Internet Archive.

Wings of Fury

What an absolute masterpiece of an arcade game. Amazing playability and balance of realism and challenge. You can actually go and play a version of it online and while it's the PC version not the Apple original, I recommend you go and do so immediately. The Internet Archive also holds the true Apple II version but it asks for side 2 of the disk and I can't find a way to feed that in; although the Emularity project that makes this possible are aware of the issue.

As I progressed through high school, the capabilities of the Apple as a word processor became far more important. Many of my peers were still submitting draft essays in longhand, then rewriting the whole thing again after getting the teacher's feedback - a process that seemed incredibly repetitive and wasteful. I took the opportunity (for perhaps the first time in my life) to harness the power of the computer to save me some effort. AppleWorks had been included in our original bundle of shareware, and I used it for a good few years. Being about as non-WYSIWYG as it gets, it was my introduction to marking up text, and thus some of the fundamental ideas of HTML were getting drip-fed to me as I wrapped a sentence in Ctrl-U (or whatever it was) to underline it. The whole printing process was a lot more manual too - choosing a font and its output quality was done with buttons on the printer's front panel, and constant vigilance was required when spanning pages; top- and bottom- margins were highly variable in reality.

A revelation came along when I "obtained" (probably through some disk-copying skulduggery at school) what I think must have been BeagleWrite (although I have no recollection of that name), which was a full WYSIWYG, GUI-and-mouse driven word processor, with white background and black text making it look like a true Mac refugee. I was fairly familiar with the Mac's point-and-click paradigm but actually doing productive work with it (as opposed to just fooling about on someone else's computer) was pretty incredible. I believe we'd call it "discoverability" now, but the ability to just see what commands were available, and of course undo them was mind-blowing. I think it's fair to say that the reason I became "good with computers" was through amazing pieces of software like BeagleWrite where there was no penalty for just trying stuff to see what happens. Apparently this is not that common a trait ...
BeagleWrite screenshot from Vintage Geek - for such an incredibly-good bit of software there is very little evidence of its existence!

And I can't write a post about the Apple II without mentioning my own brush with its legendary creator Woz. Probably the most famous person I will ever have had the pleasure and honour of meeting.

Saturday, 30 January 2021

Computers I Have Known - Part One

In the spirit of very entertaining blog posts by Jacques Mattheij and Jim Lawless, I thought I might celebrate having written computer software professionally for 20 years, by recapping all the computers I have known, since the beginning.

And in the beginning, there was, an Acorn Electron. Yes, the "King of the 8-Bits" BBC Micro's little brother, and, well, he wasn't very good. In their efforts to reduce the Beeb's chip count and cut costs to a Sinclair Spectrum-rivalling price-point, Acorn bottlenecked the processor's access to memory so that while for the most part it was compatible with BBC BASIC, programs would run, at best, around half the speed of the Model B.

8-year-old me neither knew nor cared about this however; I had a computer, in my bedroom, and it was amazing. I'm pretty sure my Dad picked the computer up from Curry's or Dixons (UK high street electrical retailers) at a heavily discounted price, just in time for my birthday. As he is a complete luddite I'm fairly sure he was advised by a family friend (a teacher) that the BBC Micro (or indeed, something compatible) would be a fine choice; I don't recall ever outwardly expressing a desire for a home computer but had certainly enjoyed playing the BBC B at our friends' house. That machine was very well specced with a disc drive and dedicated colour monitor; my setup was substantially lower-rent with a domestic-grade cassette recorder and a monochrome television pressed into service for display duties. Sadly I don't have a picture of my first "workstation" but here are some very close approximations:
The cassette recorder here is almost identical to what I had, in the same position to the left of the Electron, because that's where the I/O and motor control connectors were and the cable wouldn't reach anywhere else.
Here's the mighty Binatone 12-inch monochrome TV that was my "monitor". I was very pleased to be able to recall that brand name! It plugged into the Electron's RF port and had to be tuned in for a nice sharp picture. Although pretty crappy by almost every measure, I was at least lucky enough to have this TV dedicated for my computing, and so didn't have to share the family TV.

Together with the hardware came a veritable mountain of boxed software; almost all of it from Acornsoft in their distinctively-80s graph-squares-and-neon-script style:
(from acornelectron.co.uk)

These were a couple of my favourites; Starship Command was a very Star Trek-inspired shoot-em-up with lovely smooth circular scrolling and "high" resolution graphics (in black-and-white, the cost of such a resolution), while Sphinx Adventure was an impenetrable (well, it seemed like it) text adventure in the GO NORTH, TAKE SHOVEL, GO EAST, USE SHOVEL style.

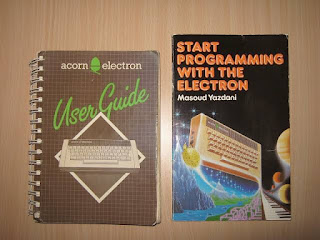
Yep, games. Sorry, I'd love to be able to say I was busting out 6502 assembly and "racing the beam", unlocking hidden hardware capabilities and pushing the limits ... but no, while I did program, it was mostly small BASIC experiments based on these two books (that came in the original bundle):
Although I stayed very much "within the lines" of what those books showed me, I still built up the fundamentals of programming; variables, conditionals, looping. I never got as far as arrays on the Electron as far as I can tell - I remember wanting to make a virtual airport departures board (after being suitably impressed by the board at Gatwick Airport I think) and being stumped at how to make the departures "move up" as the topmost flight disappeared.

The main aspect of BBC BASIC I remember being fascinated with was the graphics "API", principally the LINE command, which would draw a straight line between two X,Y points in the current paint colour. Combined with a pair of nested loops, I'd build spider-web like meshes around the edges of the screen. Very, very slowly. The super-smooth inner curves thus achieved delighted me then, and indeed still do:
(Go chortle at my Codesandbox HTML Canvas version here)

Sunday, 27 October 2019

What's in a name?

You've probably seen the old joke.
There are only 2 hard problems in Computer Science:

  1. Naming things
  2. Cache invalidation
  3. Off-by-one errors

But like every good joke there's a substantial core of truth in it. And there's a good reason why Naming Things is top of that list. It's hard. And with most geeks being complexity-addicts, we like to ladle additional difficulties on top of the naming problem; for example:

  • Compiler restrictions - Java insists on one-class-per-file, with a match between filename and class name
  • Linter rules - Requiring interfaces to start with I or implementations with Impl
  • Usability problems - if all your files are called index.js (because they live in different directories), navigating your text editor's tabs becomes a challenge
  • Readability problems - Spending too long with AbstractInjectedDAOFactoryDecorator and AbstractInjectedDAOFactoryDecoratorBuilder-type names will wear out your sanity even faster than your keyboard

But the thing is, it's worth it. Especially in the increasingly-decomposed, microservicey, lambda-esque landscape, being able to latch onto a variable and/or class because its name is well-chosen and descriptive, can be the difference between a laser-like open file by name, make change, test, commit, DONE and a flailing find in all files, open a dozen of them, trace execution path, make speculative change, get it wrong, repeat until somehow fixed loop.

Better yet, as your team grows in experience, your shared vocabulary grows with it. Those well-named classes become a shorthand; you can use them as examples or references and everyone knows what you're on about - much like the Gang of Four Design Patterns are/were all about. I say "were" because of the 23 original GoF patterns, I would argue only a handful are in common usage today and have achieved the universality of understanding the authors were hoping for: Singleton, Iterator, Observer (although probably referred to as publisher-subscriber), Adapter/Proxy (often used interchangeably) and Factory Method.

I note that the design patterns that have truly "taken off" are without exception, the "simple" ones. I mean, look at Adapter (diagrams from the Black Wasp site also linked above):


... and now compare with Abstract Factory:

All those classes. All of them need names. And in Java at least, each one living in its own file. Possibly in different directories too. Is it any wonder that people have shied away from these complex patterns?

Saturday, 27 July 2019

React: 24 years' experience ;-)

I wrote my first HTML page in 1995. Unfortunately I don't have a copy, but given the era you can be pretty confident it would have consisted of a wall of Times New Roman text in sizes h1, h2 and p broken up with some <hr>s, a repeated background image in a tiled style, and, down at the bottom of the page, an animated Under Construction GIF.

My mind turns to that first img tag I placed on the page. I would have Yahoo-ed or AltaVista-ed (we're well before the Googles, remember) for a reference on HTML syntax, and awkwardly vi-ed this line into existence:

  <img src="images/undercon.gif" width="240" height="80">

Undoubtedly I would have forgotten a double-quote or two, got the filename wrong and/or messed up the sizing at first, but eventually, my frustrated bash of the [F5] key would have shown the desired result in Netscape Navigator, and delivered me a nice little dopamine hit to boot. I learnt something, I built something, and it worked. Addictive.

24 years later while reflecting on how far we've come in many areas, I've just realised one of the many reasons why I enjoy developing React.js apps so much. Here's a random snippet of JSX, the XML-like syntax extension that is a key part of React:

  <CancelButton bg="red" color="white" width="6em" />

Seem a little familiar?

One of the most successful parts of the React world is the "component model" which strives to break pages down into small, composable, testable elements, combined with a "declarative style" where, to quote React demigod Dan Abramov:

"we can describe the process at all points in time simultaneously"

If you've written any HTML before, writing JSX feels totally frictionless, because the <img> tag has been encapsulating complex behaviour (namely, converting a simple string URL into a web request, dealing with errors, and rendering the successfully-fetched data as a graphical image with the desired attributes) in a declarative way, since 1993.

And it turns out to have been another web god, Marc Andreessen, who originally suggested the basic form of the <img> tag. Truly we are standing on the shoulders of giants.

Saturday, 29 June 2019

Things I will never do again

Again reflecting on twenty years in the software development industry, there are a number of things I can be pretty certain I will never do again. Either because "we don't do things like that any more" or because I will simply refuse. Sadly, it's often the latter!

In no particular order:

  • Work on a codebase with tens/hundreds of thousands of lines of code and no unit tests
  • Deploy production code to a Windows Server that faces the Internet
  • Build production code on my development machine
  • Work alongside someone whose title is XML Architect
  • Use JBoss, or indeed any "Application Server"
  • Do meaningful work on a project without signing a contract and/or being paid for at least some portion of it
  • Have to wear a suit and tie
  • Have to log into Jenkins slave machines to delete files because they've run out of disk
  • Configure builds in Jenkins by tediously pointing and clicking
  • Work in a building in the centre of a big city, where an entire floor is devoted to hosting and running racks of servers, storage, switches etc
  • Have to ensure that a website works on a browser with JavaScript disabled because "accessibility"
  • Write code that has no tangible benefit to users, but will "game" an executive's KPIs in order to achieve a bonus

Friday, 24 August 2018

Building a retro game with React.js. Part 5 - Fill 'er up

By now I had a good portion of the "player's part" of the game complete. Movement around the game area, drawing lines, detecting intersection with existing lines and preventing illegal movement were all done, using the div-based "drawing" that I was familiar with. But now it was time to draw the filled colour block that results when a closed area has been completed. And I was looking at a wall of complexity that I didn't know how to scale.


The answer was to challenge my own comfort zone. Allow myself to quote, myself:
I could do that with an HTML canvas, but I'm (possibly/probably wrongly) not going to use a canvas. I'm drawing divs dammit!
After all, if ever there was a time and place to learn how to do something completely new, isn't it a personal "fun" project? After a quick scan around the canvas-in-React landscape I settled upon React-konva, which has turned out to be completely awesome for my needs, as evidenced by the amount of code changes actually needed to go from my div-based way of drawing a line to the Konva way:
The old way:

const Line = styled('div')`
  position: absolute;
  border: 1px solid ${FrenzyColors.CYAN};
  box-sizing: border-box;
  padding: 0;
`;

renderLine = (line, lineIndex) => {
  const [top, bottom] = minMax(line[2], line[4]);
  const [left, right] = minMax(line[1], line[3]);
  const height = (bottom - top) + 1;
  const width = (right - left) + 1;
  return <Line key={`line-${lineIndex}`}
                  style={{ top: `${top}px`, 
                           left: `${left}px`,
                           width: `${width}px`,
                           height: `${height}px` }} />;
}

The new way:

import { Line } from 'react-konva';

renderLine = (line, lineIndex) => {
  return (
    <Line
      key={`line-${lineIndex}`}
      points={line.slice(1)}
      stroke={FrenzyColors.CYAN}
      strokeWidth={2}
    />
  );
}

... and the jewel in the crown? Here's how simple it is to draw a closed polygon with the correct fill colour; by total fluke, my "model" for lines and polygons is virtually a one-to-one match with the Konva Line object, making this amazingly straightforward:
renderFilledArea = (filledPolygon) => {
  const { polygonLines, color } = filledPolygon;
  const flatPointsList = polygonLines.reduce((acc, l) => {
    const firstPair = l.slice(1, 3);
    return acc.concat(firstPair);
  }, []);

  return (
    <Line
      points={flatPointsList}
      stroke={FrenzyColors.CYAN}
      strokeWidth={2}
      closed
      fill={color}
    />
  );
}

Time Tracking
Probably at around 20 hours of work now.

Monday, 16 July 2018

Building a retro game with React.js. Part 4 - Drawing the line somewhere

In the previous instalment of this series, I was able to get the player's "sprite" (actually just a div with a border!) to move around the existing lines on the edge of the screen. The next logical step is to allow the player to draw their own lines, which, upon joining at both ends to existing lines, will become part of the "navigable" world the player can manoeuvre through.

Bugs Galore
It was at this point where I started being plagued by off-by-one errors; it seemed everywhere I turned I was encountering little one-pixel gaps when drawing lines, because:
  • My on-screen lines are actually 2px wide
  • My line-drawing function was doing an incorrect length calculation (had to do (right - left) + 1)
  • I was not updating my position at the right time, so was storing my "old" position as the current line's end point; and;
  • I was naively using setState and expecting the new this.state to be visible immediately

My solution to almost all of these problems (with the exception of the UI line-drawing function) was to write a heap of unit tests; these generally flushed things out pretty quickly.

Writing the line-drawing function was a weird experience. Virtually every software development "environment" I've ever used before, from BBC Basic on my Acorn Electron on, has had a function like drawLine(startX, startY, endX, endY);. And I could do that with an HTML canvas, but I'm (possibly/probably wrongly) not going to use a canvas. I'm drawing divs dammit! Here's what my function looks like:
renderLine = (line, lineIndex) => {
  const [top, bottom] = minMax(line[2], line[4]);
  const [left, right] = minMax(line[1], line[3]);
  const height = (bottom - top) + 1;
  const width = (right - left) + 1;
  return <Line key={`line-${lineIndex}`}
                  style={{ top: `${top}px`, 
                           left: `${left}px`,
                           width: `${width}px`,
                           height: `${height}px` }} />;
}
Where minMax is a simple function that returns [min, max] of its inputs, and Line is a React-Emotion styled div:
const Line = styled('div')`
  position: absolute;
  border: 1px solid ${FrenzyColors.CYAN};
  box-sizing: border-box;
  padding: 0;
`;
Notice that I resisted the temptation to pass the top, left etc into the Line wrapper. The reason for this is that doing so results in a whole new CSS class being created, and getting applied to the line, every time one of these computed values changes. This seems wasteful when most of the line's attributes remain the same! So I use an inline style to position the very-thin divs where I need it.
Time Tracking
Up to about 12 hours by my rough estimate.

Friday, 15 June 2018

Building a retro game with React.js. Part 3 - I Like To Move It

So with most of the graphical pieces in position, it's time to make things move around.

Again, starting with the easy stuff, I wanted the four directional keys to move the Player around. But in Frenzy, you can only move (as opposed to draw) along the boundaries of the game area and on lines you have already drawn. So if we look at my first iteration of the code in GameArea to handle a request to move the Player left, it's something like this:
 
update = () => {
  if (this.keyListener.isDown(this.keyListener.LEFT)) {
    this.moveLeft();
  }
};

moveLeft = () => {
  if (this.canMove(Direction.LEFT)) {
    this.setState({
       playerX : this.state.playerX -1
    });
  }
}
I ended up bundling quite a lot of smarts into the Direction enumeration in order to make the logic less "iffy" and more declarative. That one Direction.LEFT key encapsulates everything that is needed to check whether a) the player is on a line that has the correct orientation (horizontal) and b) there is room on that line to go further to the left.
A line looks like this:
[Orientation.HORIZONTAL, 0, 0, 478, 0], // startX, startY, endX, endY
and Direction looks like this:
export const Direction = {
  LEFT: {
    orientation: Orientation.HORIZONTAL,
    primaryCoord: (x, y) => y,
    lineToPrimaryCoord: (line) => line[2],
    secondaryCoord: (x, y) => x,
    testSecondary: (c, line) => c > Math.min(line[1], line[3])
  },
  ...
}

My test for whether I can move in a certain direction is:
static canPlayerMoveOnExistingLine = (playerX, playerY, direction, lines) => {
  const candidates = lines.filter(line => {
    return (line[0] === direction.orientation)
  });
    
  const pri = direction.primaryCoord(playerX, playerY);
  const primaryLines = candidates.filter(candidateLine => {
    return direction.lineToPrimaryCoord(candidateLine) === pri;
  });

  if (primaryLines.length > 0) {
    const sec = direction.secondaryCoord(playerX, playerY);
    const found = primaryLines.find(line => {
      return direction.testSecondary(sec, line);
    });

    return typeof found !== 'undefined';
  }
  return false;
} 
Declared static for ease of testing - easy and well worth doing for something like this where actually moving the player around is time-consuming and tedious. It's working well as it stands, although as we all know, naming things is hard. It's pretty easy to follow the process though. At this point I'm holding a lines array in this.state and doing filter and find operations on it as you can see above. We'll have to wait and see whether that will be fast enough. It may well be a good idea to keep a currentLine in state, as most of the time it will be unchanged from the last player movement. Next up, it's time to start drawing some new lines on the screen!

Kudos
I am starting to build up some tremendous respect for the original author of this game; although often dismissed as "very simple" there are some tricky little elements to coding this game and I'm only just scratching the surface. To achieve the necessary performance on an 8-bit, 1MHz processor with RAM measured in the handfuls of kilobytes is super impressive. Assembly language would have been necessary for speed, making the development and debugging a real pain. I haven't even started thinking about how to do the "fill" operation once a line has been drawn and it encloses some arbitrary space, but I suspect the original developer "sniffed" the graphics buffer to see what was at each pixel location - a "luxury" I don't think I'll have!
Time Tracking
Up to about 6 hours now.

Monday, 11 June 2018

Building a retro game with React.js. Part 2 - Screens

Continuing to nibble my way towards the hard parts, I've finished the basic designs of the welcome page, main game page and the paused-game page, including wiring up the key listeners so it all works as expected.

One thing I hadn't thought about was the behaviour of listening to the P key to pause and also resume. The first iteration of the code would flicker madly between the game page and the paused page whenever the P key was pressed - the game loop runs so fast that the app would transition multiple times between the two pages, because the isDown test would simply toggle the state of this.state.paused. I messed around for a while with storing the UNIX time when the key was first pressed, and comparing it to the current time, before realising I really just needed to know what "direction" was being requested, and then waiting for this "request" to finish before completing the transition.
...

debounce = (testCondition, key, newState) => {
  if (testCondition) {
    if (this.keyListener.isDown(key)) {
      // No. They are still holding it
      return true;
    }
    this.setState(newState);
   }
   return false;
};
 
handleKeysWhilePaused = () => {
  if (this.debounce(this.state.pauseRequested, P, {
    pauseRequested: false,
    paused: true
  })) {
    return;
  }

  if (this.debounce(this.state.unpauseRequested,P, {
    unpauseRequested: false,
    paused: false
  })) {
    return;
  }

  if (this.keyListener.isDown(Q)) {
    this.props.onGameExit();
  }

  if (this.keyListener.isDown(P)) {
    this.setState({unpauseRequested: true});
  }
}

handleGameplayKeys = () => {
  if (this.keyListener.isDown(P)) {
    this.setState({pauseRequested: true});
  }
}

update = () => {
  if (this.state.pauseRequested || this.state.paused) {
    this.handleKeysWhilePaused();
  } else {
    this.handleGameplayKeys();
  }
};
...
Effectively I've implemented an isUp(), which is surprisingly not in the react-game-kit library. Oh well, it's all good learning.
Time tracking
I'd estimate the total time spent on the game so far would be 3-4 hours.

Friday, 8 June 2018

A New Old Thing; Building a retro game with React.js. Part 1 - Background and Setup

I've blogged before about entering the fast-paced world of React.js, after a couple of years I'm still (on the whole) enjoying my day job working with it. Over this period React has done a pretty good job of delivering the "maintainable large JavaScript application" promise, but in the apps I built we've seen a few problems that stemmed from our developers' differing levels of experience with design patterns, immutability concepts, higher-order functions and higher-order components.

At the risk of being immodest, I'm comfortable with those concepts - Design Patterns from waaaay back and the functional paradigms from my five-year (and counting) love affair with Scala. What I wanted to explore was - what would happen if I built a React app by myself, endeavouring to write the cleanest, purest software based upon the best starting-point we currently have? How productive could I be? How long would it take to build a working full app? How would maintenance go? How quickly could I add a new feature?

As my day job is basically building CRUD apps, I wanted to do something a lot more fun for this side-project. And what could be more fun than a game? (Mental note: ask people working at Electronic Arts...) There's also a pleasing circularity in building a game and documenting how I did it - back in my earliest days of having a computer, aged about 7, I would buy magazines with program listings and laboriously enter them, line-by-line, while marvelling at how anyone could really have been good enough to know how to do this.

The Game
I'll admit, I've never built a non-trivial game before, but I think attempting an 8-bit home computer game I remember fondly from my childhood, on top of 2018's best front-end technologies, should be about the right level of difficulty.

The game I'll be replicating is called Frenzy; a Micro Power publication for the BBC B, Acorn Electron and Commodore 64. My machine was the Electron - basically a low-cost little brother to the mighty Beeb; highly limited in RAM and CPU, titles for this platform usually needed substantial trimming from their BBC B donor games, despite using the same BBC BASIC language.

Check out the links above for more details and screenshots, but the game is basically a simplified version of "Qix" or "Kix" where the object is to fill in areas of the screen without being hit by one or more moving enemies.

Just for the hell of it, I'm going to place this game front-and-centre on my homepage at http://www.themillhousegroup.com, which I just nuked for this purpose. The page is now a React app being served off a Play Scala backend as per my new-era architecture, and the key technologies I'm using so far are: I'm sure more will follow.

Initial Development
To develop the game, I decided to start from the start. The welcome page would need to be suitably old-skool but would force me to consider a few things:
  • What screen size should I be working to?
  • Can I get a suitably chunky, monospaced font?
  • Press Space to start sounds easy, but how do I make that actually work?
Decisions
The original Frenzy must have operated in the BBC's graphical MODE 1 because it used a whopping 4 colours and the pixels were square. So that means the native resolution was 320x256. While it would be tempting to stick to that screen size and thus have it fit on every smartphone screen, I've decided to double things and target a 640x512 effective canvas.
Some searching for 8-bit fonts led me to "Press Start 2P" which, while intended to honour Namco arcade machines, is near enough to the chunky fonts I remember fondly from my childhood home computer that I can't go past it:
As a tiny nod to the present, the "screen" is actually slightly transparent and has a drop shadow - showing how far we've come in 34 years!
The final piece of the welcome screen was achieved by mounting the FrenzyGame component in a React-Game-Kit Loop and using the KeyListener to subscribe to the keys I care about - a quick perusal of the demo game showed me how to use it:
class FrenzyGame extends Component {

  constructor(props) {
    super(props);
    this.keyListener = new KeyListener();

    this.state = {
      gameOver: true  
    };
  }

  componentDidMount() {
    this.loopSubscriptionId = this.context.loop.subscribe(this.update);
    this.keyListener.subscribe([
      this.keyListener.SPACE
    ]);
  }

  componentWillUnmount() {
    this.context.loop.unsubscribe(this.loopSubscriptionId);
    this.keyListener.unsubscribe();
  }

  update() {
    if (this.state.gameOver) {
      if (this.keyListener.isDown(this.keyListener.SPACE)) {
        this.setState({ gameOver: false });
      }
    }
  };

  ...

  render() {
    return this.state.gameOver 
      ? this.renderWelcomeScreen() 
      : this.renderGame();
  }
}